
ADJUSTING THE DRY MOUNT PRESS
by
J.B. HARLIN
 I am sure that most everyone knows how to dry mount a photograph. There are several techniques used, but they all require the press be adjusted for correct mounting temperature and pressure. Some presses have a thermometer that directly reads the platen temperature. You can also purchase temperature indicator strips to confirm the thermostat is keeping the platen at the proper temperature. The real unknown is how exactly to adjust the platen pressure. I found this somewhere in a book on professional mounting many years ago. I have forgotten exactly where the information came from, but I have never forgotten the procedure.
In order to achieve a good mount, the dry mount press must apply even pressure to the mounting sandwich. For proper bonding this pressure must not be too little or too much. The pressure must be adjusted for the thickness of the mounting sandwich. This adjustment is actually very simple to do.
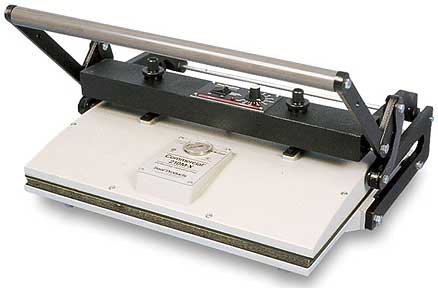
First familiarize yourself with the working parts of the press. The lever arm is used to raise, lower and clamp the clamping bar of the press. The platen is held to the clamping bar by two adjusting bolts. The adjusting bolts are used to adjust the pressure applied by the platen. The adjusting bolts have locking rings to keep them from moving once they are properly adjusted. To adjust the platen pressure, you loosen the locking rings, adjust the adjusting bolts and thus the platen pressure, then tighten the locking rings.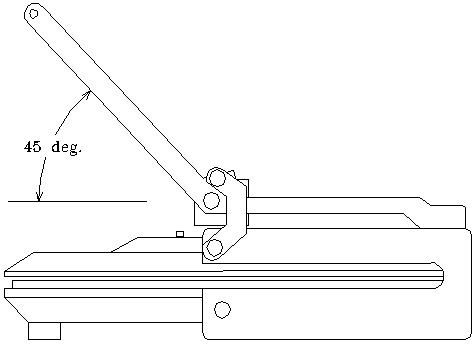
Do not turn the press on, you will make these adjustments with the platen cold. In order to properly set the platen pressure, you must use the exact thickness of the mounting sandwich you normally use when mounting a photograph. Begin by assembling the mounting sandwich just as if you were going to mount a print. (If you have a scrap print that is already mounted use it).
Place the entire sandwich in the center of the foam pad. Lower the platen until it rests on the mount sandwich, DO NOT LATCH THE LEVER ARM. You just want the platen to rest on the mount sandwich, not to clamp it. If the press is correctly adjusted the lever arm should be at a 45 degree angle to the platen. You can measure this angle with an angle finder available at your local hardware store.
NOTE: If you use a mechanical angle finder, be sure to level the press bed or you will not get an accurate reading.
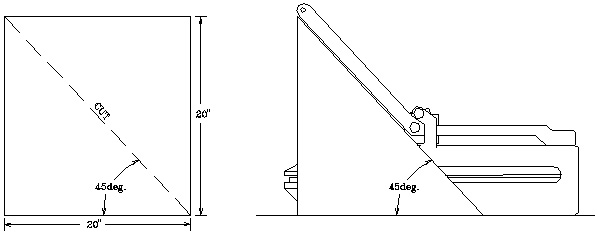
Another way to measure the lever arm angle is to make a right triangle from a piece of scrap mat board. Begin by cutting a piece of mat board (or foam core board) to exactly 20 inches square. Then cut the square corner to corner to form a perfect 45 degree angle. Place the triangle on the table top with the 45 degree side facing the lever arm and use it as a guide to check the arm angle. You need to check both arms to be sure the angel is correct on both sides of the press.
 If the lever arm is not at 45 degrees, loosen the locking rings on the platen adjustment bolts and turn the adjustment bolt next to the end you are measuring until the lever arm is exactly 45 degrees. Now move to the other end and adjust the other adjustment bolt. Adjust one side of the press and then the other. You will have to work back and forth several times to get both ends of the lever arm exactly the same. Once you are satisfied that both lever arms are adjusted to 45 degrees, tighten the locking rings. You are done. This is all there is to adjusting the press for proper clamping pressure.
Remember, this adjustment is for the thickness of the materials used during adjustment. If you use thicker or thinner materials you will have to readjust the press clamping pressure.
If you use several different thickness of mounting materials there is an easy way to set up the press so you only have to make this adjustment once. Adjust the press for the thickest material you will be using. Next cut shims from various thickness of mount board sized to fit under the foam pad.
If you are mounting your thickest sandwich you remove all of the shims. If you are mounting a thinner sandwich you simply place the appropriate shims under the foam pad to make up the difference. You can place tape index tabs on the edge of the shims so you can tell at a glance which shims are under the foam pad.
Your dry mount press should now be properly adjusted and ready to use. Correct pressure during mounting is necessary to achieve proper bonding. Dry mounting is easy, clean and neat when properly done.