
A QUICK & EASY SHEET FILM
NUMBERING SYSTEM
by
J.B. HARLIN
 When we began to work with large format, and then ultra large format film, we found a whole new world of photographic possibilities. The increased resolution and the slowing down of the whole photographic process was a very eye opening experience. We began to seriously practice a very strict exposure and developing system based on a modification of the Zone System. We began to experiment with filters, modified exposure and different developing times.
I like to be as efficient as possible. I want to create photographs and not be distracted by the technical things. I like to keep the equipment as simple as possible, but I nearly always modify or change, in some way, every piece of photographic equipment we use. This is not an obsession, it is just that a small change here and there makes the hardware more transparent to the creative process. The idea is to get on with the making of the photograph and if I find a short coming in a piece of equipment I first analyze and locate the problem, then I try to find the easiest and most efficient fix.
THE IDENTIFICATION PROBLEM
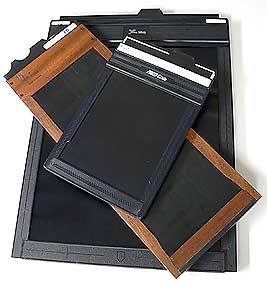
 One of the first real stumbling blocks we ran across using sheet film was the fact that there was no easy way to identify each sheet of film. True, each film holder had an individual number, but once the film was removed and mixed in with others, exact identification was difficult. Plus, there was two of us shooting! Usually we could distinguish each frame by referring to our field notes, but some exposures were different. Different filters were used on identical subjects. On some long trips there would be over 200 negatives of one film size. We needed some method of marking each negative with its film holder number for identification and filing purposes.
I pondered the idea of using a pattern of small holes drilled in the film hold-downs located along the long side of the holder. The problem was there just isn’t enough room and drilling a small, clean, hole there was difficult without damaging the film plane septum plate below. I knew there had to be a simple way to get a unique identifying mark onto each negative.
A SOLUTION
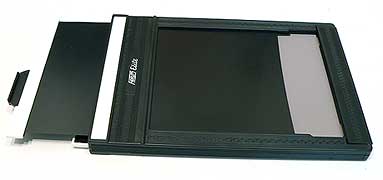
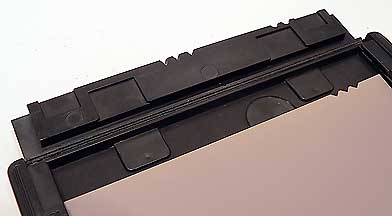
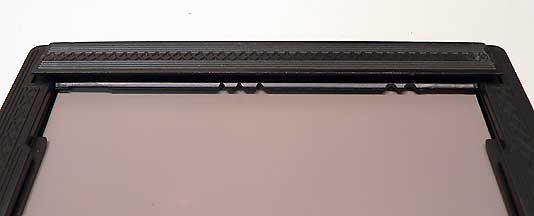
 Then, finally an idea came to me. I closely examined a film holder. Lifting the film loading flap I realized that there was a small lip across the bottom of the loading flap door. This lip is just under the dark slide slot and is used to press the film flat onto the film plane. All I needed to do was to file a series of small notches in this hold-down lip of the film loading flap. When the film is exposed there will be a unique series of notches on the film edge that will identify which holder the film came from.
I needed to generate a code that would be easily read. I went to my tool box and came up with a set of miniature needle files. There was one with 3 sides, this would make a nice triangle notch. A small square file would make a square notch. Another was round and would make a half circle. Now that I had my notch possibilities all I had to do was assign a numbering system to them.
I decided that a triangle notch would represent 1’s. The square notch would be 5’s, and the half circle would be 10’s. You do not have to be a rocket scientist to figure out that the highest number of notches possible with the 1’s and 5’s symbols is 9. This would be 1 square followed by 4 triangles (5 + 4 = 9). The only other digits would be the 10’s and would slowly progress as the holders went from 10 to 20 to 30 . . . etc.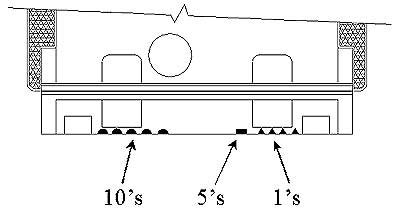
EXAMPLE: Film holder #59 would have the following code: 5 half circles, 1 square, 4 triangles would be; 10 + 10 + 10 + 10 + 10 + 5 + 4 = 59
All I needed to do now was decide how to arrange the notches on the hold down lip of the loading flap. Positioning the film holder with the loading flap open and facing me, I decided that the 10’s half circles would start on the left side of the flap. The 5’s square and the 1’s triangles would be located about 75% the distance across the length of the flap. This would allow plenty of room to number all of the holders, with room for more as needed.
TOOLS
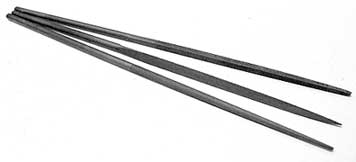 The only special tools required are a set of miniature needle files. I used the Sears Craftsman needle file set, part number 96757. You will also need an Exacto™ knife and a clean, well lit, work space. A jeweler’s loupe or some type of magnifier is handy to closely examine each set of notches. The small needle file set works fine for 4×5 and 4×10 holders. For larger holders, like 8×10 or larger, I used a larger file set to make larger notches. Not sure where this set of files came from since they had been in my tool box for years. You should check with your local hardware store to find a larger set of files for the larger holders.
CAUTION: The following procedure requires you be familiar with doing small intricate precision file work on soft plastic or wood. Read the WARNING at the end of this text before proceeding with this modification.
THE PROCEDURE
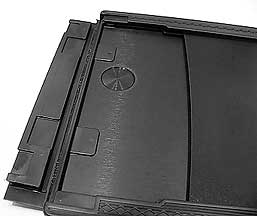
Now all that is left to do is to file the correct notch code into each film holder. Lay the holder near the edge of a sturdy table (I use my shop work bench). Position the loading flap facing you. Open the flap and position it near the table edge.
 Since the loading flap will not lay flat on the work surface it is a good idea to support it with a small piece of wood or metal. This will prevent damage to the cloth hinge. A small 1/4 inch wide by 1/8 inch thick piece of aluminum or wood works well. The idea is to keep from stressing the hinge backwards while filing. With wooden holders, it is a good idea to support the flap door lip by inserting a thin strip of wood into the notch where the dark slide engages in the loading flap. This will support the hold down flap lip and prevent it from being broken while you file the notches.
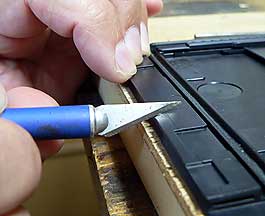
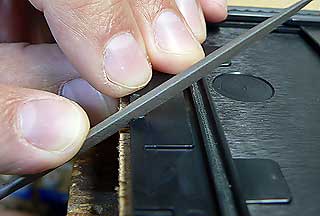
Hold the film loading flap firmly, then gently file the appropriate notches into the film hold down lip only. You must hold the file at an angle so that the notch will only be filed into the hold down lip. Be very careful because if you make a mistake there is no fix short of replacing the entire flap.
NOTE: Be very careful not to damage the outer lip of the flap. This is the outer portion of the film loading flap located above the dark slide when the flap is closed. The notches must only be filed into the inner hold down lip of the film loading flap. This is the portion of the flap that comes into contact with the film when the flap is closed.
 Check often to be sure you are holding the file at enough of an angle as not to damage the outer portion of the flap. Work slowly and file each notch to the same depth and spacing. The notches should be filed to a depth of about 1/8 inch on a 4×5 holder. . . deeper on larger holders. This will show very well on the exposed film and is quite easily read.
 Once the correct notch code is filed into the hold down lip, use an Exacto™ knife to deburr the edges of the notches. It is very important to remove any burrs that would make an unsharp marking on the film edge. Work very slowly and carefully because the material, whether plastic or wood, can be soft and easily gouged. Clean the work area often using a soft brush or compressed air. Examine the notch code carefully, use a loupe to be sure the machine work is clean and even.
Once the notches are in place and deburred, it is a good idea to give the film holder a thorough cleaning to remove any filings. After this I use a small Shop-Vac® to vacuum out the holder thoroughly.
USING THE MODIFIED HOLDER
 Once the film holders are coded with the notch pattern it is simple to locate which negative came from each film holder. Along the film edge where the film identification notches are located will be a coded pattern exposed onto the film. Reading the coded pattern on each negative is easy. Accurate identification of each negative is a snap.
It should be noted that this coding system can be used on any film holder regardless of film size. I have coded every holder we own. . . from 4×5 to 16×20. Either wooden or plastic holders, they all work equally well. We no longer have to guess which negative was exposed using which filter. I can process all our negatives at once and not worry about keeping them in separate groups for later filing.
The only time this identification system does not work is when there is no film exposure where the notches are filed in the film flap. This only happens when there is insufficient exposure at the film edge where the notches are located. This has not proven to be a great problem even with a large number of negatives to identify. Some identification is better than none at all. . . especially when you have 100 or more negatives to sort and file.
SUMMARY
We have used this numbering system on all of our film holders for over ten years now. It has performed flawlessly for us. We have been on trips that lasted over a month. Brought home close to three hundred 4×5. . . one hundred 8×10. . . and numerous other sizes of film. All are batch processed, then sorted once they are all finished. We have always been able to sort our negatives using our field notes and the notch code on the film edge.
We have film holders in numerous sizes including 4×5, 8×10, 4×10, 11×14, 8×20 and 16×20. We have holders by most every manufacturer. . . Fidelity, Riteway, Lisco, S&S, Lotus, Wisner and AWB. Some holders are plastic, some are wood. The one thing they all have in common is my numbering system. This numbering system can be added to any of these film holders.
I hope you will find this simple and effective identification system as useful to you as it has been to us. Remember, when filing the holders, go slowly and be very meticulous, you only have to do this once and then you can enjoy your film holder modification from now on. Just be very careful and do not damage anything. You will always know which film holder number was used to expose every sheet of film from now on. No more guess work, just a simple modification (improvement) to make your photographic endeavors more efficient and pleasurable.
I wish you all the best and remember, photography is about the photograph – not the equipment. Expend all of your effort in making images that have meaning to you.
Good luck!
WARNING!!! . . . IF YOU ARE NOT COMFORTABLE USING SMALL PRECISION FILES, YOU SHOULD NOT ATTEMPT THIS MODIFICATION. YOU CAN CAUSE PERMANENT DAMAGE TO YOUR FILM HOLDERS. IF YOU ARE UNSURE OF YOUR ABILITY TO ACCURATELY DO PRECISION HAND WORK, TRY A PRACTICE RUN ON A PIECE OF SCRAP PLASTIC OR WOOD.
IF YOU CANNOT PERFORM THE NECESSARY HAND WORK YOURSELF TRY TO FIND A MACHINIST OR SOMEONE FAMILIAR WITH MODEL BUILDING OR CONSTRUCTING MINIATURES TO HELP OR DO THE WORK FOR YOU.