DIY

PENTAX DIGITAL METER SCALE MODIFICATION

I have been going through and updating this blog site and I have found several entries I have never posted. This is a project that was completed way back in 2007. Enjoy this blast from the past!
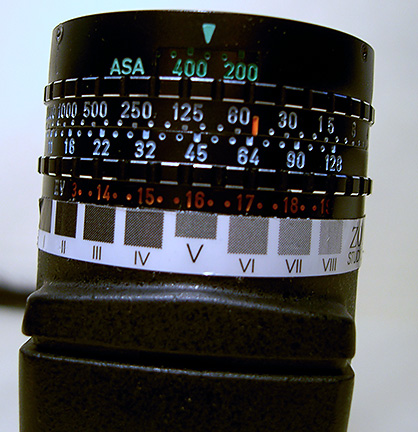

Pentax Digital Meter ModSo, I know that I really should spend more time talking about photography, but it is so much easier to talk about equipment and modifications. . . so. . . here we go again.  I know I have said several times before that little around here has not been modified in some way.  I have to say that my Pentax Digital Spot Meter is about my number one tool when photographing.  Maybe I should say it is my only tool that has a battery.  No wonder Paul Horowitz chose it to modify for Zone VI.  I like everything about it, except the Zone Dial.  Now don’t get me wrong here, the old Zone VI Zone Dial was plenty useable.  It was just that the label was not that durable and though we had purchased replacement Zone scales, I wanted something that was more rugged.   So, this is how it all started.  I just wanted to make a better label.  And, another complaint I had was that part of the Zone Scale was covered by the meter barrel.


What I wanted was a more durable scale, and the ability to see the entire scale from Zone I to Zone X against the EV numbers on the dial.  I had an idea about the scale and I thought I might open up the barrel of the meter a little.  Turns out the scale was not that difficult, but in order to open up the barrel on the meter required I machine an entire new part.

First I needed to design a new meter scale and see how it would fit.  The nice thing about doing your own modifications is you can design for the way you think.  I set off first laying out a Zone Dial that I liked.  I wanted a few symbols to jog my memory without clutter.  I wanted to see ten full stops.  It would include markers for N as well as N+1 ½ and N-1 ½, so I would not have to do any counting of Zones or EV numbers, just dial up whatever you want with little thought or counting.  I also added a marker for Zone III to remind me of deep shadows and one at Zone IV for lighter shadows.  Of course I added my name, website and copyright and there it was.  I did the artwork in TurboCad and laid out the spacing to match the EV dial on the meter.  I printed out a paper model and proceeded to check for fit and functionality.

Next I needed to rework the rear part of the meter barrel.  I first thought I could modify the original, but it became obvious that if I were to cut away metal on the factory part, I would then have to strip the original anodize and re-plate.  That usually does not work too well, so I opted to just make an entire new ring.  This wasn’t that hard to do.  The lens barrel is easily removed and the rear part that I needed to modify was simple machining.  All I had to do was measure the original and make the replacement, adding my modification.  I turned out the new part and made several test fits to make sure everything worked as planned.  Once I was satisfied with the new ring, it was just a matter of some black anodize and assembly.  I should note that we have four of these meters and I modified all of them at the same time.

I ordered some light sensitive, adhesive backed, aluminum that is mostly used for trophies and name plaques.  I have used this material for panels on prototype devices before.  This would serve as my new meter dial.  I printed out a negative on clear film and this was used to expose the metal plate.   After development, I had my dials ready to be cut to size.  All that was left at this point was positioning the dials onto my new, opened up, meter barrel and one more project was done.

Zone System Dial

This was another one of those projects that was a little more involved than originally anticipated, but turned out to be well worth the effort.   I did the modifications in 2007 and our meters have seen a lot of use since.   My slightly encoded Zone Dial has worked very well, allowing me to work quickly and hopefully with fewer mistakes.  Like I have said before, I like to keep things as simple as possible when working.  Too much technical chatter gets in the way of creativity.  I would rather do the technical work in the shop so I can get on with making my art without too much distraction.

JB

Posted by JB Harlin in DIY, How-To, Photography

CUSTOM PANO PRINTING EASELS

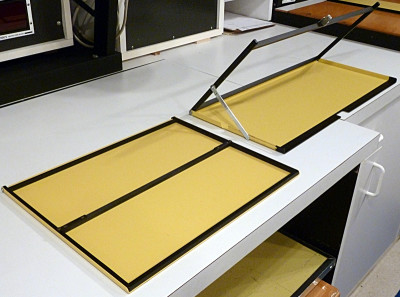
Custom modified 5.5 x 14 & 8 x 20 printing easels

Seems the more you do the more you need to do.  Or, maybe more accurately, the more you do unique things, the more custom hardware you need.  Either way, seems there is always some project that needs to be addressed.

Susan started working in the pano format exclusively about 11 years ago.  She shoots only 4×10 and 8×20 film.  This means she enlarges her 4×10 negatives to mostly 5 1/2 x 14 or 8 x 20.  She cuts 11 x 14 and 16 x 20 paper in half when she prints.  Not much of anything exceptional there, except you need some sort of non-standard printing easel when making such prints.  For years now she has been using a modified 16 x 20 Saunders Speed Easel and an adjustable easel for 5 1/2 x 14.  Thing is, these easels are very large and the way our 8×10 enlarger is setup, you have limited baseboard area.  What she wanted was a custom easel for the 8 x 20 for sure and something similar to her modified 16 x 20 using an 11 x 14 Speed Easel.

 
This is not that difficult of a machining project. . . just requires a little thought, some metal and the magic ingredient. . . time!  Oh, and a couple of spare Saunders Speed Easels to perform a modification upon.  We did find the easels on eBay, and I had ordered the material. . . finally I found the time.
 
For the 8×20 easel the idea was to cut down the hold-down border to the correct size, then cut the base to match.  This would make a custom 8 x 20 Speed Easel.  The actual re-fabrication was not too difficult.  It took more time measuring to make sure things worked out to the right print border size, since this is a cut once type of project.  I machined a new cross bar for the hold-down, made sure it was a good fit and drilled and tapped the ends.  Next I cut off the unneeded portion of the stock hold-down, drilled the side bars and assembled the new 8×20 border hold-down.  It all fit just about right.
 
Next I needed to cut off the unneeded portion of the base of the easel.  I carefully measured and marked the needed cut.  The bandsaw did the rest.  A little dressing with a large flat file and the new base was almost done.  Since the larger Speed Easel has a locking mechanism to keep it closed, I needed to add a relief in the base to clear the latch.  That required a little more bandsaw work, followed by some finishing up in the vertical mill and all was well.

Once everything was test fitted, all that was left was a little painting.  Since all of the easel is steel, it is a good idea to discourage rust.  I lightly sanded the newly fabricated border hold-down and gave is a luxurious coat of self-etching flat black primer. . . done.  The base was a little different.  I really didn’t want to repaint the whole thing and finding paint that matched the Saunders yellow was not really an option either.  I decided to mask off the end where I had removed the excess base about one inch inward and only paint that portion with the black primer.  That way I would get the bare edge of the exposed metal covered and it would not look that bad.

All that was left now was to wait for paint to dry and then assemble.  I did have to remove the anti-skid rubber feet from the cutoff piece of the base and glue them to the new 8 x 20 easel.  That was it. . . all done. . . ready to use.

For the 5 1/2 x 14 easel modification, I took a much simpler approach.  Since the original 11 x 14 easel was small, there was no problem using it on the enlarger base.  So, no need to cut the entire easel down to a smaller size.  All I really needed to do was machine a new cross bar to cut the easel size in half.  I also worried that if I did cut the easel down that the border bar assembly would not have enough weight to hold the paper flat.

I cut a new cross bar from a length of 0.25″ square steel bar and machined up a couple of bracket pieces from aluminum to hold it in place.  A little drilling and tapping and six #4-40 truss head socket cap screws and all was ready for some finish work.  The new divider bar, along with the brackets were cleaned and given a coat of flat black self-etching primer.

I know this is not a project for the average person to attempt with only a few hand tools.  This is not complicated, but does require a degree of precision and tools suited to the task.  There are those times you have to build what you need.  This is one of those things I do to relax and unwind.  I offer this little project as an example of what can be done.  If you decide to modify your easel, do proceed with caution.

JB

Posted by JB Harlin in Darkroom, DIY, How-To, Photography

8X10 LED VC ENLARGER HEAD

8x10 LED VC Control Head
There are always those projects that you really want to undertake.  But there is sometimes hesitation due to doubt as to the feasibility, or maybe the availability  of the needed technology at the time to make the idea reality.  Here is one of those projects that has been in the pipe, yet on the back burner, for quite some time.  There were doubts as to whether this one would work.  What the heck am I talking about. . . OH. . . that?

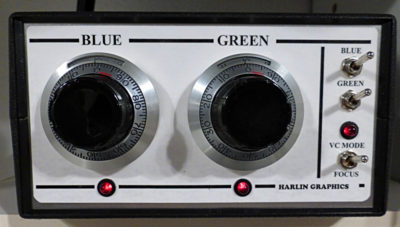
We finally committed to doing the research and development of an LED VC head for the 8×10 enlarger.   This one took some time for research, design and testing, but it is finally a reality.  Want to read about what it took to build a working 8×10 LED VC enlarger head?

Look in the Articles Area of our web site for the story or, here is the direct link to the PDF ”

DESIGNING & BUILDING AN LED VC ENLARGER HEAD.”


Posted by JB Harlin in Darkroom, DIY, How-To, Photography

UPDATE TO FORMULAS

We have just updated the FORMULAS area here on the jbhphoto.com BLOG (click the link at top of the page).  What you will see is mostly cosmetic with a few corrections here and there.  The formatting of the older area was made of screen grabs of notes and was not that well organized.  Hopefully it is now a little more tidy.
Very little changes in the realm of the wet darkroom and film photography.  There are no fads. . . no here today, gone tomorrow. . . no high-tech gadgets. . . no amazing updates.  Traditional film photography is a craft you learn; fine tune; then use.  The bottom line is the finished fine print.  Traditional film photography is very old fashion and grounded in down-to-earth proven techniques, that once learned are the backbone of the art form.  Bottom line; not a lot to stand in line or camp on the street to be the first for some new-fangled gadget or upgrade.  Once you master the technique, there are no excuses not to produce finished work.  Film photography is a craft; you learn it; then you use it; for the rest of your life; and you pass on what you have learned.

In our Formulas area you will find the mixtures we use.  Nothing very special about anything we do, and it would be a good assumption you will see little new there.  Take what you can make work for you; leave anything else for the next interested photographer.

JB

Posted by JB Harlin in Darkroom, DIY, Film, Formulas, How-To, Photography

SHOWING YOUR FINISHED PHOTOGRAPHS

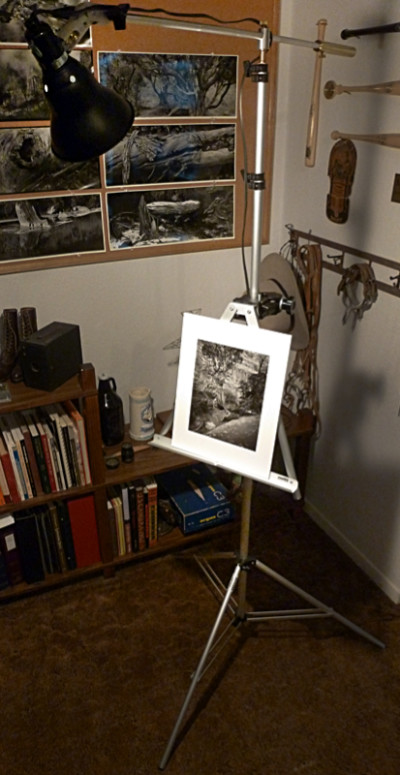
Lighted Easel

We work very hard out in the field exposing film to interesting and inspiring subjects that we believe we can turn into an acceptable finished photograph.  Next we hold our breath as we get a first look at the negative. . . same thing when we get a peek at the proof and later the first work print.  This continues through all of the refinements until we finally end up with a finished photograph.  Next we live with this image. . . and when we are finally satisfied with what we have created, it is time to show the print.

We love to show our finished photographs. . . to anyone that is willing to look.  The thing is, in order to really view a fine photograph, you have to light it correctly.  Looking at prints in a dark room, gathered around a table in a restaurant, or anywhere there is insufficient light, is not what should be done.  The problem is there is no easy way to properly light a photograph without hauling your own light.  This has been one of those things I have pondered for years.  The best I have ever done is to use an easel and a spotlight on a stand to illuminate sufficiently the photographs to be shown.  Even Edward Weston would get out his light when he showed his prints.  This is the correct way to show your photography.

The proper lighting of finished fine prints has been something I have agonized over for years.     As usual, when I am faced with trying to design something from scratch, I take a nap.  I do my best thinking when I am asleep.  This one took more than a nap.  I pondered this for quite a while, off and on for months.  Then one night I had a dream. . . there it was!

Bringing an idea to reality is not always an easy task.  Fortunately, I have been doing this for years and I have found that if I can imagine it, I can eventually build it.  The interesting thing about this project was I had most everything I needed laying around.  It was just a matter of putting it all together and making it work.

So, what am I talking about?  What I wanted was a simple, easy to transport, easy to assemble display easel with integrated light.  A single unit so I do not have to carry a wooden easel and a light with a separate stand.

As I said, we had most everything needed laying around the house.  We have several of these really nice aluminum tabletop easels.  There are several light stands in the closet, along with light fixtures and even a Manfrotto SuperClamp.  These items made up most of what I needed.

The bulk of the project required that I make a boom to hold the light fixture and come up with a way to mount the easel to the SuperClamp.  I machined a block of aluminum to hold the easel at a convenient angle and attach it to the SuperClamp.  I spun out a simple boom with a counterweight that attaches to the top of the light stand and is fully adjustable.  The SuperClamp, with mounted easel, is easily attached to the stand at any convenient height.  All that is needed is electricity for the lamp.  Presto. . . a complete, self-contained, lighted display easel.

The last piece of the puzzle was coming up with some convenient way to store and transport the lighted easel and its assorted parts.  There wasn’t much we could find off-the-shelf, so it was off to the garage to build a wooden carrying case.  Fortunately, there was enough scrap plywood on hand and it was just a matter of building the case and fitting the parts inside.  A little sanding, a few quick coats of varnish, some felt padding, hinge, handle, latches and the whole thing is ready for the road.

Now all we need is a captive audience!

JB

Posted by JB Harlin in DIY, Photography, Presentation

CRATES FOR TRANSPORTING FRAMED PRINTS

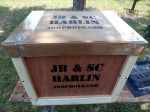
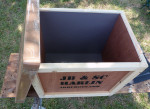
We seem to be doing more exhibitions and it is always a challenge to deliver framed prints.  For years we used heavy cardboard boxes, but they are not that durable.  It was always nerve racking to handle a box of framed prints on a two wheel dolly when transporting a lot of framed prints.  There comes a time when you just have to  build what you need.  Wood crates are by far the best and safest way to transport multiple framed prints.  This is not a difficult project and when you build your own, you can design custom-size transport crates that suit your specific needs.

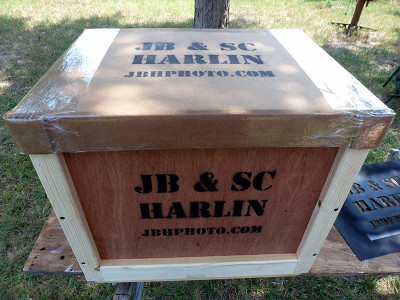
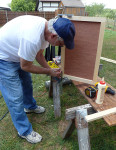
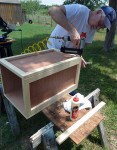
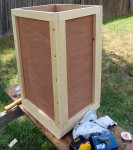
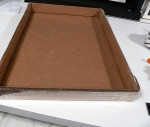
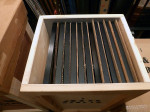
Building a custom transport box is nothing more than designing a simple wooden crate.  We also make a cover that slips over the top from regular corrugated board.  Gather a few pine boards and a sheet or two of 1/4″ plywood, some hardware and you are ready to start building.   I like to use an air brad nailer and a cutoff saw, but you can get by with a few hand tools.  I rip 1″x10″ lumber into 2″ runners and this requires a table saw.   You could buy pine in 1″x2″ and skip this step if you don’t have a table saw.   The side panels are made by cutting 1/4″ plywood to the desired size and then edging it by nailing and glueing 2″ runners on all four sides.  These panels are then assembled into the box using more glue, brads and deck screws.  The bottom of each crate is reinforced with wooden cleats and also have wooden skids with tapered ends.  Take a look at the photos to get an idea of how our crates are built.

Once the box is assembled, I will go over the outside with a belt sander to smooth things out.  Next I like to use a router with a 1/4″ round-over bit to round all edges.  A little hand sanding and any chance of splinters is pretty much eliminated.

The boxes we use are sized to be about one inch larger than the frames they hold.  Each box holds about 10-15 framed prints and are pretty heavy when filled.  I like to line the inside of the box with single-ply mat board.  This helps to keep the frames from scuffing against the raw wood.  We cut corrugated board just a little larger than the frames and use one sheet between each frame.

It is a pleasure to have nice crates to transport your framed photos.  A few nice sturdy crates protect your framed art and make moving much easier and safer for your work.

JB

Posted by JB Harlin in DIY, How-To, Photography

LED LIGHTING

We have finally started to transition into the 21st century.  I have been doing research into LED lighting for our darkroom and workroom for some time.  Not because I really care that much about the power use. . . I am more concerned about the useless heat generated by incandescent lighting.  In case anyone has never investigated this, your standard filament-type lamp produces more infrared heat than visible light.  We live in Texas and every bit of heat generated inside has to be pumped out with the A/C system.  Need I say, I really don’t care for hot weather, nor a hot house.

I have been intrigued by LED lighting and I have been following the technology for some time.  Up until recently LED lighting has been very expensive and not all that great as a replacement for the old reliable standard incandescent light bulb.  Cost not being factored in, there was still an issue of the color of the LED lighting and something completely new to me. . . CRI (Color Rendering Index).  When you are working with photographs, CRI becomes a very important consideration as well as color temperature.

Most everyone is familiar with color temperature.  Measured in degrees Kelvin, light is either warm or cold in appearance.  The standard incandescent lamp has a color temperature of somewhere between 2700K to maybe 3000K for some halogen lamps.  We have always used standard reflector flood lamps which inherently have a color temperature of 2700K.  LED lighting now is available with color temperatures that range from 2700K to 5000K.  This was an easy choice for us. . . what I wanted was something that matches what I have always used, so 2700K is the logical choice.

Seems that the newest specification for LED lighting is the appearance of CRI.  You will find very few lamp manufacturers that will specify the CRI.  CRI is a measure of how well a light source reveals colors.  The sun has a CRI of 100.  The very least you can expect anywhere near true color is a CRI of no less than 84 or so.  Most incandescent lamps have a CRI of about 93 to 94.  Many LED lamps have a CRI of about 80. . . not that great.

There is one more specification that is important and that is the lumens a lamp produces.  This is simply the amount of light created for the watts of electricity used.  The higher the number, the more light output.

That is a lot of information, but let it suffice to say that things have finally caught up with what I might call the Heat : Color : CRI : lumens : $$$ ratio, and it is finally time to seriously look into LED lighting.  We found a suitable replacement for the lighting in our workroom and proceeded to test the LEDs against the old incandescent lamps.  I first replaced random lamps among twelve 45W reflector lamps that light our work area.  Once on, I could not detect any difference in the light color, coverage or quality.  I looked at color under each light and saw no perceivable difference.  I had one more test. . . take a digital photo of the room and see if the camera could see any color difference.  We both looked at the photo and could not tell where the LED lamps were compared to the others.   The biggest difference we saw in the workroom was the blue of the light coming in the window from outside.  So far, so good!  Next we lived with the new light for a few days.  Did the color comparison several times.  Took more digital photos, both with the Panasonic digital cameras and with the iPhone camera.  Still, even the cameras were not showing any difference.  That was it!

Next. . . the darkroom.  We have had two fluorescent fixtures in the darkroom for as long as we have been here.  I hate those greenie-weenie light things know as fluorescent.  I have wanted to install track lighting above the sink for years, but did not want to put up with the heat.  We installed a track with four fixtures and 65W equivalent LED lamps. . . what a difference!  We also installed two, three-lamp fixtures for general room lighting.  We next repeated the tests with the cameras and there is not a detectable difference in the color of the light.  We did several visual color comparisons and there just wasn’t any discernible difference between the incandescent and the LED lamps.  That was pretty much all that I needed to see. . . fixed!

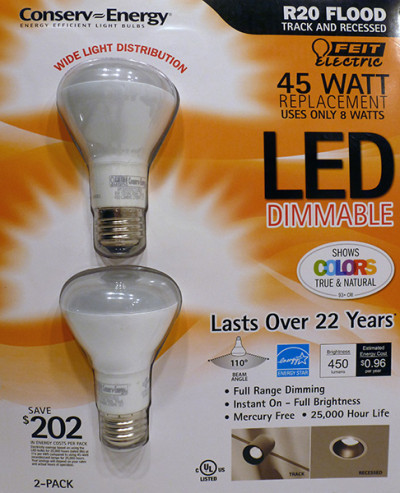
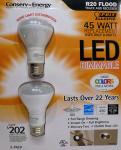
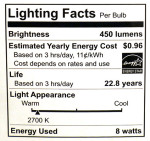
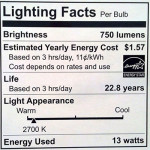
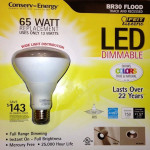
I know the question will come up as to what manufacturer and which lamps we selected.  We chose the Feit Electric R20, 45/8W, 450 lumen and BR30, 65/13W, 750 lumen LED lamps.  These are reflector lamps with a 110 degree beam angle and a CRI of 93+.

One of the most noticeable things about the LED lighting is the absence of searing heat.  The lamps themselves do get warm, but there is none of that burning IR heat that will even warm a black object on the table top.  I also need to add that these LED lamps are dimmable and do work with every dimmer we have tried them with here.

 
If you are looking to upgrade to LED lighting, these seem to be about the best at this time.  I am sure that as the technology matures, you will see even better performance and pricing.  It is like most all high-tech items today. . . you have to choose a point, then jump on the band wagon.  Tomorrow there will be a whole new ball game.  At least we have chosen to start now.  We have taken the leap into LED lighting.  We’ll see how well these hold up. . . the manufacturer claims their lamps have a 22 year life!

JB

Posted by JB Harlin in Darkroom, DIY, Photography

JBH PHOTOGRAPHY HOW-TO E-BOOKS

We are proud to announce that the JBH photography how-to book series is now available in e-book format.  Each book has been revised and updated.  This how-to book series has been created specifically for those interested in traditional large format fine art black & white film photography, practiced in the wet darkroom.

All four books are available for immediate download in PDF format to your computer.

JBH PHOTOGRAPHY HOW-TO E-BOOKS

SPECIAL INTRODUCTORY OFFER!
Purchase multiple e-books and save.

NOTE:  A PayPal account is not required to purchase.
You can use your credit card without having or creating an account with PayPal.


Stop by our new BOOK STORE for more information and to purchase securely with PayPal.

JB

Posted by JB Harlin in Darkroom, DIY, Film, How-To, Photography

A DIY SENSITOMETER. . . REALLY???

DIY SENSITOMETERFilm testing is one of those things that is just a fact of life if you, like me, choose to continue to pursue that art form.  I am no fan of any testing, that is for sure.  But, there are times you have to test in order to better understand how things will work.

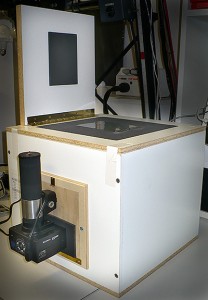
I never thought I would ever need a sensitometer, but never say never.  To compare different film developer formulas, I found that I needed to run some tests.  In order to make the test I needed to expose numerous sheets of film and expose them all identically.  What I needed was a film sensitometer.  What I did was build one.  This project was not as difficult as I first expected and most everything I needed was laying around, either in the closet, or the junk box.

I wrote abut my experience designing and building a DIY Sensitometer back in 2009, then shelved the article where is has remained dormant since.   Well finally, I drug the thing out and put it up on our web site.   Interested in learning more about building a film sensitometer?  Head over to the ARTICLES & HOW-TO area of our web site, scroll down the page to the link titled, “BUILDING A FILM SENSITOMETER.”  You will see how I did it, and you may just want to try it yourself. . . if this is something you have a need for.

JB

Posted by JB Harlin in Darkroom, DIY, Film, How-To, Photography

DIY PREPACKAGED DARKROOM CHEMISTRY

DARKROOM CHEMISTRYMixing our own darkroom chemistry has become the established method around here.   Since the demise of Zone VI chemistry, we are pretty much on our own when it comes to processing chemistry.  Things like PyroCat-HD can easily be mixed by weighing out the necessary materials each time, since you are mixing stock solutions and it is not something you have to do every time you process film.  I mix up the print developer as two stock solutions that are combined when a printing session starts.  I keep one and two liter bottles of part A and B mixed and ready to go.  That is just another element of the process.  On the days we are not doing darkroom work, I am in there cleaning and mixing solutions.
 
One thing you use a lot of when making large prints is Fixer.  We go through a lot of fixer, and I do not believe in skimping.  The F-24 formula will fix 25 8×10 prints (or equivalent area, 80 sq inches per print) per liter. . . that would be 100 per four liter batch.  I never run fixer more than 60% of capacity, so that would be 60 8×10’s per four liter batch.  Another darkroom rule is, we never pour anything back into the container. . . most of the time.   Used fixer is dumped into buckets in the garage and when I get a batch, it goes through the silver recovery unit.
 
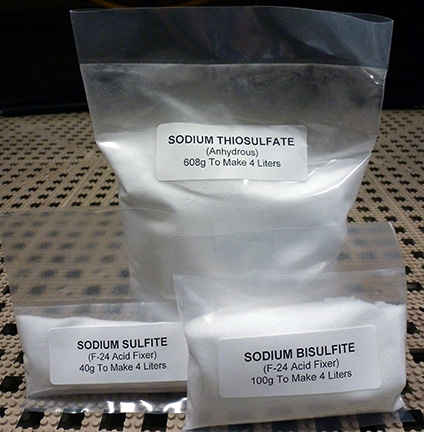
Because we purchase Sodium Thiosulfate in 50 pound bags, this can present a storage problem, let alone a hassle for measuring and mixing.  It was obvious that we needed to find some convenient way of storing and measuring large volumes of dry material.  The solution is actually not that difficult.  We already had an impulse heat sealer, all that was needed was bag material.  You can purchase continuous rolls of poly tubing, and 4mil is a good choice.  Making a custom bag is easy.  Heat seal the end, cut off the length you need, measure the chemical, pour into the bag, squeeze out the excess air, and heat seal the other end.  The only other thing you need is a label, or you can write on the bag with a marker.
 
For the F-24 Fixer we use, I measure out the correct amount of all three ingredients and seal them into an appropriate size bag.  I use four inch wide 4mil tubing that comes on a 1,500 foot roll.  I print off an adhesive label for each bag and store the small bags in plastic shoe containers and the larger bags in five gallon plastic buckets.  When I need to mix fixer, just grab three bags, run water into a suitable container at the appropriate temperature, cut open the bags and stir.

You can purchase Poly Tubing from suppliers like ULINE in widths from 1 to 48 inches on large rolls.  They also sell Impulse Heat Sealers in various sizes.  The unit we have is the 12 inch model and has seen a lot of use over the years.  Be sure to order a spare heating element service kit.  Pick up some adhesive labels for your computer printer and you have everything you need to make your own prepackaged darkroom chemistry.
 
JB

Posted by JB Harlin in Darkroom, DIY, How-To, Photography