Film

THE VIEW CAMERA IN THE FIELD

This Is How We Work With A View Camera.

Susan Pack o1There is always a lot of discussion on how best to carry LF gear in the field. Seems that most people like to carry their camera in a backpack. That is our favorite mode of transportation in the field for sure. We like the backpack idea so much that Susan builds our packs to custom fit our cameras and accessories. All that we have learned about camera packs has been worked out the hard way. We have copied the features of commercial packs that we find useful and modified as required.Susan Pack 02

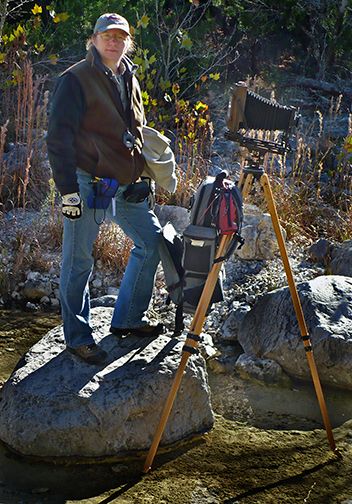
It seems that most people plop their pack down on the ground when they get ready to shoot. That is fine, unless you are in mud, water, or knee deep in snow. I have never liked the idea of setting my pack on the ground. And, yes I know, there are those that carry a tarp, but that is way too much trouble for me. I want to find my subject, plop down my tripod and then get to work without having to look for a convenient and safe place to put down the pack. This thinking led to a modification to both the tripod and the pack. Susan added a webbing loop to the top of the pack and I added a hook on the bottom of the tripod crown. This allows us to hang the pack from the tripod, keeping it out of the dirt and making it very accessible.

We both have worked out a system that allows us to carry everything we need and work efficiently in most any situation. The packs we use have a large compartment in the bottom for the camera and a separate top compartment for lenses and accessories. The custom packs also have room for several film holders.

This is how we do it and it has proven to be very efficient. However you choose to work in the field, the most important thing is to have everything you need with you, well protected, and easily within reach.

JB

Posted by JB Harlin in Film, Photography

THE B&W VIEWING FILTER

Susan and I have used a Zone VI B&W viewing filter for years. This nifty little round device not only shows you the relative tonal relationship between different areas of a scene, it also acts as a framing device.

Zone VI 4×5 Viewing Filter

So, what is a B&W viewing filter? In reality it is a Wratten #90 monochromatic filter. The gel version of these filters are available from the usual photographic suppliers. They are a gelatin filter and fragile. Several companies manufacture monochromatic viewing filters. Tiffin has a version for B&W, but we prefer the Zone VI filter. It is rugged, mine is over 15 years old and still going strong. The fragile filter is mounted between glass and encapsulated in a round molded plastic enclosure. The filter comes with a cord so it can hang around your neck ready for use at any time.

So, what does the B&W filter really do? What it does not do is turn a scene to B&W. The filter shows you the approximate tonal relationship between different areas of a scene as recorded by B&W film. It will show you if there are any mergers of tone within a scene. For example, the filter will show you if a building will tonally merge with the sky, thus indicating the use of a filter to darken the sky for separation. It will also give you a good idea of how different colors will look in B&W. I have found that nice little green moss on a tree trunk will merge with the bark and disappear. The viewing filter will show you this with just a glance. Once you get used to using this handy, yet simple little device, you will not want to be without it.

The Zone VI version also serves as a framing device. The 4×5 version has the same proportions as a 4×5 or 8×10 negative. By learning to hold the filter at the correct distance from your eye, you will soon be able to approximate what focal length lens is required on your camera for a specific framing.

One other thing, the filter forces you to close one eye to use. Remember, the camera has only one lens, one view, one perspective. You may be surprised, but try closing one eye while you are looking at a possible photograph. You just may quickly learn that once you remove the 3-D effect of using both eyes, the photo just may not work. Try it!

This is just another tool. It may work for you, maybe not. The only way to really know is to try it. The Zone VI B&W Viewing Filter is no longer manufactured, but you see them used all the time. Check the Internet. This just could become a regular part of your equipment complement.

JB

Posted by JB Harlin in Commentary, Film, Photography

TRAVELING WITH FILM

TRAVELING WITH FILMI have received several inquiries as to how we handle film when traveling. Our photographic outings typically last anywhere from two weeks to well over a month. We each shoot several different formats and we usually shoot a lot of film. We do not process film on the road since it is not practical to work with LF and ULF film anywhere but in our darkroom. So the question comes up, how do you handle several hundred sheets of exposed film when traveling?

First I have to say we keep meticulous notes on every negative we make. Everything from exposure, to location, to time of day is recorded on a small digital voice recorder. Every sheet of film gets an entry detailing all pertinent information. Search here on the jbhphoto.com BLOG for previous posts about our record keeping in these entries; “KEEPING NOTES” and “PRINTING NOTES & CATALOG.”TRAVELING WITH FILM

We only have room to haul just so many film holders in each format. So it is always necessary to carry fresh film and to reload holders on the road. Depending on how much we shoot on any particular day, we may reload every evening, or we could go several days before having to reload. Obviously we carry fresh film and empty boxes. How much film? The rule of thumb is to carry twice what you think you will shoot in any format. How do you know? Experience is the only answer to that question. If in doubt, throw in another box just in case. All I can say is we have never ran out of film on any trip. We always come home with unexposed film.

When reloading becomes necessary it is important to be able to sort the exposed film into groups that require the same developing time. We have printed sheets for unloading film. When it comes time to reload, we go through our audio notes and record the film holder numbers into columns that denote the development of each sheet of film. Once we have the sheet filled out, it is just a matter of locating the holders and arranging them in piles before unloading.

TRAVELING WITH FILMWe do not practice anything very exotic when it comes to film development. We expose with the intention of one of three development times for any particular situation. Each sheet of film is exposed to be processed either Normal, Normal +1 ½, or Normal -1 ½. That is it. . . we need three sets of empty film boxes for each format, each labeled for the appropriate developing time. As we load more film we empty more boxes that are then used to unload more exposed film. We carry labels that we print off before we leave and affix them to the boxes as needed. The labels denote film developing time and that the box contains exposed film.

We also carry a handful of large rubber bands. All boxes, whether exposed or unexposed are held closed with two rubber bands. This is insurance against a box coming open or accidentally opening the wrong box. In our scheme, any box with rubber bands on it contains film. . . Do Not Open!

We carry a large Harrison tent, but I hate using it. So, we also carry spring clips, small nails, a hammer, tape and blackout material to cover windows as needed. We can nearly always find a bathroom or other room that is easily transformed into the temporary darkroom for film handling. We also carry a small folding table which comes in handy at times. Dust is always a problem when loading film. We carry a small field service vacuum, see the BLOG entry titled “DUST. . . A Four Letter Word!” Every holder is vacuumed, inside and out, every time we reload.

When traveling and shooting LF and ULF you have to be creative and prepared. This entire process is much more difficult to explain than it is to put into use. You just need a little forethought and planning. Traveling with film is not that difficult.

JB

Posted by JB Harlin in Film, How-To, Photography

THE PYRO-CAT IS OUT OF THE BAG

Film TestingBack in February 2009 I posted an entry titled “WHO USES PYRO?” and ended it with this statement, “I have about reached a conclusion as to which formula best suits what we do. . . and. . . I may just write about what I found at a later date. . .”

One thing I can say for certain is that for us, and let me be very clear about this, I repeat, FOR US and the way we work, most any staining developer out performs any non-staining developer we have used. It was just a matter of finding the right developer that suited us and one that would allow us to produce prints that have the presence and feel that best suits our vision.

PyroCat HD

After working with several of the more popular staining film developer formulas we have finally chosen our favorite. There was a lot of research and comparisons, followed up with field testing in order to ascertain what best fit our needs. I defined the main criteria and judged each developer on how well each performed in each area. Here is a short list of the main points:

• the formula had to be published
• we considered how we work
• what we expect from the negative and developer combination
• ease of use
• consistency of the developed film
• stability of the developer formula
• stain color
• general stain and stain density
• the look, feel, and overall print quality
• last, but not least, the cost

I prefer to always be able to mix my own chemicals from scratch. This became my first issue, since I do not want to depend on the availability of the developer from an outside source. I am a strong believer in vertical integration. Also, if I want, I can modify the formula, and I always know who to blame if something goes wrong.

One thing I have learned is that Pyrogallol is cranky. Nearly all of the formulas we tried that were based on Pyrogallol, at one time or another, under certain circumstances, gave inconsistent and sometimes unpredictable results. The problems could have been caused by any number of variables. We tray process all sheet film using the shuffle method. Some of the Pyrogallol formulas showed signs of aerial oxidation in the tray at the end of the developing cycle, while others did not. The biggest problem was that every Pyrogallol formula we tried, performed erratically and at one time or another, produced an occasional unevenly developed negative. One formula was especially sensitive to wash time. The longer you left the film in the washer, the more the general stain increased and the film went from a near neutral color to deep green. Never did understand what caused that. I am sure it was something that I did, but I do not like to have to deal with something that is that sensitive to slight variations of process.PyroCat HD

PyroCat HDOne thing I did learn was that Pyrocatechin is a much more stable and user friendly developing agent. The Pyrocatechin formulas showed little to no aerial oxidation in the tray after a processing run. No matter what I did, the negatives have not shown any uneven development or any other problems. I prefer to have the confidence that even if something is a little different during processing, it will not cause inconsistent results with the finished negative. In other words, I like to have a little wiggle room.

One other quick observation has to do with the general stain color. I know there has been a lot of discussion about the stain color and again this is what we have found to work best for us. Through our experimentation we quickly learned that green negatives do not work well for us. We print on numerous different papers, and use both graded and variable contrast materials. There is no one magic paper! The right paper is the one that works for any particular negative you are printing. We have found, that for us, the more neutral to brown stained negatives work the best. That is just us. . . if you find otherwise, then use what works for you.

With all of that behind us and a notebook full of test data, I can say it is time to stop the experimenting and get on with what is important, creating photographs. We have now chosen our favorite standard film developer. Pyrocat HD by Sandy King has proven to be the best choice for the way we work. What else can I say. It works. . . works consistently. . . and meets all of our expectations.

I would like to thank Sandy King for all of the research and work he has put into this formula. If you are not familiar with Pyro developers and Pyrocat HD, click HERE to learn more.

JB

Posted by JB Harlin in Commentary, Darkroom, Film, Formulas, Photography

FILM IS NOT DEAD!

FILMContrary to popular belief boys and girls, FILM IS NOT DEAD! And I have the proof to boot! One question that everyone has is, where do you get film for that camera? Or, even more disturbing, I thought they didn’t make film any more? Then, where do you get film processed? And finally the most frustrating of all, why would you want to mess with film?

Well, I am not going to address all of this, but I am going to shout from the roof tops again, FILM IS NOT DEAD! Something great has just happened and I am jumping up and down with excitement. Keith Canham, owner of KB Canham Cameras has just announced at Photokina this year that he is now partnered with Kodak to coordinate orders for LF and ULF film. Keith will now take orders for any current Kodak film, in any size! Let me say this again. . . any current Kodak film, in any size!

Plus, just to reinforce the idea that film is not dead, Kodak also announced a new color film. Think about this now. . . Kodak is still developing new film emulsions. They are still doing R&D and improving film! Need I say this again. . . FILM IS NOT DEAD! Here is a portion of the announcement;

Kodak Introduces new Film at Photokina

Yes, a new film: Kodak Creates World’s Finest Grain 400 Speed Color Negative Film with New KODAK PROFESSIONAL PORTRA 400

ROCHESTER, N.Y., Sept. 14, 2010 – Eastman Kodak Company today introduced their new KODAK PROFESSIONAL PORTRA 400 Film, featuring the finest grain structure available in a 400 speed color negative film. The new film incorporates KODAK VISION Film Technology, plus Antenna Dye Sensitization in the cyan and magenta emulsion layers to achieve its unbeatable fine grain.

Yes, a new fine grain color negative film from Kodak. . . and. . . you can get it in any size you can dream of! Here is more information from Photokina on the Kodak BLOG.

Also. . . don’t forget, Kodak is not the only game in town. Ilford offers their B&W film in LF and ULF sizes. Plus there is imported sheet film in many sizes from places like Freestyle Photographic Supplies and others.

Think I am excited. . . well, yes I am! A very special Thank You to Keith Canham and Kodak for your support!!!

I just have to shout this one more time; FILM IS NOT DEAD!

JB

Posted by JB Harlin in Commentary, Film, Photography

PRINTING NOTES & CATALOG

PRINTING NOTES & CATALOGIn the last entry I talked about making film notes in the field. That is the first step in the process of record keeping. I didn’t mention the last step which is negative storage. Each negative is marked on one edge with a unique number, then inserted into a clear sleeve then into an archival envelope. Each envelope has the negative number written on the upper edge. The envelopes are then placed into archival boxes, which are labeled with the contents. Also, the smaller film is proofed on our standard paper. These proof sheets are punched, and filed in binders. That pretty much sums up the negative end of the process.

The next step is printing, and yes, we keep notes on the printing process. As each print is worked out in the darkroom, we have printed sheets that PRINTING NOTES & CATALOGwe use to record the process. We make our own print planner sheets using the computer to document every step in the darkroom. Our print planner sheets have spaces to record all pertinent information for the creation of a finished print. It includes the negative number and date, along with the print date, printing paper, developer, enlarger settings and such. The print planner sheet also has a series of boxes to record exposure manipulations. . . burning and dodging. That way if we ever need to go back and reprint, we have a record of exactly how we made the first prints. These sheets are filed in a three ring binder and labeled for future reference if needed.

PRINTING NOTES & CATALOGWe also keep a computer database which contains our catalog of available photographs. This database contains all of the information from the film and printing notes. The master catalog database also contains information on the number of prints available, price, and exhibition information.

I am sure this all sounds extremely complicated, and I have to admit that if you ever get behind on the record keeping, it would be near impossible to ever catch up. The secret is to continually and consistently keep the records up to date. When we are on the road, the first order of business in the evening, after dinner, is to update the day’s notes and log. Once we get home, the next order of business is to get the film notes done. This has to be done in order to sort the film before development. Our catalog database allows us to keep track of what we have in the way of photographs and serves as a place to search for information when needed.

If you continually keep up with your film notes and records you will always have a way to see where you have been and maybe an aid to where you go next. Is it worth it? We would not do it if we thought otherwise!

JB

Posted by JB Harlin in Commentary, Film, How-To, Photography, The Darkroom Workshop

KEEPING NOTES

KEEPING NOTESI have written quite a bit about LF and ULF photography here on the jbhphoto BLOG since we started back in January of 2009. A lot of it is my rambling about this or that, and sometimes I tend to repeat myself. Oh well, must be old age??? One thing that I do not remember writing about is keeping notes. We are both meticulous about keeping records of our travels and detailed notes on the film we shoot.

We do several things when we go out on an extended trip. One is to make a lot of snapshots. They are an excellent way to keep track ofKEEPING NOTES the places we visit and are used to plan future trips and serve as a visual reminder of the places and things we discover. We also keep a daily diary/travel log of what, when, and where we were on a particular day. I have to admit that Susan is better at the diary than me, but at the end of every day before we drop off to la-la land, we try to type a few paragraphs. We keep this on a laptop computer and entries continue till the trip is over. It is a great resource, along with the snapshots, later when trying to come up with exactly what happened on any particular adventure.

But, the most important notes are those that pertain to the film we shoot. I experimented for some time when I first started shooting sheet film and eventually came up with a record keeping scheme that works. We have both used this method for many years and it has given us detailed records that, when needed, are invaluable.

When I first began seriously trying to keep film notes I started off with a small notebook. For me though, having to fumble with pen and paper was just not working. So I came up with the bright idea of using a small voice recorder. This worked great! I would record one entry for each exposure and later transcribe the information into a notebook. We both used a micro-cassette recorder for years, until mine just flat quit working. It was worn out and had to be retired.

At this point the digital voice recorders were available and they opened up an entirely new way of record keeping. With the digital recorders it is even easier to keep up with the daily notes. We make one entry for each exposure. The digital file is date and time stamped and it is easy to upload them to the laptop computer. This we do every evening along with updating the daily travel log.

Originally we transcribed each film audio entry into a notebook by hand, but starting about three yeas ago we began typing this information into a computerized form. This form has spaces for Negative Number, Film Holder Number, Development, Image Orientation, f Stop, Shutter Speed, Notes, Filter, Lens, GPS and Date and Time.

This is a somewhat complex way of keeping film data, but it has proven to be well worth the effort, especially when you need to recall the what, when, or how of a particular photo that you made years back. I can go to my film notes and tell you most anything about a particular negative, including the weather.

Keeping notes is also a way to track mistakes. If a particular negative did not turn out as expected, you have all of the information that can provide a clue as to what went wrong. I also record information on my audio entries about location, the light, temperature and anything else that might affect the image, or the photographer. Your notes can be a lifeline to help you track problems.

Detailed records of each sheet of film are not hard to keep up with if you are diligent and keep the process current. Next time I will talk a little about keeping notes in the darkroom. . . and. . . yes, we also keep pretty detailed records of the prints we make.

JB

Posted by JB Harlin in Commentary, DIY, Film, How-To, Photography

DUST. . . A Four Letter Word!

3M field service vacuumYes, the number one adversary of the LF photographer is DUST! Dust is a four letter word in the world of photography. Seems we are always fighting Dust. It gets into everything. The one place you absolutely can not tolerate the pest is on your film. A tiny speck of dust or lint in your film holder will always find its way onto that one area of smooth even texture.

So, the question is how to battle dust? One thing to do is, as mentioned in my previous post titled “Wax On. . . Wax Off” is to wax your equipment. Waxed surfaces are easier to keep clean. Also, vacuum out all of your bags, cases and packs regularly. Before every outing, take the time to disassemble your camera and clean it. Remove the bellows and vacuum out all of the folds, inside and out.

Next comes your film holders. Before you begin loading, dust the table top. I like to go over the surface with a damp cloth just to be sure. Your best friend when it comes to your film holders is a good vacuum. We travel and have to deal with film loading in all sorts of, less than desirable situations. Our number one tool is a small portable vacuum.

I first saw these small commercial vacuums being used by copy machine techs years ago. The vacuum they carry is a small, self-contained, field service vacuum and the most popular seems to be one made by 3M. We searched around and bought a 3M SV-497AJM vacuum on that auction site years ago. One of the best purchases we have made for sure!

A little searching on the Internet turned up this from 3M, “Designed by 3M Corporation for its own office products service department, this durable, reliable vacuum cleaner set the standard for all others. Designed specifically for cleaning toner from copy machines, it also is great for cleaning printers, floors or just about anything else a field engineer might encounter.” The unit is self contained with hose and attachments housed in the top and is 17″ x 6.5″ x 7.5″ weighing 9 pounds.

Our 3M field service vacuum has logged many miles with us over the years and we would not consider travel without it. It is also great to have around the darkroom to help keep dust under control.
JB

Posted by JB Harlin in Darkroom, Film, How-To, Photography, Travel

COVER YOUR BACK?

COVER YOUR BACKDo you cover the back of your view camera with the darkcloth before you pull the darkslide? I certainly do!

Have you ever experienced these pesky little light leaks along the edge of the film that seem to come from nowhere? Gremlins?CLIP Not really. They are caused by any number of things that can go wrong in LF. A holder that has a small leak only when the slide is out, one that does not fit tight in the camera back, a light trap that is worn, or maybe you stress the holder as you remove or replace the darkslide. Thing is, it always seems to show up on that one piece of film you really want to print. Light leaks were seldom a problem as long as we were shooting 4×5, but when we moved to larger film sizes it became more evident. I will say, without reservation, as the film size goes up, the problems multiply exponentially!

The good news. . . the solution is simple, and for us, solved 99% of the light leak problems. Leave the darkcloth on the back of the camera while exposing the film. This way, even if there is a problem with the holder seating or the light seal being broken when removing or replacing the slide, you greatly reduce the probability of a leak.

It has become a habit to clip the darkcloth to the camera back once it is setup, and it remains there till the exposure is finished and the darkslide is back in the holder. We both use small, inexpensive, plastic spring clamps available at the local hardware store, to clip the darkcloth to the camera back. Simple, quick, easy. . . and. . . it works!

JB

Posted by JB Harlin in Film, How-To, Photography

WHERE DO I START?

The question comes up every now and again about getting started processing and printing B&W film in the wet darkroom. Seems that as more and more people come to photography via the digi-snapper route, they eventually become interested in that antiquated art form known as Film. I have said this so many times, have been cursed and belittled by some for my comments, but here it is again. Digital is not a replacement for film. It is simply another art form. There I have said it one more time. If you don’t get it, too bad. Get over it.Do It In The Dark

Now, back to the subject for today, how to get started processing and printing film in the wet darkroom. The question is, where and how do I start? What do I need? Is it hard to do? There are many answers to these questions. You can take a class, find a workshop, or study with someone that is willing to teach you. Or, my favorite method of doing anything. . . find a good book and learn on your own.

If you choose my method the next question is, what book? There are many good books on getting started with film. Also, there are a lot of good web sites on the Internet that will help you. My recommendation is to start where I did over thirty years ago. I found a great book that is geared to the rank beginner. This book does not outline anything that is set in concrete, but if you follow it you will process a roll of film and make prints. Wherever you go from there is up to you. This is where I started and I can say it worked the first time and though I do not use much of the techniques or materials in the book anymore, this was the launching pad for me to move to more advanced techniques. Some of the materials and chemicals are no longer available, specifically the chapters on color, but the basic B&W techniques still apply. This book is a bare-bones, get you started text.

OK. . . enough of my book review, time to get down to brass tacks. First I have to say that the book I recommend is long out of print. But, the good news is the title is readily available on the used market and it is not expensive. I found several copies on the Internet for $1.00! If you are interested in getting started in the wet darkroom, here is a good place to begin. It worked for me, I am sure it will work for you also. Here it is;

“DO IT IN THE DARK”
by Tom Burk
H. P. Books 1975
ISBN 0-912656-28-X

This is one place to start. . .

JB

Posted by JB Harlin in Darkroom, Film, How-To, Photography