How-To

DON’T SCRATCH YOUR SINK

Darkroom SinkIf you build you own darkroom sink or use a commercially available unit, you need something to protect the floor of the sink from scratches and abrasions. It has been a common practice to construct wooden Duck Boards for the bottom of the darkroom sink. These work well, they protect the sink, and allow water to drain, but wood is hard to waterproof and keep from warping.

I have heard of people using plastic lighting grids or plastic rods in the sink, but I have never tired them. I have constructed and used the usual wooden Duck Boards for years. Then I found something even better.

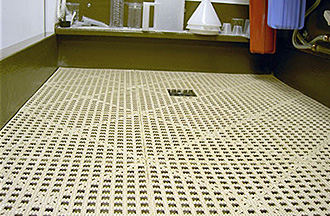
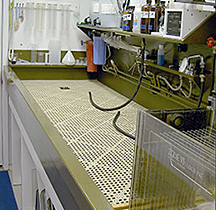
Dri-Dek® is sold as an anti-fatigue flooring for use in commercial work areas such as industrial manufacturing or commercial kitchens. It comes in 12” interlocking squares or rolls. This is a soft, flexible Vinyl that is perfect for the floor of a darkroom sink.

We installed Dri-Dek® in our sink two years ago and it has been an excellent investment. Water easily runs through and under the lattice work, it protects the sink floor, and it provides a soft, yet firm surface on which to work. Note, that the Vinyl does stain when exposed to some chemicals, like Amidol and Pyro, but it has remained flexible and I would not hesitate to recommend it to replace those old, warped wooden Duck Boards.

For more information about Dri-Dek® click HERE.

JB

Posted by JB Harlin in Darkroom, How-To, Photography

WHERE, WHEN & HOW

Snow UtahThey say one image is worth a thousand words, or something like that. I have been asked numerous times to describe the making of some of my photographs. It is strange that I can remember a lot of the details of the moment. I can recall the feel of the place, and the excitement of being there in my mind’s eye. This coupled with my field notes detailing the date, time, and technical information, recreates a somewhat in depth story of the making of a photograph.

I have just started what I plan to be an ongoing project. I will take selected photographs and try my best to tell the story of how the completed interpretation was created. Hopefully there will be something of interest for everyone interested in all aspects of photography. Each installment will cover the making of one photograph, both artistically and technically.

I invite you to stop by the new WHERE, WHEN & HOW: The Creative Interpretation area of our web site.

Enjoy,

JB

Posted by JB Harlin in How-To, Photography

BELLOWS RIBS. . . RAILROAD BOARD???

I have had a lot of really positive feedback on my recent text titled Bellows Building. I would like to thank everyone for the kind comments. There have been several inquiries for more information regarding Railroad Board, exactly what it is and where to purchase.

Railroad Board is the best material for bellows ribs. It is a smooth, thin, Bristol-type board, colored on both sides, that is used for signs, posters, mailing cards, tickets, tags, and so forth. Thicknesses are 4 ply (about .017″ or .43 mm) and 6 ply (about .022″ or .56 mm) and is available in 22″ × 28″ sheets. I recommend 4 ply for small bellows smaller than 8×10 and 6 ply for larger bellows.

You can purchase Railroad Board by the sheet or in bulk packages from Dick Blick. I would recommend black material and here are the stock numbers and the direct link to their on line CATALOG ;

13105-2002 Black 22″ × 28″ 4 Ply
13105-2102 Black 22″ × 28″ 6 Ply

Hope this answers any questions and good luck with that camera rework and bellows building project.

JB

Posted by JB Harlin in DIY, How-To, Photography

MAKING A LENS BOARD

LensBoard001sIf you own a wooden camera, be it a modern model or an old one, you will eventually need a lens board. The first thing most people do is try to find a suitable lens board from a dealer, off the internet or have one custom manufactured. But, did you know it is not that difficult to make your own. And, if you make it yourself you know it will fit!

Most modern wooden lens boards are made of solid hardwood and require three to four pieces of material to construct. Believe me nothing is more frustrating than to go through the process of fitting machining hardwood pieces to have them warp or crack. Also, nothing looks worse than a piece of birch plywood painted black.

So, what to do? I say make your own using plywood. Correct. . . Plywood. It will not warp or crack and is easily obtainable. All you have to do to make it look decent is to veneer the outside with the same wood as your camera and finish it. You will not be able to tell the difference from the solid wood boards.

Take a trip to your local woodworking store, or search on line, for some high-laminate birch plywood in the nearest thickness to the lens board that your camera uses. Hobby shops also sell suitable high-grade plywood. You will also need a few pieces of veneer of the correct type. I cross laminate the veneer and it looks just like the multi-piece hardwood boards. Look on the Internet for tips on wood laminating, it is not that hard to do. Carefully measure an original lens board and using a saw and router duplicate the profile and sand to fit your camera.

The hardest part is drilling the hole for the shutter. Here you will need a Forstner bit that is the closest to the size of the shutter you intend to mount. Remember that most shutters are metric, so choose a drill that is just under the desired size. You can then us a round file and sand paper to adjust the fit.

Once you are satisfied that everything fits, it is time to finish the board. I black the back of my boards along with the light trap offset and edges. I use black India ink which penetrates the wood and dries to a flat, non-reflective finish. Only the veneer front requires a fine finish. I use varnish, you can use spray acrylic if you like. You may have to apply stain to match your camera, experiment on a scrap of veneer first.

It is really easy to make your own high-quality lens boards. The last time I did this I made about six blanks and I still have extra undrilled boards on hand.

JB

Posted by JB Harlin in DIY, How-To, Photography

Dry Mounting Photographs

To dry mount or not. . . that is a question? This debate seems to roll on forever. Sort of like Ford or Chevy? Is there really a correct answer? I have made my choice.
For me there is nothing that comes close to a properly dry mounted photograph. Once I made my choice, all I had to do was learn the process. I worked out a method that gives me what I like, and if you are interested in dry mounting your photos and have never learned the process, I have a little booklet that details my procedure.


This is not the only way, it is just my way. . . and. . . if you are interested, it is FREE!!! Take a look HERE for “DRY MOUNTING PHOTOGRAPHS” pdf download.


Posted by JB Harlin in DIY, How-To, Photography, Presentation

THE SINK FINISH

SINKOnce you become a serious darkroom worker you will eventually want a real darkroom sink with running water. The question is, to buy, or to build? Certainly, if you have deep pockets, you can buy a commercial stainless steel sink. You can even have a stainless sink custom fabricated. Just be forewarned, you are looking at a serious amount of money.

What most do is build their own sink, typically from wood. This is my favorite construction technique and allows me to build a very functional sink to any size required. In the previous post titled “NOT THE KITCHEN SINK” we showed what it took to build a large darkroom sink from wood. Robust construction is essential to make sure the sink does not flex. Flexing can cause the finish to crack and begin to leak.

My philosophy of sink building is to build the thing like a boat. Using construction robust enough to sail the ocean. That way it is strong enough to stand up to most anything. Once complete, I like to climb into the sink and jump up and down. If nothing moves, creaks, or breaks, I am satisfied that I have a good strong sink.

Waterproofing is the next order of business. Caulking all seams is a must to insure no leaks. Next comes some form of durable, waterproof coating. I built one sink years ago and used fiberglass. Never again! Way too messy for me, and I hate working with the stuff.

After much research I found a suitable coating for my darkroom sink. Tile-Clad® HS Epoxy is a two-part, commercial-grade, epoxy-polyamide coating from Sherwin-Williams. This epoxy paint is used in power plants, offshore structures, schools, storage tanks, laboratories, hospitals and marine applications. This stuff dries rock hard and is near impervious to most chemicals.
I have found that two generous coats of Tile-Clad® makes a great smooth waterproof finish for a darkroom sink. You can also have the paint tinted to most any color you desire. Most any Sherwin-Williams store should have Tile-Clad® and be able to tint it for you. Be prepared, this material is not cheap. Seven years ago when we built our last sink it was about $110.00 for a gallon of part ‘A’ and part ‘B’ which, when mixed, makes two gallons of paint.

The main points to keep in mind when building a darkroom sink is make it robust in construction, waterproof, and resistant to chemicals. Whatever finish you choose, whether it be fiberglass or Tile-Clad®, if the sink flexes, the finish will crack. Build your sink like your life depends on its integrity and you will never have leaks nor have to build another. . . unless. . . you decide you need a larger one!

For those interested in why we chose this chocolate brown color, the first sink I built was white. Amidol and Pyro left stain spots all over the sink. We chose the closest color to the stains from the color swatches from Sherwin-Williams and had the paint tinted that color. Developer stains do not show!

BUILDING A DARKROOM SINK

JB

Posted by JB Harlin in Darkroom, DIY, How-To, Photography

NOT THE KITCHEN SINK

DARKROOM SINK

In the fall of 2002 we made the reluctant decision that we needed a larger darkroom sink. This sparked a month long project of designing a new 3 1/2×10 1/2 foot sink. The new, larger, sink was to be modeled after the current, smaller, sink. The same basic idea was to be employed. The sink height would be the same. The depth would be greater and it would be as long as the room would allow, about 10.5 feet.

Cabinets for storage would be constructed at each end of the sink with slots for trays in between. There would be space in the right hand end for the water chiller and racks for chemical storage at each end. The backsplash would be a copy of the old one, only larger, and would contain the same plumbing, including filters, two mixing faucets and temperature control unit.

Having determined the necessary measurements it was just a matter of gathering the materials and getting to work. It took about three weeks to complete and install the new sink. Construction was my usual battle ship, massive over kill, design, using plenty of nails, screws, lag bolts, caulk and paint.

For those that are interested in seeing what is involved in building a wooden sink, click HERE to visit our snapshot album chronicling that little undertaking. This is not your typical kitchen sink!


Posted by JB Harlin in Darkroom, DIY, Film, How-To, Photography

SHEET FILM NUMBERING

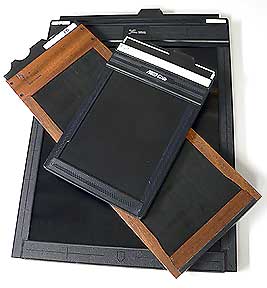
How do you identify sheet film? You put unique numbers on the film holder, but how can you identify which sheet of film came from any particular holder? You may be able to identify the film by taking notes and knowing the subject. But, what if you make several exposures of the same scene, say using different filters? How do you know which filter was used on each sheet?

We hit this impasse many years ago and I came up with a simple solution that has worked for us for years. All you have to do is file a notch code into the film loading flap. We have used this system to number over one hundred 4×5 holders. Want to learn how to modify your film holders? Take a look at “A QUICK & EASY SHEET FILM NUMBERING SYSTEM” for the details.

Hope you find this helpful. . .

JB

Posted by JB Harlin in DIY, Film, How-To, Photography