26
Aug
2012

 They say the more things change, the more they stay the same. Whatever that means. It seems like only yesterday I standardized my chemicals for printing and started using Zone VI Fixer. That was over twenty years ago. But you know, things do change, and they are not the same. We are down to our last box of the old standard Fred Picker Fixer and it is time to start rolling our own from bulk chemicals.
Actually, I started researching this over a year ago and we have obtained several hundred pounds of Sodium Thiosulfate in anticipation of this day. This is the principle chemical used in fixer and though not difficult to acquire, it is expensive to ship. Sodium Thiosulfate Pentahydrate is used in water treatment to remove chlorine. It is available from many pool supply sources. Also, check the Internet and eBay, there are sellers there that will ship to your door. You will need about two pounds per gallon of fixer. We go through anywhere from half a gallon to a gallon of fixer during a typical printing session, so we need a lot of the raw material. But, this is the price you pay when you work in the wet darkroom and we believe it is more than worth the effort.
The next question is what formula should I use. Since we are only talking about paper fixer, then there is no reason to even consider a formula suitable for film. We just need a good, dependable fixer for processing fiber base papers. Now we get into the discussion about acid vs. alkaline fixer. Boy, does that ever stir the pot. Almost like asking film or digital.
Well, I want to change as little as possible and using a running water stop bath instead of acetic acid is just not what I want to mess with. I did not want to change anything, or at least, I wanted to change as little as possible. So, it was immediately determined that an acid fixer was best for us. There are many formulas out there, and everyone has their favorite. I have tested several and settled on what we intend to use.
Also, we needed a formula for plain hypo for second fixing bath and pre-selenium toning. I found what I needed there also, thanks Ansel.
So, if you are interested in what we use, I have added our fixer choice to the Formulas Area of this BLOG. Drop by and take a look. The formulas we have chosen work fine, are simple, easy to mix, and does the job as needed. Obviously, I am not a chemist, and I am not into discussing chemical formulas. For me, working in the darkroom and mixing chemicals is only a matter of finding a recipe that reliably works, sticking with it, and getting on with making photographs. I don’t care much about the innards of chemistry. . . I’ll leave that to the chemists.
Things do change, and they are not the same, but who cares, as long as the results are the same. Fred Picker said, “different is not the same.” I miss ol’ Fred!
 I have always been an advocate of vertical integration. The more you can do yourself, the better control you have of the outcome. For many years I used prepackaged photo chemicals and have never had a problem. But, as the traditional darkroom and the materials used become more and more an alternative process, commercially available photo chemicals are getting harder to find. Some favorite chemicals have vanished. An old favorite, the Zone VI line of print developer, fixer and hypo are now gone from Calumet. I recently witnessed 8 bags of print developer and 2 bags of print and film fixer selling for $127.50 on eBay. That is well over double the original cost from Calumet.
The bottom line is, you can mix your own photo chemicals. Sometimes, if you purchase bulk raw chemicals, you can even save a few dollars. Another plus to mixing your own is the fact that you have 100% control. If something goes wrong, you know who to blame. You can also modify the formula and experiment. Mixing your own photo solutions is not hard. It is not rocket science and you do not have to be a chemist. If you can follow a recipe and bake a cake, you can mix your own chemistry for the B&W darkroom.
The first thing you need to understand is that in order to mix your own photo chemistry you will be handling CHEMICALS. If you are not comfortable with this thought, do not even go there. But, remember that you are surrounded with chemicals. . . the entire planet is made of them. If you take proper precautions and are careful, there is nothing to fear. I am not a chemist, so I have little understanding of deep details and I have even less inclination to study chemistry. Do as I do, assume that everything you handle in the way of raw chemicals are toxic. Do all mixing in a well-ventilated area. Clean up spills immediately. Avoid breathing airborne powders. Always wear gloves and purchase a respirator with proper filter. A little common sense goes a long way.
 As I said before, for me, mixing photo chemicals is nothing less than following a recipe.

For liquids, I use an appropriate size graduate, and for small quantities, a pipette is the easiest way to make accurate measurements. You can use a pipette pump to make loading and measuring easier, or just dip the pipette into the container and hold your thumb over the end. Remember to always thoroughly wash the pipette after use and always use a clean pipette when going from one chemical container to the next. If the pipette is not properly cleaned, you will cross contaminate your chemicals.
Always follow the chemical formula. Most all formulas are mixed in water and there should be a temperature specified to insure the chemicals dissolve. Always mix in the exact order as called for in the formula. Add each ingredient slowly and continually stir until each is completely dissolved before adding the next. This is where a magnetic stirrer comes in handy. Take your time. Do not rush the process. Some chemicals take some time to completely dissolve.
 I use distilled water for all stock solutions. I always use distilled water for stock solutions and processing film. Unless your tap water has known problems, it should be fine for mixing printing chemicals.
Once properly mixed, store each formula in a clean bottle with a plastic cap. Never use metal caps, some chemicals will cause them to rust and contaminate the solution. Brown glass is best for developers and plastic should be fine for most others. Be sure to label each container as to its contents and also include the date mixed. Most all stock chemicals are good for three months, some much longer.
There are many published formulas. Some popular commercial formulas are proprietary, but in many cases there are alternative, similar formulas that are published. By applying a little experimentation, you can tailor your photo mixtures to suit you. Search the Internet for formulas and pick up a copy of “The Darkroom Cookbook” Third Edition by Steve Anchell.

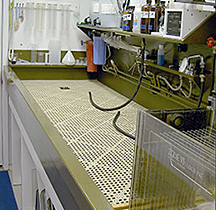 If you build you own darkroom sink or use a commercially available unit, you need something to protect the floor of the sink from scratches and abrasions. It has been a common practice to construct wooden Duck Boards for the bottom of the darkroom sink. These work well, they protect the sink, and allow water to drain, but wood is hard to waterproof and keep from warping.
I have heard of people using plastic lighting grids or plastic rods in the sink, but I have never tired them. I have constructed and used the usual wooden Duck Boards for years. Then I found something even better.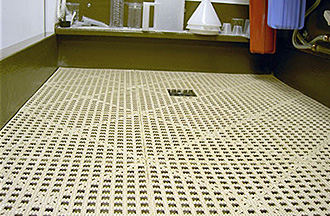
Dri-Dek® is sold as an anti-fatigue flooring for use in commercial work areas such as industrial manufacturing or commercial kitchens. It comes in 12” interlocking squares or rolls. This is a soft, flexible Vinyl that is perfect for the floor of a darkroom sink.
We installed Dri-Dek® in our sink two years ago and it has been an excellent investment. Water easily runs through and under the lattice work, it protects the sink floor, and it provides a soft, yet firm surface on which to work. Note, that the Vinyl does stain when exposed to some chemicals, like Amidol and Pyro, but it has remained flexible and I would not hesitate to recommend it to replace those old, warped wooden Duck Boards.
For more information about Dri-Dek® click HERE.
JB
 Once you become a serious darkroom worker you will eventually want a real darkroom sink with running water. The question is, to buy, or to build? Certainly, if you have deep pockets, you can buy a commercial stainless steel sink. You can even have a stainless sink custom fabricated. Just be forewarned, you are looking at a serious amount of money.
What most do is build their own sink, typically from wood. This is my favorite construction technique and allows me to build a very functional sink to any size required. In the previous post titled “NOT THE KITCHEN SINK” we showed what it took to build a large darkroom sink from wood. Robust construction is essential to make sure the sink does not flex. Flexing can cause the finish to crack and begin to leak.
My philosophy of sink building is to build the thing like a boat. Using construction robust enough to sail the ocean. That way it is strong enough to stand up to most anything. Once complete, I like to climb into the sink and jump up and down. If nothing moves, creaks, or breaks, I am satisfied that I have a good strong sink.
After much research I found a suitable coating for my darkroom sink. Tile-Clad® HS Epoxy is a two-part, commercial-grade, epoxy-polyamide coating from Sherwin-Williams. This epoxy paint is used in power plants, offshore structures, schools, storage tanks, laboratories, hospitals and marine applications. This stuff dries rock hard and is near impervious to most chemicals.
I have found that two generous coats of Tile-Clad® makes a great smooth waterproof finish for a darkroom sink. You can also have the paint tinted to most any color you desire. Most any Sherwin-Williams store should have Tile-Clad® and be able to tint it for you. Be prepared, this material is not cheap. Seven years ago when we built our last sink it was about $110.00 for a gallon of part ‘A’ and part ‘B’ which, when mixed, makes two gallons of paint.
 Everyone that has dabbled with their own film and print processing has been forced to build some sort of minimal darkroom. It is amazing to hear all of the darkroom stories from those that have been there and done that. But the truth is, there are many serious photographers, that have created amazing bodies of work with only the most basic darkrooms.
My first darkroom was in a small closet in a small apartment. I bought a garment rack and my clothes hung behind the bedroom door. A working darkroom does not have to look good. . . it just has to work good. You can load film, expose, and process paper in most any area that can be made lightproof. Once loaded into the tank, film can be processed on the bathroom vanity or kitchen counter. Paper, once processed, can be washed wherever you can set up a washer.
When you start out you may move. No telling how many times you may move before you finally settle in one place. An elaborate and expensive darkroom is nice, but if you relocate, you leave most of it behind. If you rent you have to be creative. I have moved numerous times and the more you move, the better you get at setting up some area as a darkroom.
You don’t need running water, it is nice, but not necessary. You can wash prints in the spare bathroom shower, or tub. One time I had a dry sink made from an old door, with sides screwed to it and painted with enamel paint. I later modified this with a drain, but it ran into a five gallon bucket. This was set up in a spare bedroom, with black plastic over the window. I washed prints in a print washer on the floor of the shower.
You can improvise as required when it comes to the setup. Buy a really good enlarger, with a good lens. The rest is up to you and your budget. A few trays, storage bottles, daylight film tank and chemicals and you are ready to get started. The fact is, you do not need an expensive, nor elaborate, darkroom to make seriously significant prints. Learn to make the most of what is available and put your money and effort into making fine prints. Don’t let the lack of a fully equipped darkroom come between you and your creativity. You can build that dream darkroom later.
 We have been using Pyro based film developers for some time now. So, what is it about a Pyro negative that makes it so desirable? I have yet to completely understand the desirability of the Pyro negative, but I do know there is a depth that just isn’t there with other more popular film developers.
We used Kodak HC110 for years. We even had our own dilution, that we used based on years of experience with the developer. But once persuaded to try Pyro, the HC110 negatives soon became undesirable. I guess the question is, if you have tried one of the Pyro formulas, did anyone else find that little something extra? Or is it just the mystique of using one of the oldest known developers? There has to be something. I can see it in the negative and the print.