
 I have been doing some upgrades to my spotting microscope and due to the interest this seems to have generated, here is more of the story of what I use for spotting prints and negatives and what I have learned.
STAND
The boom stand that came with the original microscope was more than adequate when spotting smaller prints, but the large base sitting on the table top was always in the way when working with larger mounted prints. I was forever having to turn the print to get to the area that needed work. The large, heavy base was always the problem, even though the boom arm reaches out 16 inches. I toyed with several ideas that would have attached the boom I had to the wall, but it still would not have been long enough, nor have enough range to be very workable. What I wanted to do was to get the stand off the table, and make the microscope more mobile.
I did some research and found that you can purchase an articulating boom for microscopes that can be clamped to a table edge or bolted to the wall. The articulating boom arm I found has a reach of 36 inches and will support loads up to twenty pounds. Certainly robust enough for my setup. I found the dimensions of the arm on the manufacturer’s web site and made a quick mock-up from wood to see exactly how the boom would fit on my table. The wall mount version turned out to be exactly what I was looking for. We ordered one and had it in hand by the end of the week. It was a simple matter to locate the appropriate place to bolt the mount to the wall and the entire installation took less than an hour.
The articulating boom is certainly robust enough, it weighs nearly 20 pounds and is made of very heavy steel. This is exactly what I was looking for. It provides a stable support that allows the microscope to cover most of the work table. Positioning the unit is extremely easy now.
ILLUMINATOR
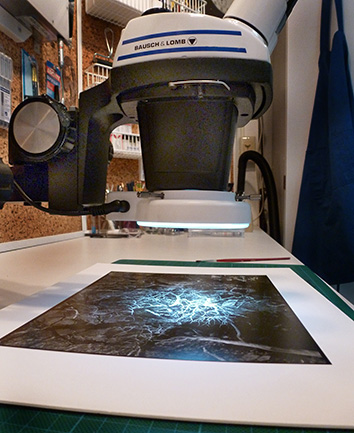
One thing I really wanted was a more even illumination under the microscope. The Bausch & Lomb 31-35-28 Microscope Light Nicholas Illuminator that came with my setup is a simple miniature spotlight. It is certainly bright enough, but the light is very harsh and directional. The unit fits into an angled hole in the back of the Focus Mount and illuminates a small circle of light just below the work area of the microscope. I found that I had to remove the print from under the microscope, find the spot under another light, mark it with the end of my gloved finger, then return the print under the microscope to complete the spotting process.
I replaced the B&L Nicholas Illuminator with a 144 LED ring light. What a difference! The print surface is now evenly illuminated. I can see spots without moving the print by looking around the microscope, then move that area into view and start work on the area. This is much better for sure. The LED ring light is dimmable and generates little to no heat. The lighting is extremely bright, even, and easy to work under.
The B&L SZ4 pod is threaded on the bottom to accept 38mm attachments. In order to mount the ring light you will need an appropriate mounting collar that fits the pod. The ring light I purchased came with a 48mm mounting ring, so I was off to the shop to spin out my own 38mm version. Found a hunk of aluminum and a couple of hours later I had my custom mount ready. Note: You can purchase a 38mm adapter if you prefer not to machine your own.
EYE PIECES
The last thing I did was to upgrade the eye piece set. The original unit came with a pair of very old B&L 10x eye pieces that I really wanted to replace. I have to admit the originals work extremely well, but after replacing them with a new set of wide angle 10x units, the difference was well worth the expense. The newer ones have a larger size that makes it easier to use wearing glasses.
AUXILIARY LENS
So, once I had everything setup one concern I had became reality. The ring light was in the way of my brush due to the very low proximity of the bottom of the microscope to the work surface once focused. I measured the distance from the lip of the ring light to the work surface and found it to be only three inches. But, there is a fix for that also. There are auxiliary lenses that screw into the bottom of the pod case that change the magnification ratio. I purchased a 0.50x lens which does three things. First; it acts as a mounting collar for the ring light (so much for my custom-made ring, oh well). Second; it reduces the magnification of the unit by one half. Third; and most important, it doubles the height of the unit above the work surface.
I now have plenty of room to work under the microscope without bumping it with my brush. Cutting the magnification by one half is not an issue, since I nearly always used the unit at its lowest magnification anyway. Cutting the magnification by one half now gives me a range of 3.5 to 15 x. The single most helpful thing about using a stereo microscope for spotting is not high magnification, but the ability to really see the area you are working on and precisely place the spotting dye on the spot and not the surrounding area.
FINAL THOUGHTS
For most users the tabletop boom stand will be more than adequate for working with prints up to 8×10 inches or even larger. If you have a deep enough work table, placing the base directly in front of you will allow you plenty of working room. My work table is not that deep, so I needed something different, hence the articulating arm and wall mount were my best choice. The tabletop boom stand weighs 34.5 pounds and is very stable. The bulk of the weight is the 0.50 inch thick steel base plate. You can see from the photo below that it supports the microscope at full extension without any danger of tipping over. I have used that setup for years on both prints and negatives.
My new setup is much more user friendly for my work space. The boom swings against the wall, out of the way when not in use and is easily swung out when needed. One more thing you need to do is cover your microscope when not in use. Dust is the worst enemy of all optics. I use a small plastic bag that fits around the microscope body and works well to keep nasty dust away.
I would like to thank Christopher Burkett for his help. He was the first photographer I saw using a microscope and was very helpful in answering my questions and helping me select a unit suitable for print and negative spotting.
I can highly recommend the B&L SZ4, since that is the unit I use. There are many other stereo microscopes that are more than suitable for the photographer. The used market is full of units that have been taken out of service in laboratories or manufacturing. A search on the Internet should find more info on what to look for and what to avoid when purchasing a stereo microscope.
As always, a very good place to look for used microscopes and accessories is the old standby, eBay. There are several instrument sellers that deal in used equipment that have stores you can browse. Again, a Google search will turn up even more used and reconditioned equipment.
Keep in mind that what I have done is upgrade my original microscope that has been in service for over five years and has been very useable in its original configuration. You do not need anything but the basic unit as described in my two previous posts titled “SPOTTING MICROSCOPE” and “MORE SPOTTING MICROSCOPE INFORMATION” to get started.
These are the refinements that I have found that make things easier and more convenient for the way I work. Be good to yourself and your eyes, let alone your art. I keep saying the same thing over and over, you can’t go wrong using a stereo microscope for spotting prints and negatives! Any microscope is better than none, or struggling with another type of magnifier. Hopefully this information will help get you started.
NOTE: I have placed the no longer needed pieces of my original microscope setup in our For Sale area. If you are piecing a setup together, you may be interested in some of the parts I no longer need.
JB
 Since I had posted my original piece titled “

