#TheDarkroomWorkshop

ARE YOU PHOTO READY?

Photo Ready

What would you do if you were asked to show a sampling of your photographs? I am sure you would jump at the chance. . . but. . . what if you were told you would be showing prints? No computer screen, no projection. Now what would you do?

What if today, right now, you were asked to have ten of your photographs ready to be displayed in an exhibition in thirty days. Could you do it? Do have ten photographs that you would put on public display? If so, do you have finished prints ready? Are they, at a minimum mounted? Could you have them dust spotted, mounted with an over mat and framed in a month?

Have you ever had to prepare for an exhibition of your work? Do you have any idea of what is involved in preparing for an exhibition of your work? Do you have the materials on hand? Have you ever framed your work for formal display? Do you have a mat cutter? Have you ever cut your own mats? Yes you can buy precut mats, but do you know where to get them? Do you have frames and glazing? Do you know where to purchase suitable frames? What frame would you choose?

It is not a trivial task and I would venture to say it will take you at least three times as much effort and time than you would expect. I don’t care what your photographic medium is. It matters not if you are traditional wet darkroom, hybrid or all digital; do you have finished prints you can show if asked? Not that you would run into this situation but, could you deliver in thirty days or maybe less?

We always have mat board on hand. In several sizes. We cut our own custom over mats; have frames and glass on hand; have presentation cases filled with mounted photographs ready to be shown on a moment’s notice. We like to be prepared. We did one exhibition of our work which included over 100 framed photographs. I can guarantee that took longer than thirty days to prepare.

The idea is, if you put your time, skill and money into your work, why not have it in a finished state, ready for display? You never know when you may be asked. Think about it.

JB


E-Books

Posted by JB Harlin in Commentary, Photography, Presentation

DON’T THROW OUT OLD PHOTO PAPER

DON’T THROW OUT OLD PHOTO PAPER
There seems to be a lot of people interested in the traditional wet darkroom these days. As many abandon their darkrooms, others are just getting started. I have seen numerous transfers of darkroom materials, chemicals and hardware to newcomers interested in the wet darkroom. . . a lot of times for FREE. There is a lot of old printing paper coming out of storage and being either tossed in the garbage or passed on (without any guarantee what so ever) to those that are just starting out. Certainly a lot of this old paper is fogged to some extent. . . but all may not be lost. If you find yourself in possession of several thousand sheets of a really great paper, depending on the amount of fog, you just may be able to make excellent prints, despite a little general degradation.

DON’T THROW OUT OLD PHOTO PAPERPaper fog, as a rule shows up as a general darkening of the processed paper, thus making pure white in the print an impossibility. You can easily test for paper fog. . . see my previous article, “MEASURING PAPER FOG” for my method for testing paper.

Success is very dependent on the image you are printing, but in most cases, fog can be eliminated in the highlights and whites of the print by simply doing a little selective bleaching. Even deep shadows can be livened up with a little work with a bleaching mixture and a brush. Selective bleaching is not difficult and here is more info from a previous post titled, “A LITTLE SELECTIVE BLEACHING.”

If the whole print requires overall livening up, you can bleach the entire print in a tray.   Look up the formula for Farmer’s Reducer. You may find that you have to over-print the image (print a little too dark) and then bleach it back upward (lightening the image) to restore the image sparkle. You will just have to experiment and find what works best for each print.

Realize that if the paper has severe fog or a mottled, spotty fog, this method will not be of much help. Also keep in mind that even severely fogged paper can sometimes be fixed out and used for other processes. Many carbon transfer printers used old, fixed out paper for their finished images. Old, fogged paper should not be thrown out without first, at the very least, trying to find if it is in some way useable. You never know. . . that free, old out-of-date paper may be a really good deal after all!

Velox

4×5 Contact Print on vintage Velox paper, expiration date of 1958

If you have a lot of fogged paper that you paid little to nothing for, why not give bleaching a try. I have successfully pumped life back into paper that had expiration dates on the box that make it nearly as old as me!

JB

Posted by JB Harlin in B&W Paper, Darkroom, Film, Photography, The Darkroom Workshop

EXHAUSTION; OR, IS THIS STILL GOOD?

Fixer does not soon become “exhausted” in the sense that it can’t dissolve more silver salts. Instead, the trouble is with silver/sulphur complexes that build up as the hypo is used. They can’t be washed out of paper. One of Alfred Stieglitz’s sins was that in spite of excellent training in photographic sciences at the Berlin Technische Hochschule under the great Wilhelim Vogle (whose discoveries made orthochromatic and panchromatic film possible), Stieglitz told the young Ansel Adams that a gallon of fixer is good for thousands of prints. He thought that Kodak’s advice to change the hypo frequently was just corporate greed-anxiety to make big profits selling more dirt-cheap hypo. No doubt that’s why some Stieglitz prints are turning funny colors.*
* Photo Techniques Magazine, “Advanced B&W Printing” 2002, “Photo 303, The Pratt Institute Handouts” by David Vestal, p.40

EXHAUSTION
Nothing lasts forever. And, this is even more true when it comes to photographic chemistry. The question is, how long does the chemistry used in the darkroom last once mixed and what is the exhaustion rate? I firmly believe that trying to milk photographic chemistry for every last little bit is a recipe for disaster. Think of it this way. You have invested a lot of time and money by the time you get into the darkroom. Is it really worth it to try and save a few dollars by pushing your luck with chemistry that may not be up to par? Honestly, the least expensive item you use in the photographic process is the chemistry and water. Why scrimp, and risk disaster?

We calculate the exhaustion rates of all chemical formulas we use. It is very important to know the capacity of the film developers you use. If you try and stretch the chemistry beyond its useful capacity you will ruin your film. Same thing happens with the fixer. Printing paper is the same, except if you make a mistake you can always start over. But with film there is no do-over.

We very closely watch the capacities of the chemistry we use. The basic rule in our darkroom is to assure that we seldom go beyond 50-60% capacity. Film developers are used one-shot, making sure to use an adequate volume of chemistry for the number of square inches of film being developed. Film fixer is ran to 50-60% capacity then discarded. The same criteria is used when printing. Paper developer is used to maybe 60-70% capacity then discarded. Paper fixer is never used more than 60% of capacity.

In our darkroom there are few chemicals that are not discarded after a darkroom session. The only fixer we keep is the rapid fix used for film and it is discarded at 50-60% capacity. The only other chemistry we keep is Selenium Toner. All chemistry is labeled with the date it was mixed. Those that are kept for reuse are marked with the number of sheets of film or paper it has seen.

There is no need to run the risk and facing the consequences of exhausted chemistry when it comes to your photography. As said before, the chemistry is the least expensive item you will use in the whole photographic process, from film to the finished print. It is not worth the possible disaster that scrimping can cause. It is important to know the capacities of every formula used and never run any to full exhaustion. Nor is it a good practice to keep mixed solutions too long. Some formulas deteriorate rapidly once mixed. Know your chemistry and use it wisely!

JB

Posted by JB Harlin in Darkroom, Film, How-To, Photography, The Darkroom Workshop

WHAT TO DO ABOUT THE EDGES

WHAT TO DO ABOUT THE EDGES

When looking for a suitable photographic subject, the subject should be the focus of the finished print. You want the viewer to be drawn to what you have chosen. Problem is, it is easy to become obsessed with that subject and blind to its surroundings. Have you ever taken a photograph of something or someone and been surprised when you see that in the finished print there is some nasty, distracting object somewhere in the background? Or maybe at the edge of the frame something shows up that really ruins your creative intention. How can this happen? I believe it is because you are mentally so focus on the subject that you completely ignore the surroundings. This is something you will learn to pay attention to after a few failures.

I learned this lesson years ago the hard way. This is why failures are important. You need to analyze your mistakes and learn not to repeat them. There is no great loss in failing. Failure can be especially important if you learn from your error. The idea is to analyze the problem and not keep repeating the same mistake. I find myself constantly scanning the edges of the frame when composing on the ground glass. I have even noticed, mostly unconsciously that I find myself scanning the edges of the frame when watching a movie. I know the director intentionally wants you to focus on the subject of the scene. Yet I am always looking at the background and what surrounds that subject. The movie set is there to establish the mood and to give the illusion of a place and time. I am fascinated by how much time is spent on the surroundings in a really well made movie. Most people completely ignore the objects surrounding the actors. I find I am always paying very close attention to those things that are not suppose to be obvious or are suppose to be ignored. This is a mindset that is learned over time.

It cannot be stressed enough that the edges of the photographic frame are important. How important? They could be much more important than the chosen subject itself. It’s your job as the photographer to make sure everything in the photograph works together. Interestingly enough, the subject is the subject and it usually takes care of itself. It’s those nasty little distractions that surround the subject that can make or break a really great photograph. Personally I find that once I have zeroed in on my main subject, I tend to spend a lot of time working with the surroundings.

Remember, you can always move the camera. If moving is not an option, you can try another lens. For fine tuning, you also have camera rise/fall and shift. The idea is to never let something distracting in the background or at the edges become something that interferes with your creative intention. Use those elements at the edge to reinforce your subject.

My best advice is to spend a lot of time on the frame edges. You will not regret it!

JB

E-Books

Posted by JB Harlin in Commentary, Photography

PRESTO, MAGIC AND SECRETS

PRESTO MAGIC AND SECRETS

It seems that working in the darkroom is magic. Developing film has little visual magic, that is to say, you see no magic, because most all film processing is done in total darkness. The magic is reserved for when you turn on the lights. But, printing is a different story. Under the dim glow of the safelight you can actually see the printed image appear, seemingly from nothing. It is a magical experience to see the photograph develop right before your eyes. No matter how many times I process a print, it is still magic to see the transformation. There is something that is otherworldly about what happens in that tray of liquid. But is it really magic?

It is well understood that a magician performing slight of hand or an illusion has many secrets. If you knew how a magic trick was done, it would ruin the experience. So in the world of magic, there are many secrets. And the working magicians guard those secrets well. Though photography seems to be magical, there are no secrets. There are no secret formulas, techniques or mystical incantations used when making traditional photographs in the wet darkroom. If you dig deep enough, you will find just about everything you would ever want to know about photography. There are no hidden secrets, only the basics of the process. Once these basics are mastered, there are many variations and techniques one can apply to achieve their personal vision.

I can say without reservation that I have no secrets. What I have learned over the years is the product of finding those techniques that work best for me and applying them as I see fit. Working in the wet darkroom and with film is about starting with the basics. You need a firm foundation of craft upon which to build your creativity. Next you apply different refining techniques and utilize them as needed to suit your vision. And what is so interesting about this is, you can do the same. You have to find what works for you.

I can also say that I never stop learning. Every time I step into the darkroom I push the boundaries of my abilities. I strive to continually learn new things that work for me. Interestingly enough, nothing I do is particular to me. Everything I do is something I learned from someone else, or an article, or publication I found. There just are no secrets. It is a matter of rolling up your sleeves and expanding your proficiency by doing.

My best advice to the newcomer to traditional photography is to come to the realization there are no magic bullets. There are no short cuts. You will only master the art form through seriously and continuously striving to achieve the results that suit you. Never stop learning and expanding your abilities.

Sorry, prestidigitation will not work. Don’t waste your time looking for that magic shortcut. . . it doesn’t exist. But the good news is there are no secrets. You only have to roll up your sleeves and learn the process, the old fashion way. You can’t say PRESTO and pull a beautifully printed photograph out of your hat!

JB

E-Books

Posted by JB Harlin in Commentary, Darkroom, Film, Photography, The Darkroom Workshop

WHY BLACK & WHITE?

WHY BLACK & WHITE?

Recently Susan and I went to a presentation from a local photographer that works for one of the camera stores. Or should I say computer store, since all he seemed to talk about was the latest computerized camera. This month’s do everything offering. That aside, I really don’t care how you make your photographs. That is your business and this is not another digital versus film discussion. What interests me is the idea of color versus black and white. And it isn’t only my opinion that you will be bored to hear me yap about.

What we saw was about an hour of the presenting photographer’s work. I’ll not even comment on that either. During the presentation there were several examples showing how color photos could be transformed into black and white. This presenter showed several examples of the original, then the black and white, followed by a side by side of the two.

What made my entire day, or should I say evening, was the comment from a couple sitting just behind us. One whispered to the other, “look at how much more detail there is in the black and white.” I could have jumped up and screamed YES! But, of course I didn’t. What I immediately thought was, here is one person in this room of 50 to 60 people that ‘gets it!’

Yep. . . I love black and white!!!

JB

NOTE: The example photo above is not one from the presentation mentioned. It is an example of one of JB’s photographs. Naturally, the depth, feeling and presence of the actual finished B&W print is lost in this representation. Depending on the resolution of your viewing screen, hopefully the idea remains.

E-Books

Posted by JB Harlin in Commentary, Film, Photography

FEELING & TOUCHABILITY; NOT NUMBERS

Feesling & Touchability

artificial intelligence (AI)

from Wiktionary, Creative Commons Attribution/Share-Alike License

n. Intelligence exhibited by an artificial (non-natural, man-made) entity.

n. The branch of computer science dealing with the reproduction or mimicking of human-level intelligence, self-awareness, knowledge, conscience, thought in computer programs.

n. The essential quality of a machine which thinks in a manner similar to or on the same general level as a real human being.

n. a computer system or software package which is artificially intelligent


HogWash!!! Numbers can not quantify a feeling; I don’t believe that even the most advanced AI will ever replace human emotion. A computer only crunches numbers. . . and only ones and zeros at that. It doesn’t think, it just computes. AI may ‘mimmic’ human thought, but it is not human. It is not capable of emotional intimacy.

This is especially true when it comes to the appreciation, recognition and understanding of art. And in particular, photographic art. Photos have a LOOK, FEEL, PRESENCE. A quality that is extremely difficult to put into words, and impossible to mimic with numbers. You can run tests and plot curves forever, but you will not KNOW for sure what a film, paper, developer combination is really doing until you make a real photograph.

I keep coming back to the same point; you can not calculate feeling. There are some things that just exist and are not possible to be explained by a mathematical expression. They are emotional expressions. . . emotional responses. . . subject to any number of personal preferences of the individual. These preferences are the product of what make each person an individual. You cannot measure these things. . . they are subjective. Think about it; can art really be expressed by numbers???

It is about personal taste. . . Ford or Chevy. . . Coke or Pepsi. . . green or blue. One size does not fit all! What you may find perfectly acceptable in a film developer combination may not suit my taste at all. My father used to say, “that is why they paint cars different colors.”

Don’t get hung up on the numbers and technology. Believe it or not, the computer inside that camera cannot think for you. Let your natural intuition guide you. If the finished photograph looks satisfactory to you, then you are there. If not; try something different. Don’t expect some computer gadget to make that decision for you. And, while you are at it, do not be swayed by another person’s comments. Only you know when it is right. When it feels right; it is right.

JB

E-Books

Posted by JB Harlin in Commentary, Film, Photography

WHAT CAN WE DO?

Film Is Not Dead
Susan and I were recently invited to visit the camera club we were members of many years ago. Back in the days before digital turned camera clubs into computer clubs we were both serious club members. Susan is a past club president and I a past vice president. Over the years this club’s membership has changed and many of the old hands we knew have moved on. The majority of those attending were new faces, but there were quite a few dedicated members we knew from years past.

The meeting brought back fond memories of being in a room with fifty or more like-minded people, all sharing their interest in photography. We had a great time visiting and catching up with what our old friends are up to now days. The group seems to still be motivated, with several photography outings planned and even a few workshops. Of course all they seem to know about is digital, PhotoShop and LightRoom.

What struck me like a bolt from the blue was the remarks that came up when the word film was added to the conversation. Blank faces; jaw drops; and a look of confusion when we mentioned we still shoot film. The same questions came up; you can still get film? When informed that film was still there and gaining in popularity, there was even more silence.

This just dumbfounded me and leads me to question myself. I have to ask, what can I do to get the word out about film? Here we were with a group of motivated photography buffs, and all they seem to be aware of is one single path for photographic expression. This situation begs the question, what can we as dedicated film shooters collectively do to make sure the world knows film is still there? Maybe we should all attend our local camera clubs and try to inform everyone that there is an alternative to being a computer club. If you are interested in the art and craft of photography, there should be a well rounded interest in all forms of visual expression. Film, digital, alternative processes; they are all valid. Even today! Our interest centers around traditional film and wet darkroom and that is what we do. Thing is, others interested can do it too. . . if only they knew it still existed.

Hello World. . . Film Is Not Dead!

JB

E-Books

Posted by JB Harlin in Commentary, Film, Photography, The Darkroom Workshop

WHAT IS YOUR LEVEL OF DEDICATION?

WHAT IS YOUR LEVEL OF DEDICATION TO PHOTOGRAPHY?

There is an old photographic saying that goes something like; “if you buy a camera, you are a photographer; if you buy a piano, you own a piano.” No matter what your experience may be with the camera and making photographs, my question for you is, what is your commitment to photography? Are you dedicated to making photographs? Do you make prints? Or, are you only interested in the hardware?

When I think of what a truly dedicated photographic artist would look like, I think of Edward Weston. He lived a very simple life. He was not a camera aficionado. Edward did not have an elaborate darkroom. Yet he created some of the most influential photographs of his time. He was all about the finished image. Certainly he was a master of his technique and the hardware he used. But technique and hardware were only the tools he used to do what he loved.

One trend I find disturbing is that people today do not make prints. There is something very special about a finished print. Whether held in an album, or framed on the wall. Just the act of making a print says there is something special about this particular photograph. It requires, even demands you look! Not a casual glance, but to really take the time to look at what is there.

I don’t care what hardware you use, do you make finished prints? Do you feel your time, money and effort is worthy of making a print? Do you go out and shoot several hundred images, look at them maybe once then discard them? Why not go out with the intention of making only one photograph which you will then take the time to make a finished print from? Why not intentionally go and make only one or two, or three photographs? Then choose the best, and take the time to make a print. Hang it on your wall and live with it. Show it to everyone you know.

Maybe, just maybe if you made prints and did it often, you could influence others to do the same. Why not be different? Why not get out of the rut of snap, look and discard? Why not demand that people look at what you do? Make a statement! Do it to the best of your abilities. Make a finished photograph. . . make several. Be tough on yourself and make photographs that say something to you. If you reach others, then you are doing something worthy. You are expressing yourself and not just flashing something on a little screen to immediately forget and discard.

Why not be a trendsetter? You never know, you might even surprise yourself!

JB

E-Books

Posted by JB Harlin in Commentary, Darkroom, Film, Photography, The Darkroom Workshop

PRE-SOAK FILM; YES/NO

PRE-SOAK FILMHere is another one of those subjects that seem to come up and usually divides those that participate in the discussion into two distinct camps.  Do you pre-soak your film, or not?  For me, there is no other choice when processing sheet film.  I process in trays, multiple sheets, using the shuffle method.  I have done this for as long as I have been using sheet film.  In fact, I have always pre-soaked film, even back in the days I processed 35mm and roll film in a tank.
 

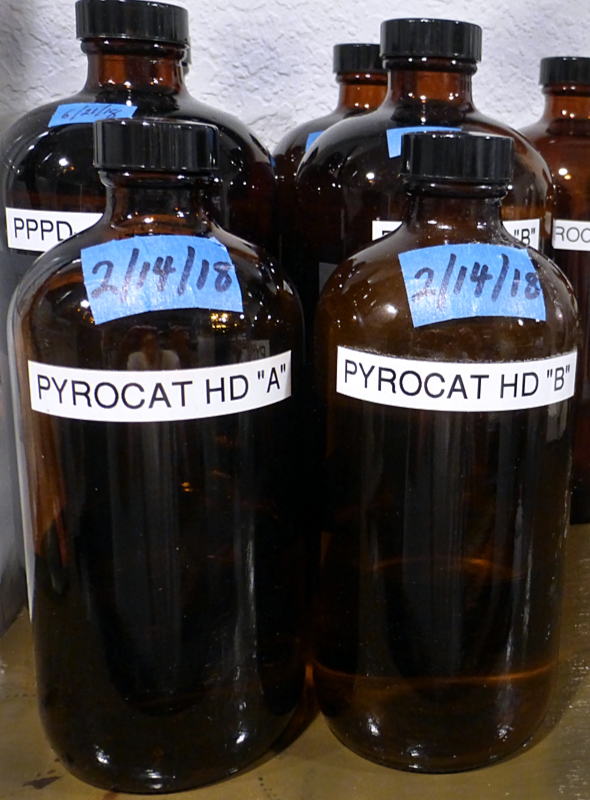
A pre-soak is absolutely necessary when using the shuffle method in trays.  If you drop a pile of sheet film into the developer dry, you will end up with a pile of film all welded together.  Each sheet has to be placed into the pre-soak tray, one at a time, and allowed to sit for a few seconds to insure each is adequately wet before adding the next.  Once I have all of the film in the pre-soak, I begin to shuffle, start the timer and continue for a minimum of three minutes.  The stack is then lifted out of the tray, allowed to drain, then it is off to the developer.

As a friend has said on numerous occasions, he believes not pre-soaking is only a manufacturer’s way of trying to speed up the process for those that do not want to add an extra step.  Pre-soak not only keeps sheet film from sticking together, I believe it allows for more even development, since the emulsion is already wet and prepared to better and more uniformly absorb the chemistry.

I have never seen any ill effect from pre-soak and I would not hesitate to recommend it to anyone that asks.  Though, I am sure there are others that will tell you all about how it is not what should be done.  One thing you will notice is the pre-soak water will have some color to it when you turn on the lights.  This is simply dye in the film emulsion, and depending on the film, ranges from light blue, to a nice bright green.


So, pre-soak or not. . . this one is up to you, but if you ask me I would say definitely yes.


JB

Posted by JB Harlin in Commentary, Darkroom, How-To, Photography, The Darkroom Workshop