
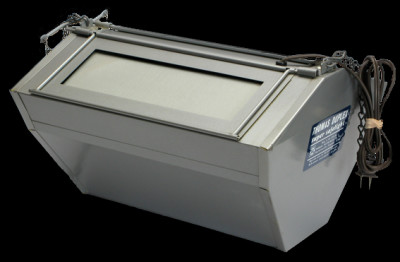
 Had an interesting discussion the other day with a group of photographers about the Thomas Duplex Super-Safelight. This is one of the best safelights you can own. They are bright, powerful and will fog your paper before you can say Look Out! Honestly, these things are designed to light a very large darkroom, I would say, far beyond the size that most of us are accustomed to having the privilege of owning. They come with several glass-mounted filters that are designed for different darkroom uses, but there seems to be a lot of confusion as to what filters to use and how this all works.
So, let’s begin by trying to better understand just how the Thomas Duplex Super-Safelight works. This is really an ingenious device that uses technology designed for something completely different. If you have ever looked inside of the unit you will see a strange looking glass lamp. This is the heart of the Super-Safelight. . . a Low Pressure Sodium lamp. . . designated in the industry as an SOX lamp. Without getting into a lot of very technical talk, this SOX lamp is an extremely bright light producing device. . . you get a lot of light per watt of electricity used. But there is a trade-off. . . the spectral output of the lamp is extremely narrow. In the simplest terms, there is a lot of light, but it is just one color. How this narrowband light is generated and the details of the lamp itself are way too complicated for this discussion. For the photographer, how to use the lamp is much more important. You do not need to know how to build a car from a block of metal to drive it. If you are really. . . really. . . really. . . interested in the technical stuff, here is a LINK. Also an Internet search will turn up even more technical info.
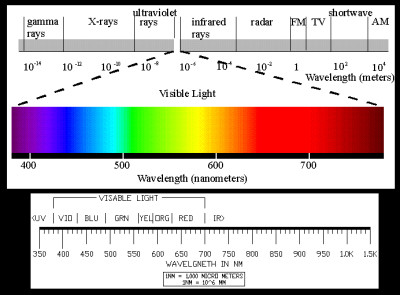
Electromagnetic Spectrum
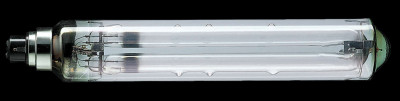
Low Pressure Sodium Lamp
What we photographers are really interested in is the spectral output of the lamp. The SOX lamp produces a virtually monochromatic light, averaging about 589.3nm wavelength. I know, more of that technical talk. What is important to know is that this wavelength of light from the SOX lamp is outside the main spectral sensitivity of B&W printing papers. This is what makes the Super-Safelight unique.
So, roughly speaking, we can say that graded papers are mostly blue sensitive, and VC papers are mostly sensitive to blue and green light. Again, roughly speaking, graded papers are mostly sensitive to about 450-500nm wavelengths. While VC papers are roughly most sensitive to about 400-570nm wavelengths.
Now with a rudimentary understanding of the SOX lamp spectral output, it becomes obvious that it is well suited for use in a photographic safelight. The thing is, these lamps put out so much light that they are a danger to photographic printing papers. If you look at the spectrum, you will also notice there are other wavelengths in the blue and near green that can cause fog. A proper cutoff filter will remove them.
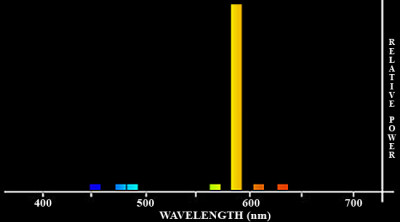
Spectral output of SOX Lamp
Even with the greatest spectral output beyond the main sensitivity range of the papers, if you expose the paper to too much light you will get fog. You have to attenuate the SOX lamp output even further. I have made my own filters for my Thomas Duplex Super-Safelight and it is not that difficult, nor is it expensive. I have another post on this BLOG that deals with the proper cutoff filter and using ND filters to tame down the light output. You will find the post titled, “THOMAS DUPLEX SUPER SAFELIGHT FILTERS” contains the details of how to make your own B&W filters.
You will also note in this previous post that I have replaced the lamp in the Super-Safelight we use. The stock unit comes with a 35 watt (SOX35) lamp, which in reality is way too much light for the small darkroom. The thing is just way too bright for our darkroom which is 9 1/2 x 16 feet. Realize that there is no practical way to electrically dim the lamp. So, I did what I usually do with most everything around here; I looked to modify how it works.
Doing a little research I found that the smallest SOX lamp available was 18watts (SOX18). That is what I wanted; less wattage; less light! If you choose to do this, keep in mind that the ballast and capacitor are specific to the lamp. If you want to change the lamp wattage, you have to purchase the appropriate ballast and capacitor. If you are not comfortable working with electricity, please ask for help, or do not attempt this. But, if you decided to move to the lower power lamp, there isn’t much to it. You simply swap out the ballast, the capacitor and the lamp.

SOX Magnetic Ballast & Capacitor
Using the SOX18 lamp will greatly decrease the light output of the Super-Safelight. This coupled with the use of the proper cutoff filter and ND filters will allow you to tame the light output to a manageable level in the smaller darkroom.
NOTE: One more thing; the stock Thomas Duplex Super-Safelight uses the older magnetic ballast and external capacitor. This is what I used and this was near 20 years ago. Now you can purchase an electronic version of the ballast but I have absolutely no experience with them, so you are on your own there.
Now you know how the Thomas Duplex Super-Safelight works, and hopefully how to best use it in your darkroom. Do Not Forget to TEST to be sure your safelight is SAFE!
JB
 Seems the last couple of times I have tested the darkroom safelight I have had to cut down the illumination. That should be a clue that the filters are fading and it is time to replace them. We use a Thomas Duplex Super Safelight that I rebuilt many years ago. Since we have a small darkroom I knew I needed to attenuate the light. My original safelight was modified when I rebuilt it and the 35 watt lamp was replaced with a 18 watt lamp. Note: You have to replace the ballast and start capacitor if you change the lamp wattage. Wasn’t that big a problem seeing how the original ballast was no good. I purchase the safelight many years ago not working for little to nothing.