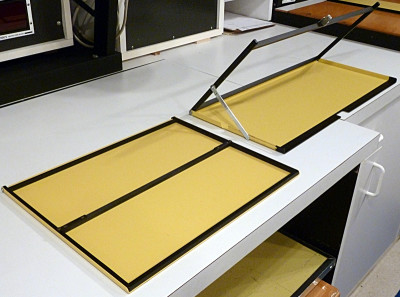
Custom modified 5.5 x 14 & 8 x 20 printing easels
Seems the more you do the more you need to do. Or, maybe more accurately, the more you do unique things, the more custom hardware you need. Either way, seems there is always some project that needs to be addressed.
Susan started working in the pano format exclusively about 11 years ago. She shoots only 4×10 and 8×20 film. This means she enlarges her 4×10 negatives to mostly 5 1/2 x 14 or 8 x 20. She cuts 11 x 14 and 16 x 20 paper in half when she prints. Not much of anything exceptional there, except you need some sort of non-standard printing easel when making such prints. For years now she has been using a modified 16 x 20 Saunders Speed Easel and an adjustable easel for 5 1/2 x 14. Thing is, these easels are very large and the way our 8×10 enlarger is setup, you have limited baseboard area. What she wanted was a custom easel for the 8 x 20 for sure and something similar to her modified 16 x 20 using an 11 x 14 Speed Easel.
This is not that difficult of a machining project. . . just requires a little thought, some metal and the magic ingredient. . . time! Oh, and a couple of spare Saunders Speed Easels to perform a modification upon. We did find the easels on eBay, and I had ordered the material. . . finally I found the time.
For the 8×20 easel the idea was to cut down the hold-down border to the correct size, then cut the base to match. This would make a custom 8 x 20 Speed Easel. The actual re-fabrication was not too difficult. It took more time measuring to make sure things worked out to the right print border size, since this is a cut once type of project. I machined a new cross bar for the hold-down, made sure it was a good fit and drilled and tapped the ends. Next I cut off the unneeded portion of the stock hold-down, drilled the side bars and assembled the new 8×20 border hold-down. It all fit just about right.
Next I needed to cut off the unneeded portion of the base of the easel. I carefully measured and marked the needed cut. The bandsaw did the rest. A little dressing with a large flat file and the new base was almost done. Since the larger Speed Easel has a locking mechanism to keep it closed, I needed to add a relief in the base to clear the latch. That required a little more bandsaw work, followed by some finishing up in the vertical mill and all was well.
Once everything was test fitted, all that was left was a little painting. Since all of the easel is steel, it is a good idea to discourage rust. I lightly sanded the newly fabricated border hold-down and gave is a luxurious coat of self-etching flat black primer. . . done. The base was a little different. I really didn’t want to repaint the whole thing and finding paint that matched the Saunders yellow was not really an option either. I decided to mask off the end where I had removed the excess base about one inch inward and only paint that portion with the black primer. That way I would get the bare edge of the exposed metal covered and it would not look that bad.
All that was left now was to wait for paint to dry and then assemble. I did have to remove the anti-skid rubber feet from the cutoff piece of the base and glue them to the new 8 x 20 easel. That was it. . . all done. . . ready to use.

For the 5 1/2 x 14 easel modification, I took a much simpler approach. Since the original 11 x 14 easel was small, there was no problem using it on the enlarger base. So, no need to cut the entire easel down to a smaller size. All I really needed to do was machine a new cross bar to cut the easel size in half. I also worried that if I did cut the easel down that the border bar assembly would not have enough weight to hold the paper flat.
I cut a new cross bar from a length of 0.25″ square steel bar and machined up a couple of bracket pieces from aluminum to hold it in place. A little drilling and tapping and six #4-40 truss head socket cap screws and all was ready for some finish work. The new divider bar, along with the brackets were cleaned and given a coat of flat black self-etching primer.

I know this is not a project for the average person to attempt with only a few hand tools. This is not complicated, but does require a degree of precision and tools suited to the task. There are those times you have to build what you need. This is one of those things I do to relax and unwind. I offer this little project as an example of what can be done. If you decide to modify your easel, do proceed with caution.
JB

