DIY

WEIGHT BAGS FOR MOUNTING PHOTOGRAPHS

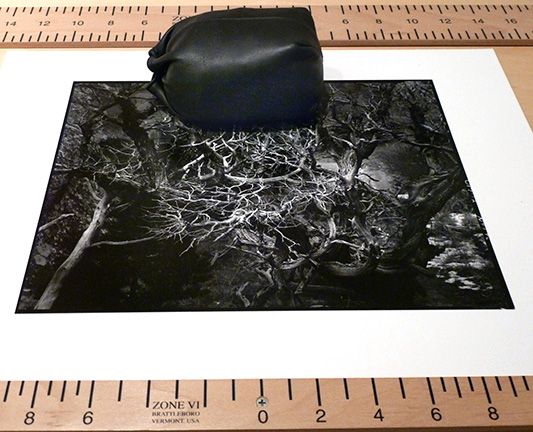
Weight BagLike most everything I do when it comes to photography, I am not the source of the technique, idea or clever device.  I would say that 95% of what I do is something I learned from someone else.  I may add my own twist, but I cannot take credit for the idea.

Mounting photographs is a tedious and time-consuming task that we all must master if we want to display our photographs.  Dry mounting is our chosen method of print presentation.  Anyone that has dry mounted photos knows what is involved.  You tack dry mount tissue to the back of the photo, trim the edges, then align the image on the mount.  It is, at best, a nerve racking chore and one slip then you have just ruined a print.

It is imperative that you get the photograph aligned properly on the mount.  This is a tedious process of measuring and measuring again. . . and. . . maybe you should measure again!  Nothing is more frustrating than when you get everything just right, you bump the print and have to start again.  What you need is something to hold the print in place while you do the final tacking to the mount.  This is where a weight bag comes into play.  For a small print only one small weight bag should be enough.  With larger prints a larger weight bag might be better, or possibly two smaller ones would be better to hold things in place.   Either way, a good weight bag is a big help.

So, now that we have solved the problem of what to do, we need to look at how we can construct a suitable weight bag.  For me, simple is always better. . . inexpensive is even better than simple.  So here is how I solved the mounting weight bag predicament.

A weight bag for mounting photographs must be made of some very soft material so as not to damage the print surface.  The perfect material is a synthetic Naugahyde-type material that lens bags are made from.   A good place to look for lens bags is your local camera show.   There is nearly always a box under some table full of such things that range from really cheap to even free.  What you are looking for are the bags that are made of very soft, supple material.  A lot of the bags are made of very stiff, rough material that will damage a print.  I have several size bags ranging from those that were intended to carry large, long, lenses, to those that would hold a small normal lens.  See if you can find several large bags and a couple of the smaller ones.Weight Bags
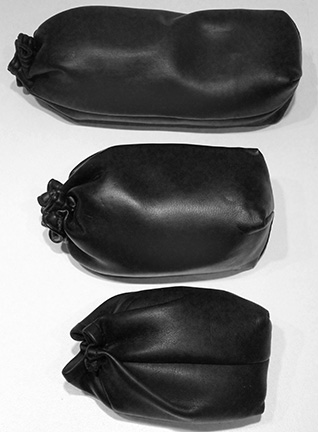
Once you have the bags it is only a matter of stuffing them with a suitable weight material.  I have heard suggestions from sand to marbles.  I would suggest using Aquarium Gravel from the local pet supply as a great weight material.  Any of these items should work well, but I did something completely different.   First, I just don’t like the idea of rocks, sand or gravel in or around my work area.  Second, I did not have that many marbles  (some say I lost all of my marbles years ago).  There was one thing I did have an abundance of and that was pennies.   I had several large jars filled with pennies in the back of a closet.  Why not use them, since they are heavy and should work well for my purpose.

No matter what material you choose for filler, I would highly recommend that you first load your weight material into a heavy plastic bag.  I would even further suggest that you double bag your weight material, just in case.  You will have to adjust the amount of filler needed to fill the lens bag and still allow you to close the drawstring end closed.   Once you have the correct amount of filler in a plastic bag, close them securely with twist ties, or use a heat sealer.  Note:  Do not stuff the inner bags too full.  You want them to be about 90-95% full.

All that is left to do is stuff the bagged weight material into the lens bag and close the draw strings.  I tie the drawstrings off then cut off the excess.

I have had my weight bags, stuffed with pennies, for years and they have served me well.  I use them for print mounting and for weight when flattening prints under a sheet of 1/4 inch glass.  Weight bags are a handy tool to have around.  The next time you are at your local camera store or a camera show, look for used lens bags.   Pick up a few soft bags and make your own weight bags.

JB

Posted by JB Harlin in DIY, How-To, Photography

ZONE VI DEVELOPING TIMER PROBE BRACKET

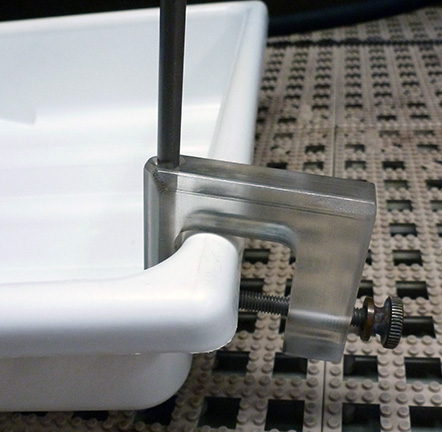
ZONE VI DEVELOPING TIMER PROBE BRACKETI am a firm believer that necessity is the mother of invention.  Let’s face it,  most people do not design and build just for the enjoyment of designing and building. . . at least I don’t.  Many years ago I decided to purchase the Zone VI Compensating Developing Timer and I have used it ever since.  This is a great darkroom tool, and I would not process film nor paper without it.

The biggest problem I had when I first got my timer was trying to come up with a way to mount the sensor to my trays.  Since by this time in my photographic career I was tray processing sheet film, I had no use for tanks and what was sorely missing was some sort of bracket to hold the sensor in the tray.  I tried tape and even a plastic close pin.  Nothing seemed to work, so it was off to think a bit.  I do my best thinking while taking a nap.

After some time contemplating the situation, I finally visualized a clamping device that could be attached to the lip of a tray.  I decided that it needed to be made of a tough material that wasn’t affected by chemistry and would be easy to keep clean.  So I chose to make my clamp from a chunk of Acrylic.

I dug out an old hunk of scrap Acrylic from the junk box and began working it into shape with a band saw and vertical mill.  What I eventually came up with was a prototype temperature clamp that I have been using for over ten years now.  Take a look at the accompanying photos and you will see a very well used piece of darkroom equipment.

I have always wanted to improve a little more on my original design, but just never got around to it, until now.  Though my prototype shows no signs of degradation, it is well stained from the Amidol days and my biggest concern is that there might come a time when the Acrylic would fail.  You know how nothing ever fails except when you really need it.  I could envision this thing breaking in the middle of a printing session or even worse, in total darkness during a film run.  Though from careful examination of the original, I can see no signs of failure.   Still, I always like having a spare on hand.

So, having decided I need a spare clamp it was time to do a little redesign and then off to the shop to cut up some Acrylic.   I beefed up the clamp a little and reworked it so it could be drilled for both sizes of probes that came with the original timer.  Yes, we do have a spare timer also.  The only thing is the spare is the newer unit and uses the larger probe.  My original Zone VI Compensating Developing Timer came with a probe with an OD of 0.1875 inches, while the newer model has a probe diameter of 0.250 inches.

As with most projects of this type, it is just as easy to make several as it is to make one.  I cut up all of the Acrylic that I had on hand and made a handful of Probe Brackets.  I still have some hardware on order, but I already feel better knowing I have spare parts on hand.

JB

Posted by JB Harlin in Darkroom, DIY, Photography

THOMAS DUPLEX SUPER SAFELIGHT FILTERS

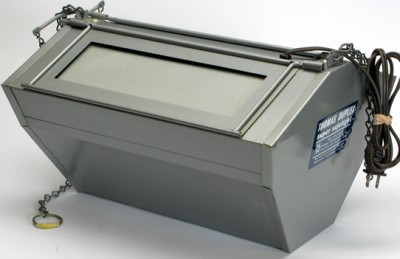
Seems the last couple of times I have tested the darkroom safelight I have had to cut down the illumination.  That should be a clue that the filters are fading and it is time to replace them.  We use a Thomas Duplex Super Safelight that I rebuilt many years ago.  Since we have a small  darkroom I knew I needed to attenuate the light.  My original safelight was modified when I rebuilt it and the 35 watt lamp was replaced with a 18 watt lamp.  Note:  You have to replace the ballast and start capacitor if you change the lamp wattage.  Wasn’t that big a problem seeing how the original ballast was no good.  I purchase the safelight many years ago not working for little to nothing.
So, now I needed to replace the filters.  Since I am only interested in B&W, work that simplifies things for sure.  All I need to find is the correct filter and then I can assemble my own replacement.  I have plenty of scrap glass, and tape.

With a little research on the Internet I discovered that the hard part had already been done.  Seems a Rosco #19 “Fire” filter has the necessary bandwidth to filter out the annoying green and blue spikes in the low pressure sodium lamp spectrum.  And, seems that others had proven this the best way possible. . . they tested it in their own darkroom.

All I needed was to order some filter material.  Rosco filters are the industry standard for stage and film production and readily available.  That was way too easy.  The thing that I was still toying with was how to adjust the light output.  It finally came to me.  Why not put the #19 filter in the body position and then add a Neutral Density filter to the vane?  Yep, that would do it.  So I ordered a sheet of Rosco #19 filter and a sheet of 0.30 ND.

We have a lot of scrap glass around.  I cut new glass to fit the body and vanes using TruVue Conservation Grade UV glass.  Thought it wouldn’t hurt to add even more filtration.  I also found out why the factory uses tissue paper.  Without it, the filter material does not look that great against the glass and I could see that if any moisture were to condense in there, it could be bad for the filter.   I really didn’t want to use tissue paper and I had a roll of Gila frosted window film from another project.  This stuff is a self-adhesive plastic material used to frost windows.  It was exactly what I needed to put a smooth textured surface on the inside of the glass to keep the filter from sticking.  It also works well to diffuse the light.

One of my favorite tapes is the aluminum HVAC ducting tape.  It is lightproof, sticks and stays in place.  Slit a few pieces of tape, peel the backing and it will hold the filter sandwich in place with ease.

I placed the #19 filter in the body and 0.30 ND in the vanes.  My first test showed there was still too much light.  I was testing at my closest point to the safelight for the worst case situation.  I ended up adding a second layer of 0.30 which made for 0.60 ND, which is two full stops attenuation.  But remember, I was testing with the most sensitive VC paper we use at a very close proximity to the safelight.  Always test for the very worst case scenario. 

Once finished, I found that the darkroom is much brighter than before.  This proves that the filters do fade.  Now we are back in business.   With the vanes fully closed all VC and standard papers are safe.  I like to print on Azo, which allows me to open the vanes for even more light.

I will test again in a year or so and if I need new filters they are easily replaced.  I have plenty of material, the Rosco filter comes in a 24 x 24 inch square.  Enough for several more safelight filters, if and when they are needed.

JB

Posted by JB Harlin in Darkroom, DIY, How-To, Photography

OLD CAMERAS BACK IN ACTION

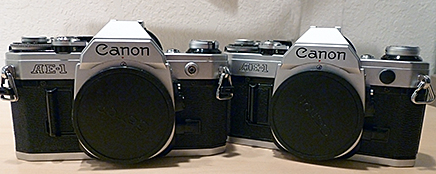
CAMERASAs I said the other day,  gather your kids and grandkids and show them something that was built to last. . . here are two cameras that are near 35 years old and still work!

The other day I drug out my first camera bag from the storage closet.  Inside was my two Canon AE-1 bodies and three lenses.  They have seen little use in the last 20 or so years and at least I did remove the batteries from the cameras and the winders.  Smart move there for sure!

The first thing I notice on inspection was the mirror damper and the body light seal material had turned to black goo.  Yep, they used some of that open cell foam that over time deteriorates into a sticky mess.  Seems that is the norm for these cameras, and others.  I had a friend ask me about this several years back.  I directed him to a seller on eBay that had seal replacement kits and he was able to resurrect his camera and is still using it.  I had all intentions of doing the same, but just never got that round-to-it.

I decided that it was time to rework my 35mm cameras.  They both still work, and neither has ever had the dreaded shutter squeak problem.  I have my first AE-1 that I purchased in about 1978 and a second that I found later used.  They have both seen a lot of action, yet I feel they are still as good as they ever were. . . just need to fix that goo problem. 

Took a little digging, but I found a place that sells seal kits on the Internet.  I ordered two kits and began the process of cleaning up the mess.  By far, the hardest part of this is getting all that goo out of things, but it is something that can be done.  It just takes a little patience, perseverance and denatured alcohol.  If you have some vintage cameras laying around that need some light seal work, here is a place to purchase what you need;

 Camera Seal Kits  http://camerasealkit.com

Camera Seal Kits has light seal kits for most popular cameras.

This is a great project for the summer when it is 100+ outside.  Now I have my two 35mm cameras back in working order, guess I will have to use them for something.  Maybe fall soccer (when it is much cooler) and some action photos of the grandkids on a roll or two of Tri-X.

JB

Posted by JB Harlin in DIY, Photography

DON’T LAY IT ON THE GROUND

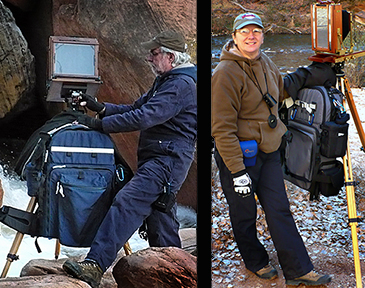
JB&Susan tripod hanger 03Strange how many questions we get about what we do, why we do it, and always how do you do certain things. I never mind answering questions. This is how one learns, and I feel that sharing what you know is very important. We have no secrets. . . no secret methods. . . secret places. . . secret formulas. . . or anything that is in any way secret.
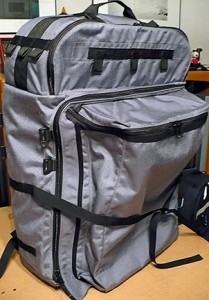
Funny how after our last trip, and sending out our Utah Snapshot Album, I received several questions about our camera packs. One that came up several times was how do you hang the pack from your tripod? We are pretty picky about our camera gear. It is imperative when you are a film photographer to keep any and all foreign materials as far from your gear as possible. I just could never set my backpack down in the dirt, let alone the mud, or snow. HERE is another post on this subject.

Pack Hook B 001 We tend to photograph in remote locations. We are always climbing over rocks, and are knee deep in mud or snow. One of the first packs I used was a really well-made and versatile Art Wolfe design that was perfect for a 4×5. The pack had a small webbing loop at the top and I soon found myself hooking it to one of the knobs on my Zone VI tripod. Worked great!
Things were fine until we moved up to larger cameras and larger packs from f64. They say necessity is the mother of invention.  So we modified the larger f64 backpacks with a hanging strap similar to the Art Wolfe design, since it was not a standard option from them. Later when we designed and built our own packs the hanging loop was a standard, must have, feature.  As our packs got larger and heavier we eventually changed over to Ries tripods and suddenly there was another problem. . . no good place to hook the pack. This was Pack Hook 06a challenge. When I need to think about something, I usually take a nap. I do my best thinking when asleep.
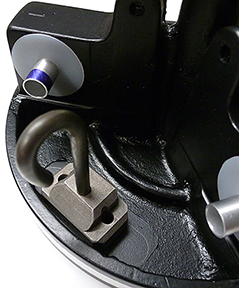
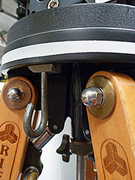
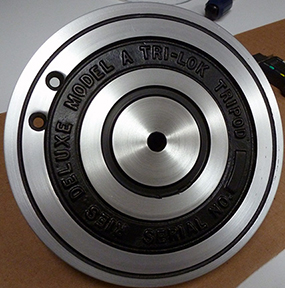
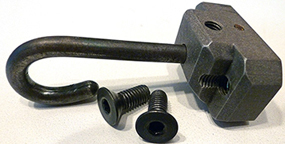
I dreamed up a simple modification to the Ries tripod head that allowed me to add a hook to the under side of the crown. I fabricated a small aluminum block and a hook made of 3/16 steel rod. The rod has to be heated and bent into shape, then quenched to harden the metal. The block uses a 6-32 set screw and a press-fit pin to hold the hook firmly in place. The hook assembly is attached using two 8-32 flat head machine screws drilled through the tripod crown.

Pack Hook B02Ries Pack HookI have added this modification to both our ‘J’ and ‘A’ model Ries tripods and they have preformed flawlessly for years. Ries tripods are extremely well-made and will support well beyond their factory weight ratings. I have hung a 45 plus-pound pack from my ‘A’ model for years now and never had any issues. . . except sometimes heaving that heavy pack onto the hook when in a difficult position.
Take a look at the photos to get a better idea of how I made this modification. I just did a complete rebuild of my 40 year old Ries ‘A’ model and it now has a new coat of paint and the legs have been refinished. It will not stay this nice looking for long. A tripod takes a beating in the field.

The running story around here is that we don’t own much of anything that hasn’t been taken apart and modified in some way. If you work with LF and ULF, you soon learn that there are very few off-the-shelf options available. If you need something, it is probably not made and you will either have to improvise, modify, or build it yourself.

This is how we solved the problem of keeping our pack off the ground. There are those times you just have to make a few modifications.

JB

Posted by JB Harlin in DIY, How-To, Photography

REWORKING MY RIES ‘A’ MODEL

It is really great to be able to fix, repair, and restore your equipment yourself.  I have always been a doer. . . I like to maintain and work on my own equipment when I can.  On our last trip to Utah I noticed that my very old and trusty Ries ‘A’ Model tripod was beginning to show signs of use.  I have no idea how old this one is, but I would guess it was manufactured in the late 1970’s or so.  I have had it for years and it was no where new when I purchased it.  The legs have taken a beating, needed a little work and a refinish.  The top crown paint was chipped and peeling and the previous owner had not used a friction washer between the head and the crown, so the crown top was pretty scared up and needed some attention also.

 What I had in mind was a complete strip down of every part of the tripod, remove all old paint and finish, repair dings and dents as best as possible, refinish everything, then reassemble.  It’s not that hard to dissemble a Ries tripod.  Take care not to damage anything and maybe take a few quick snapshots before you start, just in case you don’t remember exactly how it all fits back together. 

 I completely disassembled the legs, removing all of the hardware so I could sand and refinish the wooden legs.  The most difficult things to remove are the drive pins that hold the leg locking rods to the underside of the crown and leg swivel guides.  An appropriate size punch makes short work of the pins and an arbor press takes care of the guides. 

 At this point I have the entire tripod completely disassembled.  With the application of a little elbow grease, I completely sanded down all of the wooden leg parts, smoothed over the dings, scrapes, and dents, and shot three coats of spar varnish on all six upper and three lower legs.  Next I stripped the old paint from the tripod crown.  Took a few tries and some scrubbing with a brush, but soon I had nothing but bare aluminum.   Since the crown top surface was scored, I chucked the head in the lathe and resurfaced the top.  Next came a fresh coat of black self-etching primer and a bake in the sun for a day.   There is nothing like a day or two in the Texas sun to really cure paint. . . even in winter.

 The leg swivel guides did not fare well being removed from the crown, so I machined a new set.  Once I had the new guides pressed into the crown I also made a new set of friction washers. 

 At this point it was just a matter of cleaning up a few odd parts and reassembly of the entire tripod.  I did not need to do any work on the A250 head since it is much newer than the legs so it was only a matter of adjusting the leg tension and my tripod was ready for action.

 That is the entire process in a nutshell.  The tripod, though it will never look factory new, is now ready for another trip.

JB

Posted by JB Harlin in DIY, Photography

MIXING YOUR OWN

MIXING YOUR OWNI have always been an advocate of vertical integration. The more you can do yourself, the better control you have of the outcome. For many years I used prepackaged photo chemicals and have never had a problem. But, as the traditional darkroom and the materials used become more and more an alternative process, commercially available photo chemicals are getting harder to find. Some favorite chemicals have vanished. An old favorite, the Zone VI line of print developer, fixer and hypo are now gone from Calumet. I recently witnessed 8 bags of print developer and 2 bags of print and film fixer selling for $127.50 on eBay. That is well over double the original cost from Calumet.
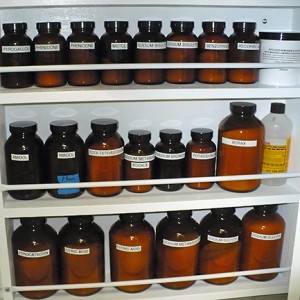
The bottom line is, you can mix your own photo chemicals. Sometimes, if you purchase bulk raw chemicals, you can even save a few dollars. Another plus to mixing your own is the fact that you have 100% control. If something goes wrong, you know who to blame. You can also modify the formula and experiment. Mixing your own photo solutions is not hard. It is not rocket science and you do not have to be a chemist. If you can follow a recipe and bake a cake, you can mix your own chemistry for the B&W darkroom.MIXING YOUR OWN

The first thing you need to understand is that in order to mix your own photo chemistry you will be handling CHEMICALS. If you are not comfortable with this thought, do not even go there. But, remember that you are surrounded with chemicals. . . the entire planet is made of them. If you take proper precautions and are careful, there is nothing to fear. I am not a chemist, so I have little understanding of deep details and I have even less inclination to study chemistry. Do as I do, assume that everything you handle in the way of raw chemicals are toxic. Do all mixing in a well-ventilated area. Clean up spills immediately. Avoid breathing airborne powders. Always wear gloves and purchase a respirator with proper filter. A little common sense goes a long way.

MIXING YOUR OWNAs I said before, for me, mixing photo chemicals is nothing less than following a recipe.
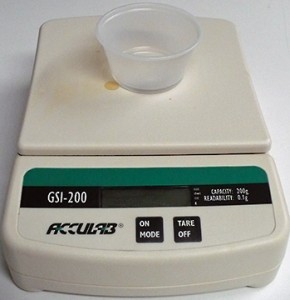
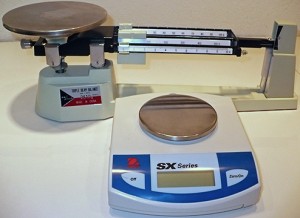
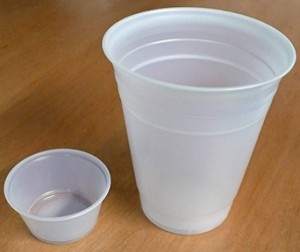
When mixing any photo chemistry formula/recipe you need to accurately measure all of the various chemicals. Most formulas call for dry chemicals measured in grams and liquids in milliliters. I have two scales for dry measure. I have a very accurate digital scale for small quantities and an old-fashion triple beam for larger amounts. I picked up a box of small serving containers at the local big box store to be used as disposable containers for measuring small amounts of dry chemicals. I also have larger 8oz plastic cups for larger amounts. Be sure to use the tare function to zero the scale with the empty container before measuring. Zero the scale with every new container, they do not all weigh the same. Once used, I toss them in the trash. I never reuse one of these plastic containers. This assures there is no chance of unwanted contamination.MIXING YOUR OWN

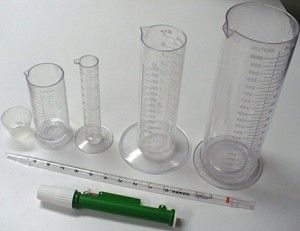
For liquids, I use an appropriate size graduate, and for small quantities, a pipette is the easiest way to make accurate measurements. You can use a pipette pump to make loading and measuring easier, or just dip the pipette into the container and hold your thumb over the end. Remember to always thoroughly wash the pipette after use and always use a clean pipette when going from one chemical container to the next. If the pipette is not properly cleaned, you will cross contaminate your chemicals.

Always follow the chemical formula. Most all formulas are mixed in water and there should be a temperature specified to insure the chemicals dissolve. Always mix in the exact order as called for in the formula. Add each ingredient slowly and continually stir until each is completely dissolved before adding the next. This is where a magnetic stirrer comes in handy. Take your time. Do not rush the process. Some chemicals take some time to completely dissolve.

MIXING YOUR OWNI use distilled water for all stock solutions. I always use distilled water for stock solutions and processing film. Unless your tap water has known problems, it should be fine for mixing printing chemicals.
Once properly mixed, store each formula in a clean bottle with a plastic cap. Never use metal caps, some chemicals will cause them to rust and contaminate the solution. Brown glass is best for developers and plastic should be fine for most others. Be sure to label each container as to its contents and also include the date mixed. Most all stock chemicals are good for three months, some much longer.

There are many published formulas. Some popular commercial formulas are proprietary, but in many cases there are alternative, similar formulas that are published. By applying a little experimentation, you can tailor your photo mixtures to suit you. Search the Internet for formulas and pick up a copy of “The Darkroom Cookbook” Third Edition by Steve Anchell.

Mixing your own is not that difficult. With a little study, careful handling, forethought and experimentation you can mix your own photo chemistry.

Here is a list of things you will need or may want to have;

• disposable gloves
• respirator
• apron
• a selection of required chemicals
• accurate scales
• disposable plastic cups for weighing chemicals
• several sizes of graduates for liquids
• stirring rod
• magnetic stirrer
• pipette
• pipette pump
• glass storage bottles
• plastic storage bottles

Resources:

Bostic & Sullivan
http://www.bostick-sullivan.com

Artcraft Chemicals Inc.
http://www.artcraftchemicals.com

The Darkroom Cookbook Third Edition by Steve Anchell
http://www.steveanchell.com

Pyrocat HD a semi-compensating, high-definition developer, formulated by Sandy King.
http://www.pyrocat-hd.com

The Book Of Pyro by Gordon Hutchings

JB

jbhphoto E-Books

Posted by JB Harlin in Darkroom, DIY, Film, Formulas, How-To, Photography, The Darkroom Workshop

CALUMET SHUTTER SPEED TESTER LF UPGRADE

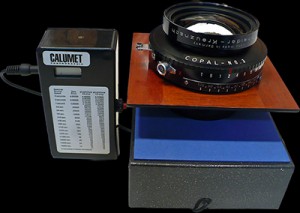
CALUMET SHUTTER TESTERIf you are lucky enough to own a Calumet Shutter Speed Tester, you know it is not exactly ideal for testing large lenses and shutters. I have owned one of these handy little devices for over ten years. I performed a modification/upgrade near ten years ago that makes the tester much more suited to testing large lenses and shutters.

This modification/upgrade is not difficult, but does require a little ingenuity and proficiency with a soldering iron. With a little planning and a good junk box full of odds and ends you can construct a remote trigger for the tester.

Follow the link HERE to our main web site which will take you to the ‘ARTICLES’ area and scroll down the page to download the PDF titled “CALUMET SHUTTER TESTER MODIFICATION: AN UPGRADE FOR THE LF SHOOTER.” This modification/upgrade has served me well over the years. Hopefully you will find this of interest also.

JB

Posted by JB Harlin in DIY, How-To, Photography

YET ANOTHER CAMERA PROJECT

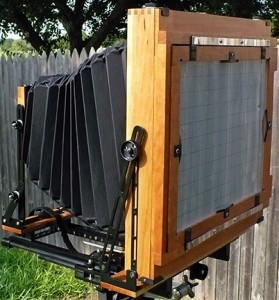
As much as I try to not talk continually about the gear, it seems that I always end up talking shop anyway. So, here I go again talking about another project. Having built two vertical pano cameras for Susan I promised myself no more camera building. Well, I do not seem to listen to myself all that well. I have this thing about big negatives. I have chosen the 8×10 to be my every day format. But there are times that I envision something just a little larger. In reality, my favorite format is 11×14, but the camera I have been using weighing in at about 24 pounds limits its usability. The idea of a more user friendly 11×14 has been rattling around in my head for some time. I spent a lot of time looking at various camera designs with particular interest in the lighter, more back friendly, cameras.

The nice thing about building your own, is you can pick and choose the features and design that best suits you. This is exactly what I did, and I ended up with a camera that is a conglomeration of designs.

The end result is what I call the Ultra-Light 11×14. Here are the specs;

FORMAT — 11X14
FILM BACK — Horizontal/Vertical
BELLOWS — Max: 36.0” Min: 5.5”
FRONT SWING — Limited by Bellows
FRONT SHIFT — +/- 2.0”
FRONT RISE — +/- 3.0”
FRONT TILT AXIS — Limited by Bellows
FRONT TILT BASE — Forward: 45º Back: 90º
REAR TILT — Forward: Limited by Bellows Rear: 35º
REAR SWING — +/- 10º
GROUND GLASS — Acrylic
WOOD — Cherry
FRAME — Composite & Aluminum
FOLDED — 18” x 19” x 6”
WEIGHT — 13.5 lbs

The most important thing here is the last item, Weight! Once all of the camera was finalized, Susan had to build a pack to haul everything. Took several weeks, but I now have a complete 11×14 packable camera system. The pack carries the camera, three lenses, accessories, three film holders, and weighs in under 45 pounds!

Now it is time to get out and get back to what is important, making photographs. This, I hope, will be my last camera building project.

JB

P.S. Take a look at my previous post titled, “THE VIEW CAMERA IN THE FIELD” November 25th, for another photo of the Ultra-Light 11×14 with pack on its second outing.

Posted by JB Harlin in DIY, Photography

KEEPING NOTES

KEEPING NOTESI have written quite a bit about LF and ULF photography here on the jbhphoto BLOG since we started back in January of 2009. A lot of it is my rambling about this or that, and sometimes I tend to repeat myself. Oh well, must be old age??? One thing that I do not remember writing about is keeping notes. We are both meticulous about keeping records of our travels and detailed notes on the film we shoot.
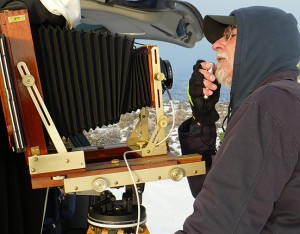
We do several things when we go out on an extended trip. One is to make a lot of snapshots. They are an excellent way to keep track ofKEEPING NOTES the places we visit and are used to plan future trips and serve as a visual reminder of the places and things we discover. We also keep a daily diary/travel log of what, when, and where we were on a particular day. I have to admit that Susan is better at the diary than me, but at the end of every day before we drop off to la-la land, we try to type a few paragraphs. We keep this on a laptop computer and entries continue till the trip is over. It is a great resource, along with the snapshots, later when trying to come up with exactly what happened on any particular adventure.
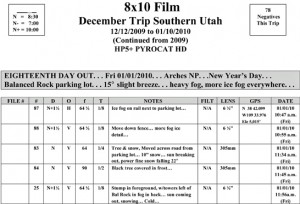
But, the most important notes are those that pertain to the film we shoot. I experimented for some time when I first started shooting sheet film and eventually came up with a record keeping scheme that works. We have both used this method for many years and it has given us detailed records that, when needed, are invaluable.

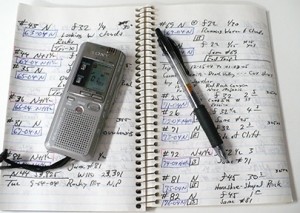
When I first began seriously trying to keep film notes I started off with a small notebook. For me though, having to fumble with pen and paper was just not working. So I came up with the bright idea of using a small voice recorder. This worked great! I would record one entry for each exposure and later transcribe the information into a notebook. We both used a micro-cassette recorder for years, until mine just flat quit working. It was worn out and had to be retired.

At this point the digital voice recorders were available and they opened up an entirely new way of record keeping. With the digital recorders it is even easier to keep up with the daily notes. We make one entry for each exposure. The digital file is date and time stamped and it is easy to upload them to the laptop computer. This we do every evening along with updating the daily travel log.

Originally we transcribed each film audio entry into a notebook by hand, but starting about three yeas ago we began typing this information into a computerized form. This form has spaces for Negative Number, Film Holder Number, Development, Image Orientation, f Stop, Shutter Speed, Notes, Filter, Lens, GPS and Date and Time.

This is a somewhat complex way of keeping film data, but it has proven to be well worth the effort, especially when you need to recall the what, when, or how of a particular photo that you made years back. I can go to my film notes and tell you most anything about a particular negative, including the weather.

Keeping notes is also a way to track mistakes. If a particular negative did not turn out as expected, you have all of the information that can provide a clue as to what went wrong. I also record information on my audio entries about location, the light, temperature and anything else that might affect the image, or the photographer. Your notes can be a lifeline to help you track problems.

Detailed records of each sheet of film are not hard to keep up with if you are diligent and keep the process current. Next time I will talk a little about keeping notes in the darkroom. . . and. . . yes, we also keep pretty detailed records of the prints we make.

JB

Posted by JB Harlin in Commentary, DIY, Film, How-To, Photography