Film

2010 ADVENTURES IN THE DARKROOM

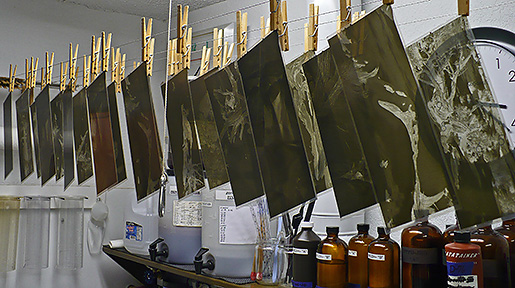
Time to start processing the film from the last trip to Utah. We spent 30 days on the road and photographed 20 days. That kind of working schedule generates a lot of LF and ULF film. Now comes the time to head to the darkroom for a little developing. Should take about 30 days to finish all of the film. Then we have to catalog and file, then proof to see what we have. Soon we will have some new film to start looking at with an eye toward making prints.

All film will be processed in a scratch-mixed Pyro developer, in small batches, by hand in open trays. Typically a day of processing will consist of 3-4 batches, normally totaling no more 30 sheets. We never try to push and do too many, if you get really fatigued, it is easy to make mistakes. This film is the culmination of hours of traveling and heaving heavy cameras in deep snow and ice, we do not want to do anything foolish now.

Hopefully we will find a few keepers in this batch of film. Watch here for more information and maybe a few new photos on the web site.
JB & Susan

Posted by JB Harlin in Darkroom, Film, Photography

SUSAN IS ONE OF SEVEN WINNERS

SUSAN PHOTOSusan’s photo ‘Orange Spring Mound’ took one of seven awards in the 2009 TAC Juried Membership Show last evening. She received recognition as a selected example of excellent and admirable art and a $100.00 gift certificate.

We had a really great time talking with new and old friends and a good time seemed to be had by all. The exhibition will be up through August 30, 2009. . . thanks everyone!!!

Posted by JB Harlin in Film, Photography, Presentation

2009 TAC Juried Membership Show

Orange Spring Mound

Susan and I have each had a photograph selected to be included in the upcoming Fort Worth Community Arts Center 2009 TAC Juried Membership Show. We have received notification that Susan’s “Orange Spring Mound” and JB’s “Canyonlands” were chosen as finalists in this annual competi

Canyonlands

Awards will be presented at the Artists Reception August 7, 2009, 6-9pm. The exhibition will run August 7, 2009 through August 30, 2009 at the Fort Worth Community Arts Center, 1300 Gendy Street, Fort Worth, Texas 76107.

We would like to invite everyone to join us for the reception and awards presentation.

JB & Susan

Posted by JB Harlin in Film, Photography

NOT THE KITCHEN SINK

DARKROOM SINK

In the fall of 2002 we made the reluctant decision that we needed a larger darkroom sink. This sparked a month long project of designing a new 3 1/2×10 1/2 foot sink. The new, larger, sink was to be modeled after the current, smaller, sink. The same basic idea was to be employed. The sink height would be the same. The depth would be greater and it would be as long as the room would allow, about 10.5 feet.

Cabinets for storage would be constructed at each end of the sink with slots for trays in between. There would be space in the right hand end for the water chiller and racks for chemical storage at each end. The backsplash would be a copy of the old one, only larger, and would contain the same plumbing, including filters, two mixing faucets and temperature control unit.

Having determined the necessary measurements it was just a matter of gathering the materials and getting to work. It took about three weeks to complete and install the new sink. Construction was my usual battle ship, massive over kill, design, using plenty of nails, screws, lag bolts, caulk and paint.

For those that are interested in seeing what is involved in building a wooden sink, click HERE to visit our snapshot album chronicling that little undertaking. This is not your typical kitchen sink!


Posted by JB Harlin in Darkroom, DIY, Film, How-To, Photography

COLD LIGHT?

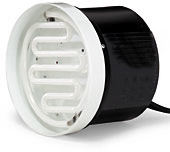
Ever wonder exactly how a Cold Light enlarger head works? How can light be Cold? The grid lamp-type enlarger light source definitely generates much less heat when compared to an incandescent light source. The heat of an incandescent lamp is generated by the infrared radiation produced by the heated filament in the lamp. A typical incandescent lamp produces more IR than visible light. In the simplest terms, the Cold Light does not generate that much IR, hence less heat. But what exactly is a Cold Light?

Most Cold Light enlarging heads contain what is known as cold cathode lighting. And, yes there is also what is known as hot cathode lighting. You say you have never heard of such things? Maybe not, but you see them both most every day. Cold cathode lighting is simply neon. That neon OPEN sign at the convenience store is a cold cathode light. The fluorescent light in your hallway is hot cathode lighting. In simplest of forms, they are both gas discharge lamps.

There are a few of the larger Cold Light enlarger heads that use fluorescent lamps, but most Cold Light heads contain cold cathode grid lamps. Without getting into a technical discussion, the usual Cold Light head is nothing but a neon sign. The glass lamp is bent into a grid instead of spelling out some advertising slogan or the word OPEN.

A cold cathode lamp depends on high voltage to operate. Your small Cold Light head will use a voltage around 6KV (6,000) volts. A larger head can use up to 12KV to operate. The high voltage source is current limited in order to keep the lamp from overheating. By adding different rare gasses and phosphor coatings inside the lamp it is possible to create different colors of light.

The dual grid Variable Contrast Cold Light (VCCL) heads, used with variable contrast papers, have two grids. One green grid for printing soft contrast and a blue grid for printing hard contrast. Adjusting the intensity of each lamp, by varying the voltage, allows you to mix different amounts of each light to achieved a continuously variable contrast grade on VC paper.

So, now you know! That Cold Light enlarger head is nothing more than a specially designed neon sign. And, one important thing to remember and this is important! There is very high voltage inside that Cold Light, so unless you know what you are doing, Keep Out!!!

JB

Posted by JB Harlin in Darkroom, Film, Photography

IS THAT AN OLD CAMERA?

How many times have I been asked, “is that an old camera?” I usually have to explain that no, it is actually a modern version of an old camera. Seldom am I asked why I would use something like an old bellows-type camera. But I get the feeling that there are those that would like to ask why.

Am I the only one that believes that simplicity has its place? For me, it really has its place when it comes to my art form. When I get out in the field, I want the equipment to become transparent in its function. And, the best way I have found to achieve this transparency is through simplicity.

I have started a list of things that I like about using a view camera. It goes something like this:

No batteries
No multi-function buttons
No multi-layered menus
No planned obsolescence
No little tiny buttons to locate
Nothing new to learn
Nothing to upgrade

I am sure with a little more time I could think of more, but I am sure you get the idea. I love the feel of a view camera. I love the feel of a view camera on a very large, heavy, wooden tripod. I love to climb under the dark cloth and just look at the ground glass. I love the fact that the image is upside down. Nothing will do more to improve your compositions than a flipped image. I like the slow pace of the view camera. I love spending an afternoon just exposing two sheets of film of one subject. Waiting for the light. Waiting for things to come together just right. I like the idea of having only one chance to make the image. I love to just stand next to the camera all set up and ready to click the shutter and just wait. I hate to be rushed. I hate to be pressured. And if things don’t work out, I can just put the camera up and head home. Nothing gained, nothing lost. There are times when just being out there with the camera is the best part of the entire experience. It is great when I bring home a really nice image, but not always necessary.

So. . . does anyone reading this believe I am a view camera advocate? Yep, that pretty much describes me. I would never even consider making a serious photograph with anything but a view camera loaded with B&W film. Just me, but I love what I do, and now you know why.

JB

Posted by JB Harlin in Commentary, Film, Photography

IS THAT A FENDER THIN?

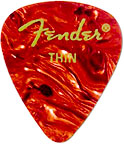
Unless you play guitar, you probably have never heard of a Fender Thin. If you are not a guitar connoisseur, it is a guitar pick. Now why on earth would someone that shoots LF and ULF be interested in a guitar pick, you ask?

Ever try to unload a sheet film holder while wearing Nitrile gloves? Or ever had a sheet of film that has a slight rearward curl. Then you know how difficult it is sometimes to get your finger under the sheet to remove it from the film holder. Now do you see the value of a thin guitar pick?

I keep a small container of thin guitar picks near the back of the enlarger baseboard where I normally unload film. I can locate my stash of picks in the dark and they are invaluable sometimes to get that stubborn sheet of film coaxed out of the film holder without excessive handling or damage. A thin guitar pick can easily be slipped under the film to allow you to get your finger under the film edge.

The next time you see a music store, stop in and purchase a few thin guitar picks. They could save you a lot of frustration. Who knows, you might want to take up the guitar!

Finally, just for the record, I really don’t use a Fender Thin. I prefer the super thin nylon 0.46mm pick sold under the Jim Dunlop name. In case anyone is really interested.

JB

Posted by JB Harlin in Commentary, Film, Photography

SHEET FILM NUMBERING

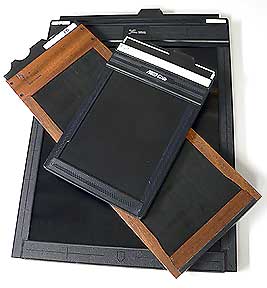
How do you identify sheet film? You put unique numbers on the film holder, but how can you identify which sheet of film came from any particular holder? You may be able to identify the film by taking notes and knowing the subject. But, what if you make several exposures of the same scene, say using different filters? How do you know which filter was used on each sheet?

We hit this impasse many years ago and I came up with a simple solution that has worked for us for years. All you have to do is file a notch code into the film loading flap. We have used this system to number over one hundred 4×5 holders. Want to learn how to modify your film holders? Take a look at “A QUICK & EASY SHEET FILM NUMBERING SYSTEM” for the details.

Hope you find this helpful. . .

JB

Posted by JB Harlin in DIY, Film, How-To, Photography

WHO USES PYRO?

We have been using Pyro based film developers for some time now. So, what is it about a Pyro negative that makes it so desirable? I have yet to completely understand the desirability of the Pyro negative, but I do know there is a depth that just isn’t there with other more popular film developers.

We used Kodak HC110 for years. We even had our own dilution, that we used based on years of experience with the developer. But once persuaded to try Pyro, the HC110 negatives soon became undesirable. I guess the question is, if you have tried one of the Pyro formulas, did anyone else find that little something extra? Or is it just the mystique of using one of the oldest known developers? There has to be something. I can see it in the negative and the print.

I have been doing a series of detailed tests comparing several of the modern Pyro film developer formulas trying to pick the one that best suits what we do. One thing that is odd is to see all of the different colors of image stain, ranging from near neutral gray to bright green. I have about reached a conclusion as to which formula best suits what we do. . . and. . . I may just write about what I found at a later date. . .

JB

Posted by JB Harlin in Darkroom, Film, Photography, The Darkroom Workshop

HAVE YOU EVER HEARD OF FRED PICKER?

ZONE VINever heard of Fred Picker? How about Zone VI Studios? If not, and if you are a serious practitioner of photographic art, I would suggest you learn about all of the aforementioned.

Fred Picker originally was a commercial photographer that developed a one-of-a-kind photographic specialties business in Vermont. Zone VI Studios manufactured and sold view cameras, B&W darkroom supplies and custom built equipment. Sadly Fred sold Zone VI to Calumet Photographic in the 1990’s. He stayed on for a few years and finally retired completely. Calumet has slowly phased out Zone VI products and they are now relegated to only being available used. Sadly Fred died in 2002. This was a great loss to the photographic community.

One of the best things that Fred left for all of us fellow artists is his newsletter. He published the Zone VI Newsletter, a quarterly little pamphlet filled with wisdom, wit and information, from 1973 till 1995. There are 83 newsletters in the collection and if you can find a set for a reasonable price, buy it! (Watch eBay)

Fred Picker also authored a great book for the beginning B&W photographer titled “The Zone VI Workshop.” This is another good book to add to your library. It is based on simplicity itself, and if you are a beginner experimenting with B&W, you need to read this book.

If you can find a copy of one of the Zone VI Catalogs, this is also a great reference for your collection. Not that any of the items are still available, but just as a collector’s item for your reference.

We still own Zone VI 4×5 and 8×10 cameras. These are well-designed, rugged, bullet-proof view cameras. If you are thinking of getting a wooden field camera, be sure not to pass up a look at a used Zone VI.

Zone VI also manufactured several innovative and unusual pieces of equipment for the darkroom. The Zone VI Compensating Enlarging Timer and Compensating Developing Timer are a permanent fixture in our darkroom. Though none of this equipment is available new, you can find it used. Check out eBay, and be ready to pay near original retail for some items. They are that good!

So. . . if you have never heard of Fred Picker, and are serious about B&W photography, you should take the time to familiarize yourself with the man and his products. We have a complete Zone VI Newsletter Index on our web site available FREE as a PDF download. Look in the Articles Area.

Posted by JB Harlin in Commentary, Darkroom, Film, Photography