How-To

THOMAS DUPLEX SUPER SAFELIGHT FILTERS

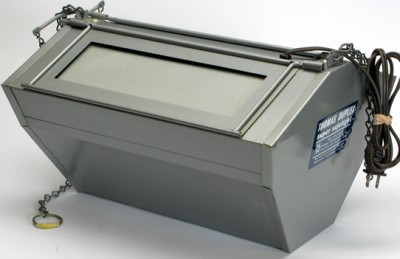
Seems the last couple of times I have tested the darkroom safelight I have had to cut down the illumination.  That should be a clue that the filters are fading and it is time to replace them.  We use a Thomas Duplex Super Safelight that I rebuilt many years ago.  Since we have a small  darkroom I knew I needed to attenuate the light.  My original safelight was modified when I rebuilt it and the 35 watt lamp was replaced with a 18 watt lamp.  Note:  You have to replace the ballast and start capacitor if you change the lamp wattage.  Wasn’t that big a problem seeing how the original ballast was no good.  I purchase the safelight many years ago not working for little to nothing.

So, now I needed to replace the filters.  Since I am only interested in B&W, work that simplifies things for sure.  All I need to find is the correct filter and then I can assemble my own replacement.  I have plenty of scrap glass, and tape.

With a little research on the Internet I discovered that the hard part had already been done.  Seems a Rosco #19 “Fire” filter has the necessary bandwidth to filter out the annoying green and blue spikes in the low pressure sodium lamp spectrum.  And, seems that others had proven this the best way possible. . . they tested it in their own darkroom.

All I needed was to order some filter material.  Rosco filters are the industry standard for stage and film production and readily available.  That was way too easy.  The thing that I was still toying with was how to adjust the light output.  It finally came to me.  Why not put the #19 filter in the body position and then add a Neutral Density filter to the vane?  Yep, that would do it.  So I ordered a sheet of Rosco #19 filter and a sheet of 0.30 ND.

We have a lot of scrap glass around.  I cut new glass to fit the body and vanes using TruVue Conservation Grade UV glass.  Thought it wouldn’t hurt to add even more filtration.  I also found out why the factory uses tissue paper.  Without it, the filter material does not look that great against the glass and I could see that if any moisture were to condense in there, it could be bad for the filter.   I really didn’t want to use tissue paper and I had a roll of Gila frosted window film from another project.  This stuff is a self-adhesive plastic material used to frost windows.  It was exactly what I needed to put a smooth textured surface on the inside of the glass to keep the filter from sticking.  It also works well to diffuse the light.

One of my favorite tapes is the aluminum HVAC ducting tape.  It is lightproof, sticks and stays in place.  Slit a few pieces of tape, peel the backing and it will hold the filter sandwich in place with ease.

I placed the #19 filter in the body and 0.30 ND in the vanes.  My first test showed there was still too much light.  I was testing at my closest point to the safelight for the worst case situation.  I ended up adding a second layer of 0.30 which made for 0.60 ND, which is two full stops attenuation.  But remember, I was testing with the most sensitive VC paper we use at a very close proximity to the safelight.  Always test for the very worst case scenario. 

Once finished, I found that the darkroom is much brighter than before.  This proves that the filters do fade.  Now we are back in business.   With the vanes fully closed all VC and standard papers are safe.  I like to print on Azo, which allows me to open the vanes for even more light.

I will test again in a year or so and if I need new filters they are easily replaced.  I have plenty of material, the Rosco filter comes in a 24 x 24 inch square.  Enough for several more safelight filters, if and when they are needed.

JB

Posted by JB Harlin in Darkroom, DIY, How-To, Photography

CONTACT PRINTING & AZO

Contact Printing AzoI have to admit that I am a contact printer.  Susan and I both contact print.  There seems to be some confusion about contact printing and all I can say is, it is the easiest way you can make a print.  Contact printing is nothing more than laying the negative directly on a sheet of printing paper, covering it with a piece of glass, and adding some light for the exposure.  Nothing could be more simple.  You do not need any special equipment to print on graded paper.  A negative, some graded paper, a sheet of glass, and a lamp.
As a side note at this point, note I use the term LAMP.  I have been corrected for years by an old friend that worked in the lighting industry at one time.  In the industry, there is no such thing as a Light Bulb. . . it is a LAMP.  So when I say LAMP, you can be assured that to the laymen I am talking about a Light Bulb.  Now back to contact printing.

You can contact print on any paper, but one of the more interesting papers that is highly sought after is the old Kodak Azo.  Azo is a silver chloride printing paper that was manufactured primarily for making proofs.  It is extremely slow and requires such a large amount of light to yield an image it is mostly used as a contact printing paper.  There seems to be some confusion about printing on Azo, and believe me, it is not that complicated.  You just have to use a light source that is bright enough to yield reasonable printing times.  This is where the lamp comes in.

All you need for printing on Azo is a simple, frosted lamp.  For small negatives, 4×5 or smaller you can use a sheet of thick glass for printing.  Larger negatives require a printing frame that holds the paper and negative under pressure.  Edward Weston printed most of his most famous work using an 8×10 negative in a simple spring back printing frame, exposed under a lamp hanging by its cord from the ceiling.  He adjusted the lamp intensity by changing the lamp size, or moving the lamp up and down by coiling the cord and using a clothespin.

So, now we get down to designing a printing rig for Azo.  This can be as simple or complicated as you wish.  I am going to describe how we print Azo and other papers.  This is the setup we use, and how it is designed.  I will say this again, you can use this same setup for contact printing regular enlarging paper also.

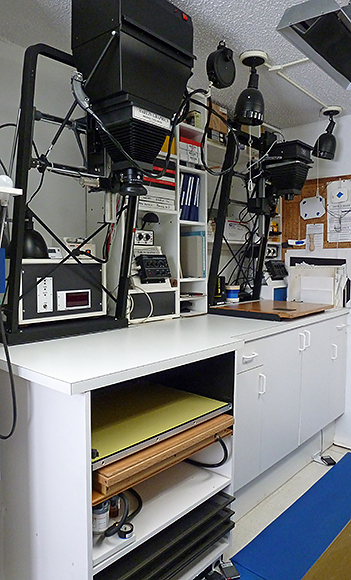
Let’s begin with the printing frame.  We print large negatives, and we use a vacuum frame.  The advantage of a vacuum frame is that you get absolute even pressure between the film and paper, no matter what the size of the film.  We shoot 8×10, 11×14, 8×20 and 16×20 film, and have a vacuum frame large enough to accommodate the largest film.  The vacuum frame is positioned under the drop table below the 8×10 enlarger.  The vacuum pump is located just below the frame and includes a vacuum gauge which is handy to confirm the frame is properly closed and the vacuum is drawn down.  By having the vacuum frame located below the enlarger we can also use the enlarger for printing on other papers, including VC papers that require control of blue and green light.  The top of the counter is removable, as is the drop shelf which is used for enlarging.  By removing the counter top and drop shelf, the vacuum frame is exposed and can be used for printing.

Printing on Azo only requires a lamp placed at some distance from the film and paper.  Different negatives require different amounts of light.  We set the vacuum frame to lamp reflector to a fixed distance and change the lamp wattage as required.  The higher the wattage, the brighter the lamp.  We keep a supply of lamps, ranging from 7 ½ watt to 200watt depending on the amount of light required.  For most of our negatives we use the 45watt, 65watt, and sometimes a 100watt lamp.  I like having a reflector around the lamp to help keep the light out of my eyes while printing.  It also focuses the light downward onto the printing frame.

The lamp fixture is fitted with a custom machined clamping mechanism that attaches to the focusing rail of the Beseler 8×10 enlarger just below the lens, and is held in place with a thumbscrew.  The enlarger head is raised or lowered to set the distance from the lamp reflector to the vacuum frame.  We always adjust the lip of the reflector to vacuum glass to 30 inches.  For our setup, this allows for even illumination of the vacuum frame and keeps the reflector between your eyes and the lamp.  The lamp assembly is easily removed by loosening the thumb screw in case you want to change to enlarging paper and use the enlarger as a light source.  This all sounds complicated, but in reality it is very simple.  Refer to the photos for more detail.

The only thing that might affect your printing repeatability would be any variation of the line voltage to the lamp, which will affect the lamp output.  The voltage is easily stabilized using a constant voltage transformer.  You can find constant voltage units used, take a look on eBay.  The one we use is a 350watt unit made by Sola-HD and will easily handle our largest lamp which is 200watts.

The constant voltage transformer is mounted in a large box that is located behind the 8×10 enlarger.  I have also added a timer and a one second metronome, both made from an old digital alarm clock.  Some cheap digital clocks can be modified to function as a resettable timer.   I was able to rig the alarm beeper so that it chirps every second.  I like to use a metronome when contact printing, and there is also a large digital readout timer that I can use as a check, just in case I lose count.  The printing lamp and timer are wired to a foot switch.  When you step on the switch the lamp comes on and the timer begins to count upward.  The metronome runs continuously and has a switch to disable it.  My wife does not like it, she only uses the timer.  There is also a switch on the main box that controls the vacuum pump.   As a safety precaution, the lamp will not activate until the vacuum pump is running.  This way if you accidentally step on the footswitch with your box of paper open, the lamp will not light.

Printing is extremely simple.  Switch off the room lights, place a sheet of printing paper, sandwiched with your negative, in the center of the vacuum frame.  Close the glass top.  Hit the pump switch and check to see that the frame has drawn down.  When you are ready to start, step on the footswitch.  The printing lamp comes on and the timer starts counting.  I always step on the switch in time with the metronome.  Count off the desired exposure.  When complete, release the footswitch.  Turn off the vacuum pump.  Remove the paper and process.

Need to burn and dodge?  Keep track of your exposure and use a card or cutout shape for the appropriate time.  You can easily see the image since the paper is white and the negative is easily seen through the glass of the printing frame or vacuum frame.

Contact printing on Azo, or any other printing paper, is extremely easy, and is not rocket science. By adding the ability to print Azo using the 8×10 enlarger, we save space, which is always a premium in the darkroom.  You can make your printing setup as simple, or complex as you desire.  The main thing is to make prints.  Make lots of prints.  Those prints are what is important. 

JB

Posted by JB Harlin in Darkroom, How-To, Photography

DON’T LAY IT ON THE GROUND

JB&Susan tripod hanger 03Strange how many questions we get about what we do, why we do it, and always how do you do certain things. I never mind answering questions. This is how one learns, and I feel that sharing what you know is very important. We have no secrets. . . no secret methods. . . secret places. . . secret formulas. . . or anything that is in any way secret.
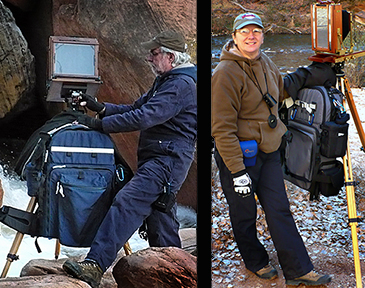
Funny how after our last trip, and sending out our Utah Snapshot Album, I received several questions about our camera packs. One that came up several times was how do you hang the pack from your tripod? We are pretty picky about our camera gear. It is imperative when you are a film photographer to keep any and all foreign materials as far from your gear as possible. I just could never set my backpack down in the dirt, let alone the mud, or snow. HERE is another post on this subject.

Pack Hook B 001 We tend to photograph in remote locations. We are always climbing over rocks, and are knee deep in mud or snow. One of the first packs I used was a really well-made and versatile Art Wolfe design that was perfect for a 4×5. The pack had a small webbing loop at the top and I soon found myself hooking it to one of the knobs on my Zone VI tripod. Worked great!
Things were fine until we moved up to larger cameras and larger packs from f64. They say necessity is the mother of invention.  So we modified the larger f64 backpacks with a hanging strap similar to the Art Wolfe design, since it was not a standard option from them. Later when we designed and built our own packs the hanging loop was a standard, must have, feature.  As our packs got larger and heavier we eventually changed over to Ries tripods and suddenly there was another problem. . . no good place to hook the pack. This was Pack Hook 06a challenge. When I need to think about something, I usually take a nap. I do my best thinking when asleep.
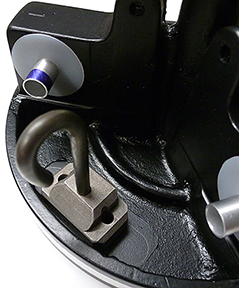
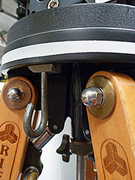
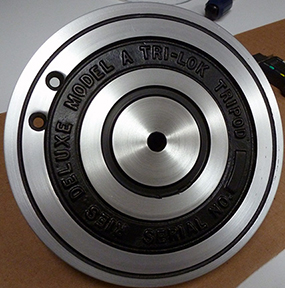
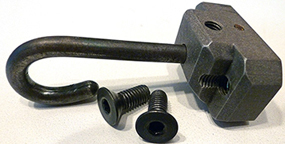
I dreamed up a simple modification to the Ries tripod head that allowed me to add a hook to the under side of the crown. I fabricated a small aluminum block and a hook made of 3/16 steel rod. The rod has to be heated and bent into shape, then quenched to harden the metal. The block uses a 6-32 set screw and a press-fit pin to hold the hook firmly in place. The hook assembly is attached using two 8-32 flat head machine screws drilled through the tripod crown.

Pack Hook B02Ries Pack HookI have added this modification to both our ‘J’ and ‘A’ model Ries tripods and they have preformed flawlessly for years. Ries tripods are extremely well-made and will support well beyond their factory weight ratings. I have hung a 45 plus-pound pack from my ‘A’ model for years now and never had any issues. . . except sometimes heaving that heavy pack onto the hook when in a difficult position.
Take a look at the photos to get a better idea of how I made this modification. I just did a complete rebuild of my 40 year old Ries ‘A’ model and it now has a new coat of paint and the legs have been refinished. It will not stay this nice looking for long. A tripod takes a beating in the field.

The running story around here is that we don’t own much of anything that hasn’t been taken apart and modified in some way. If you work with LF and ULF, you soon learn that there are very few off-the-shelf options available. If you need something, it is probably not made and you will either have to improvise, modify, or build it yourself.

This is how we solved the problem of keeping our pack off the ground. There are those times you just have to make a few modifications.

JB

Posted by JB Harlin in DIY, How-To, Photography

MIXING YOUR OWN

MIXING YOUR OWNI have always been an advocate of vertical integration. The more you can do yourself, the better control you have of the outcome. For many years I used prepackaged photo chemicals and have never had a problem. But, as the traditional darkroom and the materials used become more and more an alternative process, commercially available photo chemicals are getting harder to find. Some favorite chemicals have vanished. An old favorite, the Zone VI line of print developer, fixer and hypo are now gone from Calumet. I recently witnessed 8 bags of print developer and 2 bags of print and film fixer selling for $127.50 on eBay. That is well over double the original cost from Calumet.
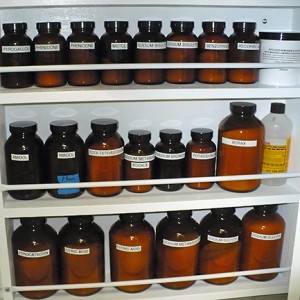
The bottom line is, you can mix your own photo chemicals. Sometimes, if you purchase bulk raw chemicals, you can even save a few dollars. Another plus to mixing your own is the fact that you have 100% control. If something goes wrong, you know who to blame. You can also modify the formula and experiment. Mixing your own photo solutions is not hard. It is not rocket science and you do not have to be a chemist. If you can follow a recipe and bake a cake, you can mix your own chemistry for the B&W darkroom.MIXING YOUR OWN

The first thing you need to understand is that in order to mix your own photo chemistry you will be handling CHEMICALS. If you are not comfortable with this thought, do not even go there. But, remember that you are surrounded with chemicals. . . the entire planet is made of them. If you take proper precautions and are careful, there is nothing to fear. I am not a chemist, so I have little understanding of deep details and I have even less inclination to study chemistry. Do as I do, assume that everything you handle in the way of raw chemicals are toxic. Do all mixing in a well-ventilated area. Clean up spills immediately. Avoid breathing airborne powders. Always wear gloves and purchase a respirator with proper filter. A little common sense goes a long way.

MIXING YOUR OWNAs I said before, for me, mixing photo chemicals is nothing less than following a recipe.
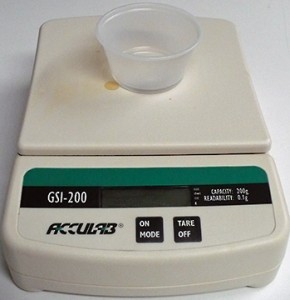
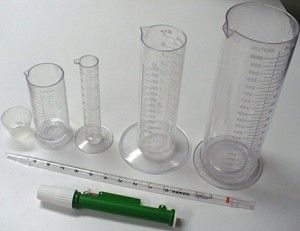
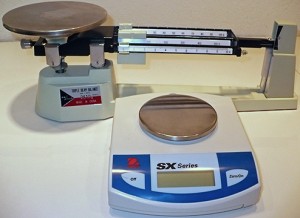
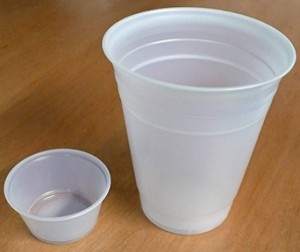
When mixing any photo chemistry formula/recipe you need to accurately measure all of the various chemicals. Most formulas call for dry chemicals measured in grams and liquids in milliliters. I have two scales for dry measure. I have a very accurate digital scale for small quantities and an old-fashion triple beam for larger amounts. I picked up a box of small serving containers at the local big box store to be used as disposable containers for measuring small amounts of dry chemicals. I also have larger 8oz plastic cups for larger amounts. Be sure to use the tare function to zero the scale with the empty container before measuring. Zero the scale with every new container, they do not all weigh the same. Once used, I toss them in the trash. I never reuse one of these plastic containers. This assures there is no chance of unwanted contamination.MIXING YOUR OWN

For liquids, I use an appropriate size graduate, and for small quantities, a pipette is the easiest way to make accurate measurements. You can use a pipette pump to make loading and measuring easier, or just dip the pipette into the container and hold your thumb over the end. Remember to always thoroughly wash the pipette after use and always use a clean pipette when going from one chemical container to the next. If the pipette is not properly cleaned, you will cross contaminate your chemicals.

Always follow the chemical formula. Most all formulas are mixed in water and there should be a temperature specified to insure the chemicals dissolve. Always mix in the exact order as called for in the formula. Add each ingredient slowly and continually stir until each is completely dissolved before adding the next. This is where a magnetic stirrer comes in handy. Take your time. Do not rush the process. Some chemicals take some time to completely dissolve.

MIXING YOUR OWNI use distilled water for all stock solutions. I always use distilled water for stock solutions and processing film. Unless your tap water has known problems, it should be fine for mixing printing chemicals.
Once properly mixed, store each formula in a clean bottle with a plastic cap. Never use metal caps, some chemicals will cause them to rust and contaminate the solution. Brown glass is best for developers and plastic should be fine for most others. Be sure to label each container as to its contents and also include the date mixed. Most all stock chemicals are good for three months, some much longer.

There are many published formulas. Some popular commercial formulas are proprietary, but in many cases there are alternative, similar formulas that are published. By applying a little experimentation, you can tailor your photo mixtures to suit you. Search the Internet for formulas and pick up a copy of “The Darkroom Cookbook” Third Edition by Steve Anchell.

Mixing your own is not that difficult. With a little study, careful handling, forethought and experimentation you can mix your own photo chemistry.

Here is a list of things you will need or may want to have;

• disposable gloves
• respirator
• apron
• a selection of required chemicals
• accurate scales
• disposable plastic cups for weighing chemicals
• several sizes of graduates for liquids
• stirring rod
• magnetic stirrer
• pipette
• pipette pump
• glass storage bottles
• plastic storage bottles

Resources:

Bostic & Sullivan
http://www.bostick-sullivan.com

Artcraft Chemicals Inc.
http://www.artcraftchemicals.com

The Darkroom Cookbook Third Edition by Steve Anchell
http://www.steveanchell.com

Pyrocat HD a semi-compensating, high-definition developer, formulated by Sandy King.
http://www.pyrocat-hd.com

The Book Of Pyro by Gordon Hutchings

JB

jbhphoto E-Books

Posted by JB Harlin in Darkroom, DIY, Film, Formulas, How-To, Photography, The Darkroom Workshop

A PLACE TO STAND

Ever found that once you have your camera in just the right position that you can’t quite see the very top of the ground glass. It is important to get up there so you can see if your foreground is in focus. Never fails, you need just a little more to get a good view. Well, we found a neat accessory that just may save the day for you.

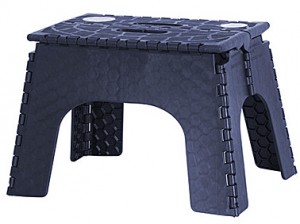
We discovered a nifty little folding step stool at Wal-Mart. We hauled a couple of these with us on our last trip and though I never used mine, Susan found it very helpful with several of her photographic efforts. It was especially useful for her and the pano format cameras she uses.  She made use of the step several times when she needed a little height working with difficult setups.

Here is more information from the Wal-Mart web site;

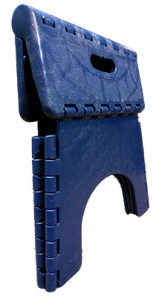
Keep everything within reach with the Mainstays 12″ Folding Step Stool. This skid-resistant step stool gives you an extra boost to reach high shelves or cabinets. It folds down to two inches thick for easy storage.

Mainstays 12″ Folding Step Stool:
Easy to carry
Skid-resistant top and feet
Stands 12″ high
Folds to 2″ thick
Weight capacity: 300 lbs
Folded Size: 13.5″ x 12.5″ x 2″
Weight: 2.5 lbs
Wal-Mart No.: 007126355

This 12″ step folds up and is easily tucked away till you need a little boost.  This is another accessory that is a life saver when you need it. We ended up purchasing several of these for use around the house also. You never know what you are going to find when you are out poking around in the stores.

JB

Posted by JB Harlin in Film, How-To, Photography

CALUMET SHUTTER SPEED TESTER LF UPGRADE

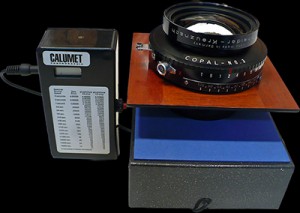
CALUMET SHUTTER TESTERIf you are lucky enough to own a Calumet Shutter Speed Tester, you know it is not exactly ideal for testing large lenses and shutters. I have owned one of these handy little devices for over ten years. I performed a modification/upgrade near ten years ago that makes the tester much more suited to testing large lenses and shutters.

This modification/upgrade is not difficult, but does require a little ingenuity and proficiency with a soldering iron. With a little planning and a good junk box full of odds and ends you can construct a remote trigger for the tester.

Follow the link HERE to our main web site which will take you to the ‘ARTICLES’ area and scroll down the page to download the PDF titled “CALUMET SHUTTER TESTER MODIFICATION: AN UPGRADE FOR THE LF SHOOTER.” This modification/upgrade has served me well over the years. Hopefully you will find this of interest also.

JB

Posted by JB Harlin in DIY, How-To, Photography

WRITING ON THE NEGATIVE EDGE

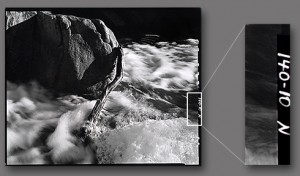
WRITING ON THE NEGATIVE EDGEI was recently asked what type of writing device we use to mark the catalog number on the edge of our film. I had not given it much thought since we have been using the same pens for marking film for many years. I have heard of people using various mechanical pens and India ink. Some say they use a common Sharpie. There are numerous ways to do this, but the easiest and most effective way I have found is to use a pigment liner pen.

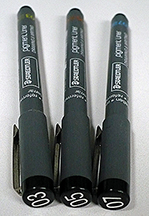
Specifically, I have used a Staedtler pigment liner pen for years. They are clean, easy to use, make very dense letters and numbers that easily show up on proofs, and are filled with permanent black ink. The ink used is lightfast and will not fade. One nice thing about the Staedtler pigment liner pen is it will not dry out. The manufacturer says, “The unique cap-off feature of the ink enables pens to be left uncapped for 18 hours without drying up. Even when left open during long breaks in writing, they remain ready for action without delay.” They also last a long time. We have not had to buy new pens in years.Staedtler pigment liner pen

The Staedtler pigment liner pens are available in nine writing widths from 0.05 mm to 0.8 mm. My favorite sizes are the 0.3, 0.5, 0.7 mm widths. I use the smaller diameter pen for small film where the clear edge is very narrow. You still get very legible writing along the film edge that prints well on the proofs. I prefer the larger diameter pen for the really big film. These have worked well for me for over 30 years, and should work well for you also.

Staedtler pigment liner penHere are a few things I have learned over the years that may help when using these pens to mark your film. I always mark my negatives on base side opposite the emulsion, this way the file number prints correctly on the edge of prints and proofs. Be sure to let the ink dry thoroughly before you place the film into a storage sleeve. It should only take a minute to dry. I have found that if you make a mistake, you can remove the ink using a cotton swab lightly moistened with acetone. And, one more thing; the biggest mistake you can ever make is not using a filing system for your negatives. If you choose to mark your film on the edge, these markers will do the trick.

If you are interested in learning more about Staedtler pigment liner pens, HERE is their web site.

JB

Posted by JB Harlin in Film, How-To, Photography

EASILY FIND GRADE #2 AND GET YOUR FILM TEST CORRECT

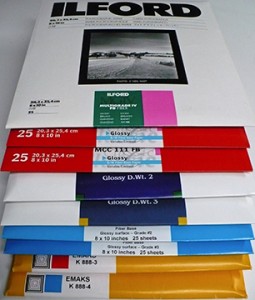
GRADE #2 So, here is the predicament; you are getting ready to do your film testing; you have decided to use the simple visual film testing technique. Visual film testing is a really simple way to determine your correct film EI and developing time. All you need to do is perform these tests on a grade #2 paper and you will know you are making the best possible negatives.

>But, there is one nagging little problem. If you are using VC paper, how do you know what filter, or light source setting, that will produce a  grade #2 contrast? Even if you are using filters, each filter set has different filters that will give different paper grades on different papers. Even the developer you choose can affect paper contrast. You really need to KNOW how to achieve a true grade #2, using your equipment and darkroom, in order to do a valid film test.

What if I could show you an easy, inexpensive, and quick method that will get you plenty close enough?   Well, here you go. . . “FINDING VC PAPER GRADE #2; EYEBALL CALIBRATION.”  This method should get you well within range to get you started on the right track.

Remember, that making a good negative is the first step in making a great print. Hope this helps you on your quest for photographic excellence!  Download the PDF version  from the Articles area of our web site.

“Simplicity is the ultimate sophistication.” -Leonardo da Vinci-

JB

Posted by JB Harlin in Darkroom, How-To, Photography

MEASURING PAPER FOG

I was recently asked to test some Kentmere paper for fogging. A friend had shut down his wet darkroom and had several packages of paper he wanted to sell, but wanted to know if it was still useable. I agreed to test for him and if you wonder how to check for paper fog, here is the process I use.

PAPER FOGBegin by cutting off a strip of the paper to be tested in very subdued safelight to total darkness. Since the paper I was testing was 16×20, I cut off a strip across the short side about two inches wide. I then cut the strip in half. This gave me two pieces of paper 2×8 inches. On the back of the paper I mark one with the letter ‘F’ and the other with the letter ‘D’ and place the latter into a light-tight box.

The strip marked ‘F’ is placed into a tray of fresh fixer and agitated for five minutes. Then it is placed in a tray of running water. Next the strip marked ‘D’ is placed into a tray of developer, agitated for two minutes. . . stop for thirty seconds. . . and fixed for five minutes. I use my standard print developing chemicals and the normal times. If you use different materials, use your normal times. Once both strips are in the wash tray, turn on the lights and wash for thirty minutes. Remove the test strips and dry as usual.

What has happened here is I have cleared the test strip marked with the ‘F’ which stands for fixed only and I have developed the strip marked ‘D’ for developer as usual. All that is needed now is to measure the reflected difference. I used an X-Rite 810 densitometer to measure the difference and found it to only be about 0.003, which is nothing to worry about. Keep in mind that all light sensitive materials, film or paper, will have some amount of base fog when developed.

Fortunately I was able to report to my friend that his paper was in excellent condition and he was happy to be able to sell it to another photographer. Hopefully this batch of paper will live on to produce some beautiful prints.

Also keep in mind that you do not need a densitometer to run this test. If you cannot see any appreciable difference in the two test strips, you can assume the paper is in good condition. If you have some old paper that shows signs of fogging, you can experiment with adding a restrainer, like Benzotriazol, to your developer to see if it will help. Never throw out printing paper just because you have had it on the shelf for some time. Test it first. . . you may be surprised to find that it is in good condition and useable.

JB

Posted by JB Harlin in Darkroom, How-To, Photography

VIEW CAMERA LUBE

It is important that your view camera work and work smoothly without glitches in the field.  Nothing is worse than having some issue when you are out working.  I spend a lot of time maintaining our cameras.  I feel it is better to do this before we go out, than to have problems that require work in the field.  Nothing is worse than wasting time on repairs when you are out.

A high-quality Microcrystalline Wax is one of your best friends when it comes to keeping your view camera clean and working smoothly.  See my previous post titled “Wax On. . . Wax Off” for more information about waxing the camera.

But, waxing the camera is only part of keeping it functioning smoothly.  You need lubrication for the metal parts.  Metal rails, guides, and locking knobs need lubrication to keep them working freely.  Nothing is worse than having a threaded part to seize up in the field.  The best lubrication for metal parts is a dry lubricant.  One that goes on wet but dries leaving a slick lubricant that does not get on your hands and possibly on your lenses or film.   A dry lubricant also does not attract dust and dirt.

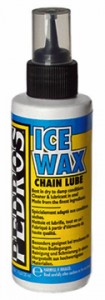
One of the best lubricants I have found is a product made for lubricating bicycles.  Pedro’s Ice Wax 2.0 is a natural wax-based dry lube for use on bicycle chains.  It is also an excellent choice for the metal-to-metal parts of the view camera.   It works on brass, steel, and aluminum surfaces equally well.  The manufacturer says it is a Hydrophobic wax coating that repels water and provides protection from wear and contaminants.  It goes on wet and dries leaving a lubricating film that keeps parts moving freely.

Just a drop or two worked into the metal-on-metal surfaces is all you need.  And it lasts for a long time.  It is also good for all threaded locking knobs to keep them free and to prevent them from seizing up.  A little Microcrystalline Wax plus some Ice Wax, and you should be good to go. . . go to the field that is, without any glitches to slow you down.

JB

Posted by JB Harlin in How-To, Photography