We have finally started to transition into the 21st century. I have been doing research into LED lighting for our darkroom and workroom for some time. Not because I really care that much about the power use. . . I am more concerned about the useless heat generated by incandescent lighting. In case anyone has never investigated this, your standard filament-type lamp produces more infrared heat than visible light. We live in Texas and every bit of heat generated inside has to be pumped out with the A/C system. Need I say, I really don’t care for hot weather, nor a hot house.
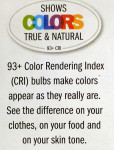
I have been intrigued by LED lighting and I have been following the technology for some time. Up until recently LED lighting has been very expensive and not all that great as a replacement for the old reliable standard incandescent light bulb. Cost not being factored in, there was still an issue of the color of the LED lighting and something completely new to me. . . CRI (Color Rendering Index). When you are working with photographs, CRI becomes a very important consideration as well as color temperature.
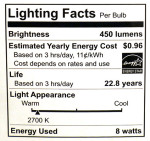
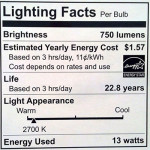
Most everyone is familiar with color temperature. Measured in degrees Kelvin, light is either warm or cold in appearance. The standard incandescent lamp has a color temperature of somewhere between 2700K to maybe 3000K for some halogen lamps. We have always used standard reflector flood lamps which inherently have a color temperature of 2700K. LED lighting now is available with color temperatures that range from 2700K to 5000K. This was an easy choice for us. . . what I wanted was something that matches what I have always used, so 2700K is the logical choice.
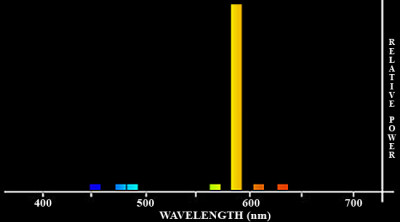
Seems that the newest specification for LED lighting is the appearance of CRI. You will find very few lamp manufacturers that will specify the CRI. CRI is a measure of how well a light source reveals colors. The sun has a CRI of 100. The very least you can expect anywhere near true color is a CRI of no less than 84 or so. Most incandescent lamps have a CRI of about 93 to 94. Many LED lamps have a CRI of about 80. . . not that great.
There is one more specification that is important and that is the lumens a lamp produces. This is simply the amount of light created for the watts of electricity used. The higher the number, the more light output.
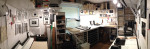
That is a lot of information, but let it suffice to say that things have finally caught up with what I might call the Heat : Color : CRI : lumens : $$$ ratio, and it is finally time to seriously look into LED lighting. We found a suitable replacement for the lighting in our workroom and proceeded to test the LEDs against the old incandescent lamps. I first replaced random lamps among twelve 45W reflector lamps that light our work area. Once on, I could not detect any difference in the light color, coverage or quality. I looked at color under each light and saw no perceivable difference. I had one more test. . . take a digital photo of the room and see if the camera could see any color difference. We both looked at the photo and could not tell where the LED lamps were compared to the others. The biggest difference we saw in the workroom was the blue of the light coming in the window from outside. So far, so good! Next we lived with the new light for a few days. Did the color comparison several times. Took more digital photos, both with the Panasonic digital cameras and with the iPhone camera. Still, even the cameras were not showing any difference. That was it!
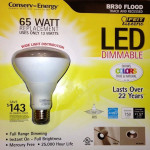
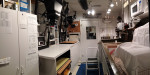
Next. . . the darkroom. We have had two fluorescent fixtures in the darkroom for as long as we have been here. I hate those greenie-weenie light things know as fluorescent. I have wanted to install track lighting above the sink for years, but did not want to put up with the heat. We installed a track with four fixtures and 65W equivalent LED lamps. . . what a difference! We also installed two, three-lamp fixtures for general room lighting. We next repeated the tests with the cameras and there is not a detectable difference in the color of the light. We did several visual color comparisons and there just wasn’t any discernible difference between the incandescent and the LED lamps. That was pretty much all that I needed to see. . . fixed!
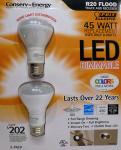
I know the question will come up as to what manufacturer and which lamps we selected. We chose the Feit Electric R20, 45/8W, 450 lumen and BR30, 65/13W, 750 lumen LED lamps. These are reflector lamps with a 110 degree beam angle and a CRI of 93+.
One of the most noticeable things about the LED lighting is the absence of searing heat. The lamps themselves do get warm, but there is none of that burning IR heat that will even warm a black object on the table top. I also need to add that these LED lamps are dimmable and do work with every dimmer we have tried them with here.
-
-
45W R20 Lamp
-
-
45W R20 Specs
-
-
65W BR30 Specs
-
-
65W BR30 Lamp
-
-
Feit Electric CRI
-
-
Test Photo: Darkroom with mixed incandescent and LED light
-
-
Test Photo: Workroom with mixed incandescent and LED light
If you are looking to upgrade to LED lighting, these seem to be about the best at this time. I am sure that as the technology matures, you will see even better performance and pricing. It is like most all high-tech items today. . . you have to choose a point, then jump on the band wagon. Tomorrow there will be a whole new ball game. At least we have chosen to start now. We have taken the leap into LED lighting. We’ll see how well these hold up. . . the manufacturer claims their lamps have a 22 year life!
JB

 We have just updated the FORMULAS area here on the jbhphoto.com BLOG (click the link at top of the page). What you will see is mostly cosmetic with a few corrections here and there. The formatting of the older area was made of screen grabs of notes and was not that well organized. Hopefully it is now a little more tidy.
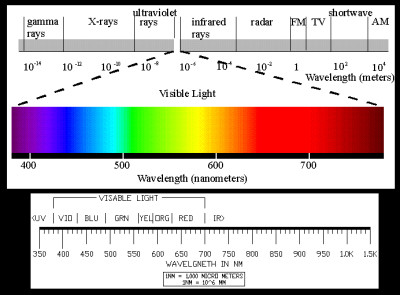
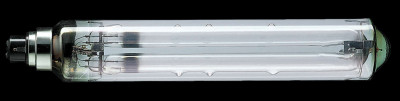
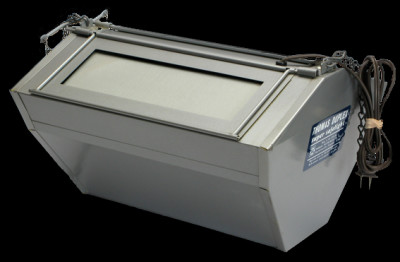 Had an interesting discussion the other day with a group of photographers about the Thomas Duplex Super-Safelight. This is one of the best safelights you can own. They are bright, powerful and will fog your paper before you can say Look Out! Honestly, these things are designed to light a very large darkroom, I would say, far beyond the size that most of us are accustomed to having the privilege of owning. They come with several glass-mounted filters that are designed for different darkroom uses, but there seems to be a lot of confusion as to what filters to use and how this all works.