darkroom

JBH PHOTOGRAPHY HOW-TO E-BOOKS

We are proud to announce that the JBH photography how-to book series is now available in e-book format.  Each book has been revised and updated.  This how-to book series has been created specifically for those interested in traditional large format fine art black & white film photography, practiced in the wet darkroom.

All four books are available for immediate download in PDF format to your computer.

JBH PHOTOGRAPHY HOW-TO E-BOOKS

SPECIAL INTRODUCTORY OFFER!
Purchase multiple e-books and save.

NOTE:  A PayPal account is not required to purchase.
You can use your credit card without having or creating an account with PayPal.


Stop by our new BOOK STORE for more information and to purchase securely with PayPal.

JB

Posted by JB Harlin in Darkroom, DIY, Film, How-To, Photography

WHERE, WHEN & HOW

We have added a new BLOG area titled “WHERE, WHEN & HOW.”  Here we will tell the story behind some of our photographs.  We invite you to join us under the dark cloth for a behind the scene view of the where, when and how of our photography.

WHERE, WHEN & HOW

Click the “WHERE, WHEN & HOW” link on the menu bar at the top of this page, or click HERE.

JB

Posted by JB Harlin in Film, How-To, Photography

A DIY SENSITOMETER. . . REALLY???

DIY SENSITOMETERFilm testing is one of those things that is just a fact of life if you, like me, choose to continue to pursue that art form.  I am no fan of any testing, that is for sure.  But, there are times you have to test in order to better understand how things will work.

I never thought I would ever need a sensitometer, but never say never.  To compare different film developer formulas, I found that I needed to run some tests.  In order to make the test I needed to expose numerous sheets of film and expose them all identically.  What I needed was a film sensitometer.  What I did was build one.  This project was not as difficult as I first expected and most everything I needed was laying around, either in the closet, or the junk box.

I wrote abut my experience designing and building a DIY Sensitometer back in 2009, then shelved the article where is has remained dormant since.   Well finally, I drug the thing out and put it up on our web site.   Interested in learning more about building a film sensitometer?  Head over to the ARTICLES & HOW-TO area of our web site, scroll down the page to the link titled, “BUILDING A FILM SENSITOMETER.”  You will see how I did it, and you may just want to try it yourself. . . if this is something you have a need for.

JB

Posted by JB Harlin in Darkroom, DIY, Film, How-To, Photography

HOT WATER

HOT WATERYes, hot water is nice, but not when it comes out of the cold tap in the darkroom.  Guess since the beginning of photography all wet processes are assumed to be run at 68F.  Personally I have nearly always ran everything at 70F.  This seems to be a good compromise since we live in Texas, where in a 12 month year, summer is 18 months long.  Personally, I don’t care for temperatures to be much above 70F outside, but what can you do?

The cold tap here runs up near 88F by August, and for many years I dealt with that by freezing plastic bottles filled with water.  Works well enough, but is still a hassle.  Finally about 18 years ago I decided to look into a water chiller for the darkroom.  I have to admit that I did try the coil of copper tubing in a washtub of ice water.  Works to some degree, but is a mess to deal with.  What I wanted was a no-muss, no-fuss way to chill the water to a manageable temperature.

So, you say you want a water chiller?  That really is not a problem.  There are commercial units that will provide very high volumes of chilled water.  Problem is, they are large and expensive.   So, like most things I had to find a balance between useable and practical.  Everything is a tradeoff of some sort.  I did a lot of research and eventually decided, based upon the limiting factors I had to face, that a small ElKay remote water chiller would be satisfactory.  The unit I settled on was their Model ER101Y, which is rated as a 9.6 GPH (Gallon Per Hour) remote chiller.  The unit was small enough to fit under the darkroom sink and ran off a 115 volt circuit. Chiller

Now, the bottom line is, how well does this work?  I have to admit it is not perfect, but it is certainly better than nothing and much better than anything else I had tried.  The setup is very simple.  I have a Calumet/Lawler mixing valve that in winter, when the cold tap is in the 50-60F range works very well.  By adding the chiller in the summer I can keep a steady 70-72F wash water with cold tap up toward 85F, with a flow rate of about 0.75 GPM for as long as I need.  This is plenty good enough for washing film or paper.  We mostly process paper in the summer anyway, and when the tap gets to 88F the wash water goes to about 75F.

Not everything is perfect though.  I would really like to run any flow rate for any length of time, at any reasonable cold tap temperature, but it will not happen with this small of a chiller.  That would require more horsepower.  Another thing to think about is the heat generated by the chiller.  I had to add a powered wall vent next to the chiller to keep the room from heating up.  The ultimate would be to vent the unit outside, but that isn’t practical for my location. . . so I just have to deal with it as best I can.

HOT WATER

At least I do have a chiller and it does work.  When I get ready to process film or print, I will fire up the chiller and allow it to cycle.  This normally takes about fifteen minutes.  I can then fill my washers, but I have to watch the temperature closely, because at full flow the chiller will run out of cold water pretty fast.  When I see the mixing valve temperature start to rise, I will shut off the water and wait for the unit to cycle again.

Bottom line is, I would not want to be without my chiller.  If I had the choice, I would upgrade to the larger ElKay ER191, which is a 19GPH unit.  It would fit in the space now available.  The original sink I installed the unit we have on did not have room.  If I were going to suggest a chiller, I would say get the 19GPH unit.  But do keep in mind that any chiller is better than none!

JB

Posted by JB Harlin in Darkroom, How-To, Photography

JBH FILM STATS 1996 TO 2013

I have been working on my photo database the last week. I have detailed records of the photos I have printed dating back to 1996. Using that data I have created some charts of what I have done.  Here are a few of the charts that outline the last 17 years of my fine art photography. This information is from the data entered into our master database which only contains those negatives that have been taken to a finished print.  This data does not include all the negatives that have been exposed and processed during this time.

 Guess all that time taking notes and entering all that data has some worth.

JB

Posted by JB Harlin in Commentary, Film, Photography

DIY PREPACKAGED DARKROOM CHEMISTRY

DARKROOM CHEMISTRYMixing our own darkroom chemistry has become the established method around here.   Since the demise of Zone VI chemistry, we are pretty much on our own when it comes to processing chemistry.  Things like PyroCat-HD can easily be mixed by weighing out the necessary materials each time, since you are mixing stock solutions and it is not something you have to do every time you process film.  I mix up the print developer as two stock solutions that are combined when a printing session starts.  I keep one and two liter bottles of part A and B mixed and ready to go.  That is just another element of the process.  On the days we are not doing darkroom work, I am in there cleaning and mixing solutions.
 
One thing you use a lot of when making large prints is Fixer.  We go through a lot of fixer, and I do not believe in skimping.  The F-24 formula will fix 25 8×10 prints (or equivalent area, 80 sq inches per print) per liter. . . that would be 100 per four liter batch.  I never run fixer more than 60% of capacity, so that would be 60 8×10’s per four liter batch.  Another darkroom rule is, we never pour anything back into the container. . . most of the time.   Used fixer is dumped into buckets in the garage and when I get a batch, it goes through the silver recovery unit.
 
Because we purchase Sodium Thiosulfate in 50 pound bags, this can present a storage problem, let alone a hassle for measuring and mixing.  It was obvious that we needed to find some convenient way of storing and measuring large volumes of dry material.  The solution is actually not that difficult.  We already had an impulse heat sealer, all that was needed was bag material.  You can purchase continuous rolls of poly tubing, and 4mil is a good choice.  Making a custom bag is easy.  Heat seal the end, cut off the length you need, measure the chemical, pour into the bag, squeeze out the excess air, and heat seal the other end.  The only other thing you need is a label, or you can write on the bag with a marker.
 
For the F-24 Fixer we use, I measure out the correct amount of all three ingredients and seal them into an appropriate size bag.  I use four inch wide 4mil tubing that comes on a 1,500 foot roll.  I print off an adhesive label for each bag and store the small bags in plastic shoe containers and the larger bags in five gallon plastic buckets.  When I need to mix fixer, just grab three bags, run water into a suitable container at the appropriate temperature, cut open the bags and stir.

You can purchase Poly Tubing from suppliers like ULINE in widths from 1 to 48 inches on large rolls.  They also sell Impulse Heat Sealers in various sizes.  The unit we have is the 12 inch model and has seen a lot of use over the years.  Be sure to order a spare heating element service kit.  Pick up some adhesive labels for your computer printer and you have everything you need to make your own prepackaged darkroom chemistry.
 
JB

Posted by JB Harlin in Darkroom, DIY, How-To, Photography

PYRO STAINING FILM DEVELOPER

PyroCat HDI had written about my experiments with Pyro Staining Developers back in October of 2010, and that should make it very clear that I have chosen my favorite film developer.  Take a look at my previous post, “THE PYRO-CAT IS OUT OF THE BAG.”  Of all of the Pyro Staining Developers I tested, PyroCat-HD by Sandy King has proven to be, hands down, the best of the best.   If you are seriously looking for the finest all-around film developer, I would strongly suggest you take a serious look into PyroCat-HD.

Sandy King has done his research and formulated an excellent developer.  Also, he has a new web site that is outstanding.  I was pleased to find that he has a section dedicated to his technical writings which contains his original article on Pyro Developers.  If you are seriously thinking about working with Pyro Developers, I would highly recommend you take a look at the article,  “AN INTRODUCTION TO PYRO STAINING DEVELOPERS, WITH SPECIAL ATTENTION TO THE PYROCAT-HD FORMULA” by Sandy King.

There is no need for me to go into the details of my experiments with Pyro Developers since I have covered what I learned in my previous BLOG post.  I would also recommend the above mentioned article by Sandy King, which covers a lot of what you need to know about Staining Developers.  All I can add is that  PyroCat-HD is the only developer we now use.  Maybe you should try it yourself?

JB

Posted by JB Harlin in Darkroom, Film, How-To, Photography

ZONE VI DEVELOPING TIMER PROBE BRACKET

ZONE VI DEVELOPING TIMER PROBE BRACKETI am a firm believer that necessity is the mother of invention.  Let’s face it,  most people do not design and build just for the enjoyment of designing and building. . . at least I don’t.  Many years ago I decided to purchase the Zone VI Compensating Developing Timer and I have used it ever since.  This is a great darkroom tool, and I would not process film nor paper without it.

The biggest problem I had when I first got my timer was trying to come up with a way to mount the sensor to my trays.  Since by this time in my photographic career I was tray processing sheet film, I had no use for tanks and what was sorely missing was some sort of bracket to hold the sensor in the tray.  I tried tape and even a plastic close pin.  Nothing seemed to work, so it was off to think a bit.  I do my best thinking while taking a nap.

After some time contemplating the situation, I finally visualized a clamping device that could be attached to the lip of a tray.  I decided that it needed to be made of a tough material that wasn’t affected by chemistry and would be easy to keep clean.  So I chose to make my clamp from a chunk of Acrylic.

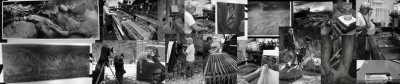
I dug out an old hunk of scrap Acrylic from the junk box and began working it into shape with a band saw and vertical mill.  What I eventually came up with was a prototype temperature clamp that I have been using for over ten years now.  Take a look at the accompanying photos and you will see a very well used piece of darkroom equipment.

I have always wanted to improve a little more on my original design, but just never got around to it, until now.  Though my prototype shows no signs of degradation, it is well stained from the Amidol days and my biggest concern is that there might come a time when the Acrylic would fail.  You know how nothing ever fails except when you really need it.  I could envision this thing breaking in the middle of a printing session or even worse, in total darkness during a film run.  Though from careful examination of the original, I can see no signs of failure.   Still, I always like having a spare on hand.

So, having decided I need a spare clamp it was time to do a little redesign and then off to the shop to cut up some Acrylic.   I beefed up the clamp a little and reworked it so it could be drilled for both sizes of probes that came with the original timer.  Yes, we do have a spare timer also.  The only thing is the spare is the newer unit and uses the larger probe.  My original Zone VI Compensating Developing Timer came with a probe with an OD of 0.1875 inches, while the newer model has a probe diameter of 0.250 inches.

As with most projects of this type, it is just as easy to make several as it is to make one.  I cut up all of the Acrylic that I had on hand and made a handful of Probe Brackets.  I still have some hardware on order, but I already feel better knowing I have spare parts on hand.

JB

Posted by JB Harlin in Darkroom, DIY, Photography

CONSISTENCY IS THE SECRET

Fred Picker QuoteWorking in the wet darkroom processing both film and paper is nothing more than simple lab work. You are a lab technician in charge of performing a series of processes. These processes must be done exactly the same way each and every time in order to guarantee consistent results. Any variation in process or mixtures will affect the end result.

You have to keep track of exactly how you process both film and paper. Consistency is of paramount importance when processing film. You only have one chance with your film and if you make a mistake there is no going back. If you happen to make a mistake when printing you can always start again. You only lose a sheet of paper. With the film, you loose the image forever.

It is imperative that you do everything exactly the same every time. Any variation, even down to the tray sizes and volume of chemical can affect the end result. Film processing is not hard, but you have to do everything exactly the same every time. It is also worth mentioning that you have to be scrupulously clean. Contamination of any of the processing chemicals can cause disastrous results.  One thing that is easily overlooked is mixing up the stock solution tops when using developers that have more than one part.  Only remove one cap at a time and replace each before opening the next.  Also, mark each cap and never mix them up.

Good darkroom habits begin with keeping notes. I keep a three ring binder containing notes on all of the procedures that I use in the darkroom. I have notes for each film size that includes the size of the trays, chemical mixtures, volumes of chemicals, and number of sheets of film for each processing run. When I begin a film processing session, the first thing I do is grab my darkroom notes. I make sure that I do the exact same thing every film run.

Even the printing process needs to have order and a plan to ensure you do not end up chasing your tail. My darkroom notes also contain information that pertains to printing. Though not as critical as film, I want to be sure I do things in an orderly and repeatable manner. I also want to be sure I mix all of my chemicals correctly, so everything is written down.

One of my favorite darkroom stories comes from Fred Picker. In his information packed little book titled “ZONE VI WORKSHOP” he describes his early days trying to get a handle on the process of B&W printing. If you have a copy of this gem of a book, turn to page 40 and read the chapter titled “THE CUSTOM LAB.” This is a really good account of how NOT to print.

I keep notes on most everything I do in the darkroom. There are times when I cannot remember exactly how I did something. With my notes there is no question as to how to remain consistent. As Fred Picker used to say, “DIFFERENT IS NOT THE SAME!

JB

Posted by JB Harlin in Commentary, Darkroom, Photography