How-To

MY REPLACEMENT FOR ZONE VI PRINT & FILM FIXER

ZONE VI PRINT & FILM FIXER
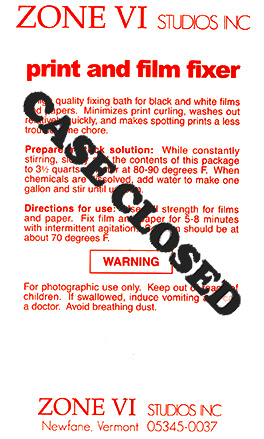
I had written earlier about the demise of Zone VI chemicals and how it has now become necessary to mix our own chemistry from raw supplies.  Take a look at the previous post titled, “ROLLING YOUR OWN FIXER.”  Since that post I have done quite a bit of research and testing.  I am convinced that the fixer formula we chose is not exactly a direct replacement for the old reliable Zone VI product.  Not that what we have been using is not a good fixer, it just is not the same.  Fred always said, “Different is not the same.”

I have mixed up several concoctions, but have always come back to the Looten Acid Fixer for its simplicity and close match of pH.  I kept bypassing some of the more well known formulas for some reason, possibly because everyone says they have a very unpleasant odor.  I don’t believe any could be any worse than the Looten Acid Fixer we have been using. . . this stuff will take the hair out of your nose.

I want to use an acid fixer for paper, because that is what I have used for years.  All I wanted to do was find a 100% replacement for the Zone VI Fixer I have used for as long as I can remember.  Zone VI Fixer was stable and it had little to no odor.   I have searched all over and have never found the exact published formula used by Zone VI.  

I looked through all of the old Zone VI Newsletters and finally resorted to watching the Picker videos.  Finally in the printing video Fred talks about his fixer being Kodak F-6.  The only problem is that the Zone VI Fixer I have used for years always came in a single bag as dry chemical.  If you check the formula for F-6 you will find it contains 28% Acetic Acid.  I am no chemist, but as far as I know, 28% Acetic Acid only comes in liquid form.  Plus, F-6 is a hardening fixer.   I have no reason to believe that Zone VI is a hardening fixer, let alone all instructions for F-6 say that the hardener, Potassium Alum, must be dissolved separately and added after all other ingredients have been completely dissolved.  Again, the Zone VI Fixer came in one bag containing only dry chemical.  So, I really do not believe that F-6 is the correct formula for what was sold as Zone VI Fixer.

There are a lot of guesses, but I do not want a guess.   I measured the pH of Zone VI Fixer to be 5.5.  None of the other concoctions that I have tried matched this pH, nor did they lack a strong odor.  My original choice of Looten Acid Fixer had the closest pH coming in at 5.0, but has a strong odor, where the Zone VI Fixer has little odor at all.  I still found myself going in circles.ZONE VI PRINT & FILM FIXER

I finally got tired of having to run the vent fan on high to get away from the smell.  Time to put on the apron, roll up the sleeves, and do more research.  This time I decided to investigate the Kodak F-24 formula.   Why I bypassed this one before is beyond me, but I did, and it was a mistake.  There is an alternative mixture that is suppose to be ‘low-odor’ that substitutes Citric Acid for the Sodium Bisulfite of the original Kodak formula.  This mixture still had a very strong smell.  So much for the alternative, low-odor mixture!

Next, I mixed up a two liter batch of the original F-24 formula, and surprise. . . it smells just like Zone VI Fixer.  Next to no odor at all.  I measured the pH. . . well whaddya know. . . it was exactly 5.5, just like Zone VI.  Next I needed a stability test.  I put two liters of F-24 in a four liter jug and let it set for a week.  No change!  That does it for me.  So far as I am concerned, there is no difference.

Wow!  Have I solved the great mystery?  Could it be that Zone VI Fixer is nothing more than Kodak F-24?  I have changed our FORMULAS AREA to reflect the formula for F-24 Fixer since it is now our chosen formula for paper.  Note, that the only difference in the new formula is the addition of 10 grams of Sodium Sulfite per liter to the original Looten Acid Fixer formula.  Not that difficult, but it does make a difference.  Even if F-24 is not the exact same formula as Zone VI, it is plenty close enough for me.  I will add that Gordon Hutchings also recommends F-24 for film and paper in “The Book Of Pyro.”   So, now you know what I have learned about fixer.  

There is one more thing to be aware of; be very careful with the temperature of the water when mixing Sodium Thiosulfate.  The most common Sodium Thiosulfate is the Pentahydrate (crystalline type) which requires 240 grams per liter.  You need water at about 100-125°F, because it is extremely endothermic and will rapidly cool the water as it dissolves.  This I knew from experience.  What I didn’t know is that Sodium Thiosulfate Anhydrous (fine grain like table salt), which requires 152 grams per liter, should never be mixed in water above 90°F, because it will decompose and form a precipitant.   Just so you know, if using Sodium Thiosulfate Pentahydrate (large crystals) use hot water.  If you are using the Anhydrous (fine grain) type, mix at about 80-85°F.

CASE CLOSED. . . at least for me.  I have found what I was looking for.  If you were a Zone VI Fixer user and are looking for a suitable, easy replacement, this should work just fine.  Now, back to making photographs. . . and. . . I can turn that vent fan down to low again!

JB

Kodak F-24

  • Water (at about 125°F)…………………750.0 ml
  • Sodium thiosulfate, crystalline………240.0 grams
  • Sodium sulfite, desiccated……………10.0 grams
  • Sodium Bisulfite………………………..25.0 grams
  • Water to make……………………………1.0 liter
Note:  If anhydrous thiosulfate is used, the water temperature should not be over 90°F (80-85°F) to prevent decomposition.


Posted by JB Harlin in Darkroom, Formulas, How-To, Photography, 0 comments

PYRO STAINING FILM DEVELOPER

PyroCat HDI had written about my experiments with Pyro Staining Developers back in October of 2010, and that should make it very clear that I have chosen my favorite film developer.  Take a look at my previous post, “THE PYRO-CAT IS OUT OF THE BAG.”  Of all of the Pyro Staining Developers I tested, PyroCat-HD by Sandy King has proven to be, hands down, the best of the best.   If you are seriously looking for the finest all-around film developer, I would strongly suggest you take a serious look into PyroCat-HD.

Sandy King has done his research and formulated an excellent developer.  Also, he has a new web site that is outstanding.  I was pleased to find that he has a section dedicated to his technical writings which contains his original article on Pyro Developers.  If you are seriously thinking about working with Pyro Developers, I would highly recommend you take a look at the article,  “AN INTRODUCTION TO PYRO STAINING DEVELOPERS, WITH SPECIAL ATTENTION TO THE PYROCAT-HD FORMULA” by Sandy King.

There is no need for me to go into the details of my experiments with Pyro Developers since I have covered what I learned in my previous BLOG post.  I would also recommend the above mentioned article by Sandy King, which covers a lot of what you need to know about Staining Developers.  All I can add is that  PyroCat-HD is the only developer we now use.  Maybe you should try it yourself?

JB

Posted by JB Harlin in Darkroom, Film, How-To, Photography

WEIGHT BAGS FOR MOUNTING PHOTOGRAPHS

Weight BagLike most everything I do when it comes to photography, I am not the source of the technique, idea or clever device.  I would say that 95% of what I do is something I learned from someone else.  I may add my own twist, but I cannot take credit for the idea.

Mounting photographs is a tedious and time-consuming task that we all must master if we want to display our photographs.  Dry mounting is our chosen method of print presentation.  Anyone that has dry mounted photos knows what is involved.  You tack dry mount tissue to the back of the photo, trim the edges, then align the image on the mount.  It is, at best, a nerve racking chore and one slip then you have just ruined a print.

It is imperative that you get the photograph aligned properly on the mount.  This is a tedious process of measuring and measuring again. . . and. . . maybe you should measure again!  Nothing is more frustrating than when you get everything just right, you bump the print and have to start again.  What you need is something to hold the print in place while you do the final tacking to the mount.  This is where a weight bag comes into play.  For a small print only one small weight bag should be enough.  With larger prints a larger weight bag might be better, or possibly two smaller ones would be better to hold things in place.   Either way, a good weight bag is a big help.

So, now that we have solved the problem of what to do, we need to look at how we can construct a suitable weight bag.  For me, simple is always better. . . inexpensive is even better than simple.  So here is how I solved the mounting weight bag predicament.

A weight bag for mounting photographs must be made of some very soft material so as not to damage the print surface.  The perfect material is a synthetic Naugahyde-type material that lens bags are made from.   A good place to look for lens bags is your local camera show.   There is nearly always a box under some table full of such things that range from really cheap to even free.  What you are looking for are the bags that are made of very soft, supple material.  A lot of the bags are made of very stiff, rough material that will damage a print.  I have several size bags ranging from those that were intended to carry large, long, lenses, to those that would hold a small normal lens.  See if you can find several large bags and a couple of the smaller ones.Weight Bags

Once you have the bags it is only a matter of stuffing them with a suitable weight material.  I have heard suggestions from sand to marbles.  I would suggest using Aquarium Gravel from the local pet supply as a great weight material.  Any of these items should work well, but I did something completely different.   First, I just don’t like the idea of rocks, sand or gravel in or around my work area.  Second, I did not have that many marbles  (some say I lost all of my marbles years ago).  There was one thing I did have an abundance of and that was pennies.   I had several large jars filled with pennies in the back of a closet.  Why not use them, since they are heavy and should work well for my purpose.

No matter what material you choose for filler, I would highly recommend that you first load your weight material into a heavy plastic bag.  I would even further suggest that you double bag your weight material, just in case.  You will have to adjust the amount of filler needed to fill the lens bag and still allow you to close the drawstring end closed.   Once you have the correct amount of filler in a plastic bag, close them securely with twist ties, or use a heat sealer.  Note:  Do not stuff the inner bags too full.  You want them to be about 90-95% full.

All that is left to do is stuff the bagged weight material into the lens bag and close the draw strings.  I tie the drawstrings off then cut off the excess.

I have had my weight bags, stuffed with pennies, for years and they have served me well.  I use them for print mounting and for weight when flattening prints under a sheet of 1/4 inch glass.  Weight bags are a handy tool to have around.  The next time you are at your local camera store or a camera show, look for used lens bags.   Pick up a few soft bags and make your own weight bags.

JB

Posted by JB Harlin in DIY, How-To, Photography

SPOTTING MICROSCOPE UPGRADE

SPOTTING MICROSCOPEI have been doing some upgrades to my spotting microscope and due to the interest this seems to have generated, here is more of the story of what I use for spotting prints and negatives and what I have learned.

STAND

The boom stand that came with the original microscope was more than adequate when spotting smaller prints, but the large base sitting on the table top was always in the way when working with larger mounted prints. I was forever having to turn the print to get to the area that needed work. The large, heavy base was always the problem, even though the boom arm reaches out 16 inches. I toyed with several ideas that would have attached the boom I had to the wall, but it still would not have been long enough, nor have enough range to be very workable. What I wanted to do was to get the stand off the table, and make the microscope more mobile.

I did some research and found that you can purchase an articulating boom for microscopes that can be clamped to a table edge or bolted to the wall. The articulating boom arm I found has a reach of 36 inches and will support loads up to twenty pounds. Certainly robust enough for my setup. I found the dimensions of the arm on the manufacturer’s web site and made a quick mock-up from wood to see exactly how the boom would fit on my table. The wall mount version turned out to be exactly what I was looking for. We ordered one and had it in hand by the end of the week. It was a simple matter to locate the appropriate place to bolt the mount to the wall and the entire installation took less than an hour.

The articulating boom is certainly robust enough, it weighs nearly 20 pounds and is made of very heavy steel. This is exactly what I was looking for. It provides a stable support that allows the microscope to cover most of the work table. Positioning the unit is extremely easy now.

ILLUMINATOR

One thing I really wanted was a more even illumination under the microscope. The Bausch & Lomb 31-35-28 Microscope Light Nicholas Illuminator that came with my setup is a simple miniature spotlight. It is certainly bright enough, but the light is very harsh and directional. The unit fits into an angled hole in the back of the Focus Mount and illuminates a small circle of light just below the work area of the microscope. I found that I had to remove the print from under the microscope, find the spot under another light, mark it with the end of my gloved finger, then return the print under the microscope to complete the spotting process.

I replaced the B&L Nicholas Illuminator with a 144 LED ring light. What a difference! The print surface is now evenly illuminated. I can see spots without moving the print by looking around the microscope, then move that area into view and start work on the area. This is much better for sure. The LED ring light is dimmable and generates little to no heat. The lighting is extremely bright, even, and easy to work under.

The B&L SZ4 pod is threaded on the bottom to accept 38mm attachments. In order to mount the ring light you will need an appropriate mounting collar that fits the pod. The ring light I purchased came with a 48mm mounting ring, so I was off to the shop to spin out my own 38mm version. Found a hunk of aluminum and a couple of hours later I had my custom mount ready. Note: You can purchase a 38mm adapter if you prefer not to machine your own.

EYE PIECES

The last thing I did was to upgrade the eye piece set. The original unit came with a pair of very old B&L 10x eye pieces that I really wanted to replace. I have to admit the originals work extremely well, but after replacing them with a new set of wide angle 10x units, the difference was well worth the expense. The newer ones have a larger size that makes it easier to use wearing glasses.

AUXILIARY LENS

So, once I had everything setup one concern I had became reality. The ring light was in the way of my brush due to the very low proximity of the bottom of the microscope to the work surface once focused. I measured the distance from the lip of the ring light to the work surface and found it to be only three inches. But, there is a fix for that also. There are auxiliary lenses that screw into the bottom of the pod case that change the magnification ratio. I purchased a 0.50x lens which does three things. First; it acts as a mounting collar for the ring light (so much for my custom-made ring, oh well). Second; it reduces the magnification of the unit by one half. Third; and most important, it doubles the height of the unit above the work surface.

I now have plenty of room to work under the microscope without bumping it with my brush. Cutting the magnification by one half is not an issue, since I nearly always used the unit at its lowest magnification anyway. Cutting the magnification by one half now gives me a range of 3.5 to 15 x. The single most helpful thing about using a stereo microscope for spotting is not high magnification, but the ability to really see the area you are working on and precisely place the spotting dye on the spot and not the surrounding area.

FINAL THOUGHTS

For most users the tabletop boom stand will be more than adequate for working with prints up to 8×10 inches or even larger. If you have a deep enough work table, placing the base directly in front of you will allow you plenty of working room. My work table is not that deep, so I needed something different, hence the articulating arm and wall mount were my best choice. The tabletop boom stand weighs 34.5 pounds and is very stable.  The bulk of the weight is the 0.50 inch thick steel base plate.  You can see from the photo below that it supports the microscope at full extension without any danger of tipping over.  I have used that setup for years on both prints and negatives.

My new setup is much more user friendly for my work space.  The boom swings against the wall, out of the way when not in use and is easily swung out when needed.  One more thing you need to do is cover your microscope when not in use.  Dust is the worst enemy of all optics.  I use a small plastic bag that fits around the microscope body and works well to keep nasty dust away.

I would like to thank Christopher Burkett for his help. He was the first photographer I saw using a microscope and was very helpful in answering my questions and helping me select a unit suitable for print and negative spotting.

I can highly recommend the B&L SZ4, since that is the unit I use. There are many other stereo microscopes that are more than suitable for the photographer. The used market is full of units that have been taken out of service in laboratories or manufacturing. A search on the Internet should find more info on what to look for and what to avoid when purchasing a stereo microscope.

As always, a very good place to look for used microscopes and accessories is the old standby, eBay. There are several instrument sellers that deal in used equipment that have stores you can browse. Again, a Google search will turn up even more used and reconditioned equipment.

Keep in mind that what I have done is upgrade my original microscope that has been in service for over five years and has been very useable in its original configuration. You do not need anything but the basic unit as described in my two previous posts titled “SPOTTING MICROSCOPE” and “MORE SPOTTING MICROSCOPE INFORMATION” to get started.

These are the refinements that I have found that make things easier and more convenient for the way I work. Be good to yourself and your eyes, let alone your art. I keep saying the same thing over and over, you can’t go wrong using a stereo microscope for spotting prints and negatives! Any microscope is better than none, or struggling with another type of magnifier. Hopefully this information will help get you started.

NOTE: I have placed the no longer needed pieces of my original microscope setup in our For Sale area. If you are piecing a setup together, you may be interested in some of the parts I no longer need.

JB

Posted by JB Harlin in Darkroom, How-To

MORE SPOTTING MICROSCOPE INFORMATION

Spotting Microscope Since I had posted my original piece titled “SPOTTING MICROSCOPE” I  have received numerous additional questions.  Seems everyone is looking for an easier way to spot prints, and I will tell you one thing;  there is nothing better for print spotting than a good stereo microscope!  There just is no better way that I have found to see and eliminate those pesky spots we all have to deal with.

First a little information on what to look for.  The microscope is a modular device and you can configure it to suit your needs.  There are five main items you will need.

  1. POD:  this is the main body of the microscope
  2. EYE PIECES:  these are where you look into the unit and their design sets view and magnification (I use the Wide Field 10x)h4>
  3. FOCUS MOUNT:  this holds the POD and allows you to move it up and down in order to focus the unit (like focusing a view camera)
  4. g>STAND:  the stand holds the entire microscope assembly
  • ILLUMINATOR:  a concentrated light source you will need for spotting prints

Most of the questions I have received pertain to what microscope I use.  I had to do a little research as to the exact model I have.   What I use is not the latest model and is probably at least 30 years old.  The good news is quality microscopes are well-made and will last a lifetime if taken care of properly.

The unit I have is made by Bausch & Lomb and is the StereoZoom 4.   Here is a brief description;  “One of the most popular stereo microscopes of all time is the Bausch & Lomb StereoZoom 4 (SZ4), later taken over by Leica and also marketed under the Cambridge Instruments name. It was introduced in 1959 and made until 2000.”

They must have made many thousands of these units in many configurations.  They are plentiful on the used market.   Another question I get is how much do they cost?  That depends on condition and where you find the unit.  We have had ours for some time now and it seems we paid about $450.00 from a seller on eBay including shipping.
reconditioned and fully guaranteed unit from a specialty company will be more expensive.  Keep in mind that the stand is very heavy and adds to shipping cost.    My best recommendation is to purchase a unit with a good return policy if possible.JBH Spotting Microscope

Here is a great site with instructions on how to service and adjust the StereoZoom 4:

http://www.covingtoninnovations.com/stereozoom

I will add a few more comments that might be helpful.  When it comes to the Illuminator there are numerous choices.  The unit we use is an incandescent-type that uses lenses to focus the light into a concentrated beam that illuminates the print surface.   It mounts in the Focus Mount and works very well.  You can also use a Ring Light mounted to the bottom of the Pod.   There are numerous illuminators and some even use LEDs.  I am going to try a Ring Light that I have to see how well, and evenly, it lights the print surface.  Another thing I have not tried so far.

Another thing to consider is the Stand.  There are times I wish the arm of the stand was longer when working on larger prints.  I have been seriously looking at an Articulating Boom mount that attaches to the wall.  Wall mounting will free up work table area and the boom has a reach of about two feet.  Just something else to consider.

Hope this helps to clear up some of the questions.  As I said in my PREVIOUS POST, “. . . a stereo microscope is the Rolls Royce of spotting magnifiers.”

JB

Posted by JB Harlin in Darkroom, How-To, Photography

EDGE B&D CARD

Edge Bruning CardI keep harping on the same old line, but it is true that everyone has their own way of doing things and I am no different.  But it seems that I continue to get questions about how we work.  There seems to be a misconception that when you contact print that Burning and Dodging (B&D) are not possible.  That is 100% malarkey!   Whether you use a spring back or vacuum frame, the image on the negative is visible against the white printing paper.   Burning and dodging is exactly the same as enlarging.

Now having dispelled the myth about contact printing, and understanding things work the same, I find there are two B&D tools I use all the time.  Yes, there are times you will have to cut strange shapes to make a particular B&D tool for a certain image.  No matter what special shapes I may need, I find two shapes that are universally used most of the time.

By far my most used B&D shape is a rectangular piece of mat board.  I use this for edges, sides and most any other large areas.  The second most used B&D shape is a specially modified rectangle for edge burning.    I seem to forever need to burn all four edges of most prints and why burn each edge one at a time?  I cut a piece of mat board smaller in both dimensions than the print I am making.  Then I cut off all four corners at a 45 degree angle.  This is my Edge B&D tool and it sees a lot of use.  I can burn all four sides of a print in one exposure.  The farther you hold the tool from the print, the larger the area that is held back.  Moving the Edge B&D card either in a slow circular motion, or moving slowly up and down, yields a nice even edge burning all the way around the print.

I mostly print 8×10 and 11×14 negatives, and I mostly contact print, so I have two Edge B&D cards for those size prints.   I use a custom handle to hold dodging shapes fashioned after Fred Picker’s Lawton Dodger.  Most of the time, I have my Edge B&D card taped to my dodger.

This is something to think about and may work as well for you as it has for me.  And, this is not just for contact printing.  It works equally well for enlarging.  Try making your own Edge B&D card, you may like using it!

JB

Posted by JB Harlin in Darkroom, How-To, Photography

CONTROL IS SIMPLE

Transfer GraphLet me begin by qualifying what I am about to discuss by saying that I am a traditional B&W photographer.  I shoot film and print in a wet darkroom using traditional materials and techniques.  Whenever I talk about photography, I am talking about traditional B&W.  I know little about color photography and even less about digital.

I have often heard the argument that traditional B&W is so complicated.  I actually heard that from several old-time wet darkroom color photographers.  The truth is, working with traditional B&W, wet darkroom materials is very simple.  But, there is sometimes a complex deception in simplicity.  Keep in mind that the most complex machine, or procedure ever devised is little more than a lot of simple things all working together to create a seemingly complex outcome.  True, as you add more steps, each step can interact with the others, but if you break each piece of the greater puzzle into less complex, bite-size pieces, it is understandable and controllable.

When it comes to traditional B&W photography, you only have four basic controls to worry about.  There are only four simple things that have power over the major aspects of the end product. . . the B&W photograph.

  1. Film Exposure

  2. Film Development

  3. Print Exposure

  4. Print Development

1.  Film Exposure:  This is the first, and is a very important aspect of photography.  You can manipulate how a scene is captured through the way you meter and expose the film.  There are numerous manipulations you can employ, including zone placements and filters. 

2.  Film Development:  The tonal range captured on the film at the time of exposure can be further manipulated by development.  Different developers and times will yield different results, but so far as the film goes, this is all you can do.

3.  Print Exposure:  Next comes the process of printing.  You can vary the way in which the paper is exposed.  Matters not whether you are enlarging or contact printing.  You can further manipulate print exposure by dodging and/or burning, and you can adjust the paper contrast, either by paper grades or by using VC papers. 

4.  Print Development:  The only other control you have during printing is the choice of developer, dilution, time, and maybe some additives.   But in reality, these are the only two fundamental controls available for making prints.

Certainly there are numerous smaller adjustments and techniques that can be employed in B&W photography, but these four major areas are where you start.  Anyone that tells you traditional B&W photography is difficult, simply does not have a good understanding of the process.   If you are interested in delving into traditional photography, do not be intimidated.  It is not that difficult.  What is difficult is learning the subtleties that make the process beautiful.  

You need to begin with the fundamental steps.  You can only learn by doing.  Fred Picker said, “ you can learn to talk about something by talking about it, but you can only learn to do something by doing it.”  These four basic areas are where you start.  Then proceed to fine-tune your technique as necessary.  You will soon find that you can easily control the basic processes and develop a photographic approach that suits your vision.

JB

Posted by JB Harlin in Commentary, How-To, Photography

SELENIUM TONING

SELENIUM TONEREveryone has their personal way of doing most anything.   I have sorted through what works for me and it may not be the only way to do things, but it is the way I have refined and standardized my working habits.  (I hate the term ‘workflow’ sounds way too digital for me.)  What I have tried to do is explain how I work in the darkroom.  You can use my methods as a starting point and determine what works best for you.

Selenium toning of finished prints is a given for what we do.  Every print is toned in selenium, for permanence, a slight shift in print color, and to enhance tonal range.  We have used numerous dilutions of toner and what works for one paper and developer combination, may not work for another.  When it comes to the dilution and time, you have to experiment.

Here is how we selenium tone prints.  Not sure exactly where all of this came from.  Some from Ansel Adams, others from Fred Picker.  Never the less, here is our standard procedure.

Prints are developed, stopped in acid stop, then fixed in an acid sodium thiosulfate fixer for four (4:00) minutes.  The finished prints are rinsed in running water for five (5:00) minutes or so, then transferred to an archival washer.   The washer is used as a holding bath during a printing session that may last all day.

Once printing is finished, each print is evaluated and may receive further processing by some selective bleaching.  After bleaching, the prints are washed again in running water and again end up in the archival washer for storage.

At this point it is time to start toning.  We use three trays when selenium toning.  The first contains plain hypo (Hypo), the second selenium toner at some predetermined dilution (Toner), and the third tray is hypo clearing agent (HCA).

Prints are removed two at a time and placed, back to back, in the Hypo tray for about four (4:00) minutes.   This is your second fix.  The Hypo is an alkaline fix and is necessary to prevent stains, since any acid in the toning solution will result in undesirable stain.  If you use an acid first fix as we do, be sure to wash well before placing into the Hypo.  You do not want to carry any acid into the alkaline Hypo.

After the plain Hypo, prints are drained and transferred to the Toner tray.  Start the timer. . . Toning times vary.  We adjust the Toner dilution to yield a Toning time between two (2:00) to about four (4:00) minutes.   The Toner tray requires continuous agitation by tipping front to back and side to side.  As soon as the prints are in the Toner tray, two more prints from the washer are added to the Hypo tray.  The prints in the Hypo tray are used as a reference to judge the amount of change that is happening in the Toner tray.

When the prints in the Toner tray have reached the desired tone, they are drained and moved to the HCA tray.  The prints in the Hypo are moved to the Toner and two new prints are added to the Hypo.  When the HCA tray gets its second set of prints, the set that has been in the longest are rinsed in running water, then moved back to the washer.

This is a daisy chain process that continues until all of the prints have been process and are back in the washer.  The idea is to fix the prints for about four (4:00) minutes in the Hypo. . . Tone for two to four (2:00-4:00) minutes. . . then about four (4:00) minutes in the HCA.  These times may vary, and is not that critical.  You need to second fix, in Hypo, for no less than three (3:00) minutes and HCA for the same amount of time.

Once all of the prints are back in the washer, wash as usual. For us, our tested time is about one hour.  Be sure to test your washer for optimum wash time.  You will find the mixtures we use posted in the FORMULAS page here on this BLOG.

This is a whole lot more complicated to explain than to actually do.  It is a rhythm you pick up as you work through the prints and is really quick and easy.  One word of caution; once you begin to selenium tone your prints, you will never be satisfied if you don’t.

JB

Posted by JB Harlin in Darkroom, How-To, Photography

A LITTLE SELECTIVE BLEACHING

Selective bleaching is a technique that uses a very dilute solution of Potassium Ferricyanide, which is brushed on specific areas of a print to lighten the tone and increase contrast.  It must be done very judiciously and anyone practicing this technique must be prepared to ruin a few prints.  But, with a little patience and practice, bleaching is a powerful tool in the darkroom.  Selective bleaching can open up an entirely new avenue of expression.  Here is an example from a recent printing session.

First, here is the subject;  a blind cave between two large sandstone fins in Arches National Park.


Selective Bleaching

Next, the printing session;  the negative printed quite easily, without any manipulation.  It is quite interesting, but lacked depth and was somewhat depressed, especially at the bottom.  Also the wood and cracked mud needed to be lighter to draw the eye and enhance the feeling of depth.  Here is a side by side comparison of two prints, one before,  the other after selective bleaching. . . (this is a quick snapshot of the wet prints on the viewing stand before toning)

Selective Bleaching

Finally, the finished print;  we selenium tone every print we make, not only for permanence, but for the slight tonal shift and deepening of the contrast of the image.   Here is the finished dry print.  Note the change in color and contrast after selenium toning.

Selective Bleaching

I will not get into the technique employed, since selective bleaching is deceptively simple and is beyond the scope of this short article to adequately explain.  As I said before, be prepared to ruin a few prints.  This is another tool you can add to your arsenal of darkroom techniques. . . remember, it is always about the finished print.

JB


Posted by JB Harlin in Darkroom, How-To, Photography, The Darkroom Workshop

ROLLING YOUR OWN FIXER

Zone VI GoneThey say the more things change, the more they stay the same.  Whatever that means.  It seems like only yesterday I standardized my chemicals for printing and started using Zone VI Fixer.  That was over twenty years ago.  But you know, things do change, and they are not the same.  We are down to our last box of the old standard Fred Picker Fixer and it is time to start rolling our own from bulk chemicals.

Actually, I started researching this over a year ago and we have obtained several hundred pounds of Sodium Thiosulfate in anticipation of this day.  This is the principle chemical used in fixer and though not difficult to acquire, it is expensive to ship.  Sodium Thiosulfate Pentahydrate is used in water treatment to remove chlorine.  It is available from many pool supply sources.  Also, check the Internet and eBay, there are sellers there that will ship to your door.  You will need about two pounds per gallon of fixer.  We go through anywhere from half a gallon to a gallon of fixer during a typical printing session, so we need a lot of the raw material.  But, this is the price you pay when you work in the wet darkroom and we believe it is more than worth the effort.

The next question is what formula should I use.  Since we are only talking about paper fixer, then there is no reason to even consider a formula suitable for film.  We just need a good, dependable fixer for processing fiber base papers.  Now we get into the discussion about acid vs. alkaline fixer.  Boy, does that ever stir the pot.  Almost like asking film or digital. 

Well, I want to change as little as possible and using a running water stop bath instead of acetic acid is just not what I want to mess with.  I did not want to change anything, or at least, I wanted to change as little as possible.  So, it was immediately determined that an acid fixer was best for us.  There are many formulas out there, and everyone has their favorite.  I have tested several and settled on what we intend to use.

Also, we needed a formula for plain hypo for second fixing bath and pre-selenium toning.  I found what I needed there also, thanks Ansel.

So, if you are interested in what we use, I have added our fixer choice to the Formulas Area of this BLOG.  Drop by and take a look.  The formulas we have chosen work fine, are simple, easy to mix, and does the job as needed. Obviously, I am not a chemist, and I am not into discussing chemical formulas.  For me, working in the darkroom and mixing chemicals is only a matter of finding a recipe that reliably works, sticking with it, and getting on with making photographs.  I don’t care much about the innards of chemistry. . . I’ll leave that to the chemists.

Things do change, and they are not the same, but who cares, as long as the results are the same.  Fred Picker said, “different is not the same.”  I miss ol’ Fred! 

JB

Posted by JB Harlin in Darkroom, How-To, Photography