25
Jan
2014

For 20 years the best selling ILFORD MULTIGRADE IV FB paper has been the product of choice for creative photographers and printers the world over. BORN following extensive R&D, significant improvements have been made to the product that is now renamed ILFORD MULTIGRADE FB CLASSIC. The new paper is available in Glossy and Matt surfaces and offers sharper images, improved maximum density and shorter exposure times. The new MULTIGRADE FB CLASSIC has also been developed to better respond to traditional toning techniques than the product it replaces.

 Film testing is one of those things that is just a fact of life if you, like me, choose to continue to pursue that art form. I am no fan of any testing, that is for sure. But, there are times you have to test in order to better understand how things will work.
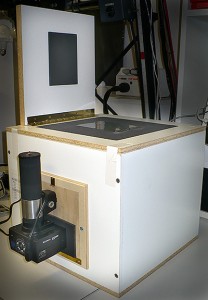
I never thought I would ever need a sensitometer, but never say never. To compare different film developer formulas, I found that I needed to run some tests. In order to make the test I needed to expose numerous sheets of film and expose them all identically. What I needed was a film sensitometer. What I did was build one. This project was not as difficult as I first expected and most everything I needed was laying around, either in the closet, or the junk box.
I wrote abut my experience designing and building a DIY Sensitometer back in 2009, then shelved the article where is has remained dormant since. Well finally, I drug the thing out and put it up on our web site. Interested in learning more about building a film sensitometer? Head over to the ARTICLES & HOW-TO area of our web site, scroll down the page to the link titled, “BUILDING A FILM SENSITOMETER.” You will see how I did it, and you may just want to try it yourself. . . if this is something you have a need for.
JB
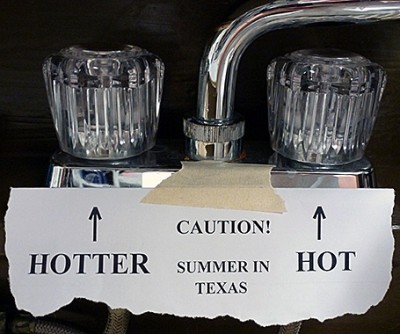 Yes, hot water is nice, but not when it comes out of the cold tap in the darkroom. Guess since the beginning of photography all wet processes are assumed to be run at 68F. Personally I have nearly always ran everything at 70F. This seems to be a good compromise since we live in Texas, where in a 12 month year, summer is 18 months long. Personally, I don’t care for temperatures to be much above 70F outside, but what can you do?
The cold tap here runs up near 88F by August, and for many years I dealt with that by freezing plastic bottles filled with water. Works well enough, but is still a hassle. Finally about 18 years ago I decided to look into a water chiller for the darkroom. I have to admit that I did try the coil of copper tubing in a washtub of ice water. Works to some degree, but is a mess to deal with. What I wanted was a no-muss, no-fuss way to chill the water to a manageable temperature.
So, you say you want a water chiller? That really is not a problem. There are commercial units that will provide very high volumes of chilled water. Problem is, they are large and expensive. So, like most things I had to find a balance between useable and practical. Everything is a tradeoff of some sort. I did a lot of research and eventually decided, based upon the limiting factors I had to face, that a small ElKay remote water chiller would be satisfactory. The unit I settled on was their Model ER101Y, which is rated as a 9.6 GPH (Gallon Per Hour) remote chiller. The unit was small enough to fit under the darkroom sink and ran off a 115 volt circuit. 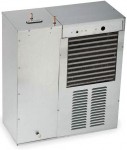
Now, the bottom line is, how well does this work? I have to admit it is not perfect, but it is certainly better than nothing and much better than anything else I had tried. The setup is very simple. I have a Calumet/Lawler mixing valve that in winter, when the cold tap is in the 50-60F range works very well. By adding the chiller in the summer I can keep a steady 70-72F wash water with cold tap up toward 85F, with a flow rate of about 0.75 GPM for as long as I need. This is plenty good enough for washing film or paper. We mostly process paper in the summer anyway, and when the tap gets to 88F the wash water goes to about 75F.
Not everything is perfect though. I would really like to run any flow rate for any length of time, at any reasonable cold tap temperature, but it will not happen with this small of a chiller. That would require more horsepower. Another thing to think about is the heat generated by the chiller. I had to add a powered wall vent next to the chiller to keep the room from heating up. The ultimate would be to vent the unit outside, but that isn’t practical for my location. . . so I just have to deal with it as best I can.
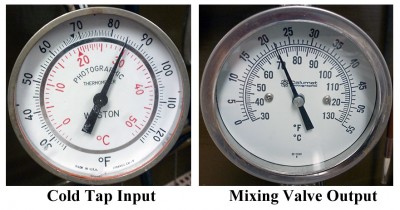
At least I do have a chiller and it does work. When I get ready to process film or print, I will fire up the chiller and allow it to cycle. This normally takes about fifteen minutes. I can then fill my washers, but I have to watch the temperature closely, because at full flow the chiller will run out of cold water pretty fast. When I see the mixing valve temperature start to rise, I will shut off the water and wait for the unit to cycle again.
Bottom line is, I would not want to be without my chiller. If I had the choice, I would upgrade to the larger ElKay ER191, which is a 19GPH unit. It would fit in the space now available. The original sink I installed the unit we have on did not have room. If I were going to suggest a chiller, I would say get the 19GPH unit. But do keep in mind that any chiller is better than none!
JB
 Mixing our own darkroom chemistry has become the established method around here. Since the demise of Zone VI chemistry, we are pretty much on our own when it comes to processing chemistry. Things like PyroCat-HD can easily be mixed by weighing out the necessary materials each time, since you are mixing stock solutions and it is not something you have to do every time you process film. I mix up the print developer as two stock solutions that are combined when a printing session starts. I keep one and two liter bottles of part A and B mixed and ready to go. That is just another element of the process. On the days we are not doing darkroom work, I am in there cleaning and mixing solutions.
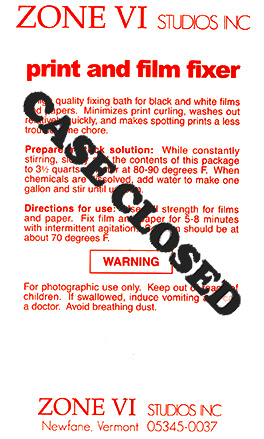 I had written earlier about the demise of Zone VI chemicals and how it has now become necessary to mix our own chemistry from raw supplies. Take a look at the previous post titled, “ROLLING YOUR OWN FIXER.” Since that post I have done quite a bit of research and testing. I am convinced that the fixer formula we chose is not exactly a direct replacement for the old reliable Zone VI product. Not that what we have been using is not a good fixer, it just is not the same. Fred always said, “Different is not the same.”
I have mixed up several concoctions, but have always come back to the Looten Acid Fixer for its simplicity and close match of pH. I kept bypassing some of the more well known formulas for some reason, possibly because everyone says they have a very unpleasant odor. I don’t believe any could be any worse than the Looten Acid Fixer we have been using. . . this stuff will take the hair out of your nose.
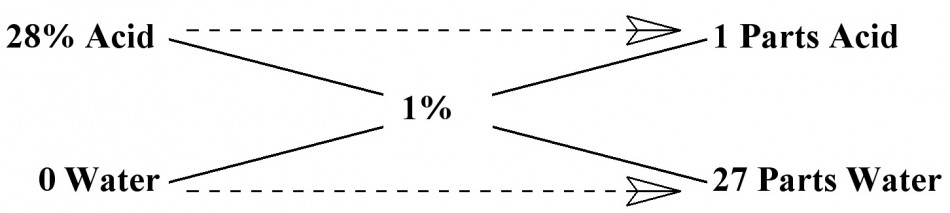
I want to use an acid fixer for paper, because that is what I have used for years. All I wanted to do was find a 100% replacement for the Zone VI Fixer I have used for as long as I can remember. Zone VI Fixer was stable and it had little to no odor. I have searched all over and have never found the exact published formula used by Zone VI.
I looked through all of the old Zone VI Newsletters and finally resorted to watching the Picker videos. Finally in the printing video Fred talks about his fixer being Kodak F-6. The only problem is that the Zone VI Fixer I have used for years always came in a single bag as dry chemical. If you check the formula for F-6 you will find it contains 28% Acetic Acid. I am no chemist, but as far as I know, 28% Acetic Acid only comes in liquid form. Plus, F-6 is a hardening fixer. I have no reason to believe that Zone VI is a hardening fixer, let alone all instructions for F-6 say that the hardener, Potassium Alum, must be dissolved separately and added after all other ingredients have been completely dissolved. Again, the Zone VI Fixer came in one bag containing only dry chemical. So, I really do not believe that F-6 is the correct formula for what was sold as Zone VI Fixer.
There are a lot of guesses, but I do not want a guess. I measured the pH of Zone VI Fixer to be 5.5. None of the other concoctions that I have tried matched this pH, nor did they lack a strong odor. My original choice of Looten Acid Fixer had the closest pH coming in at 5.0, but has a strong odor, where the Zone VI Fixer has little odor at all. I still found myself going in circles.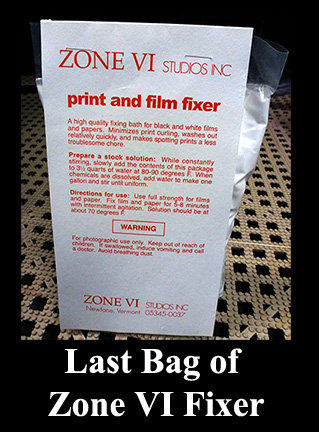
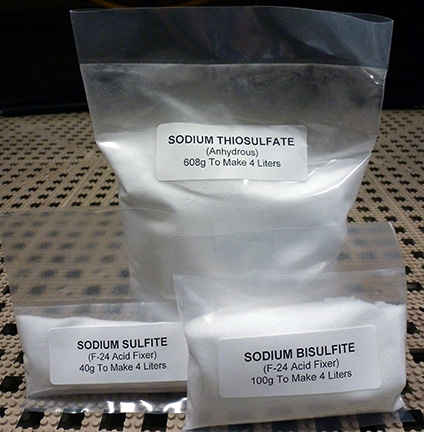
I finally got tired of having to run the vent fan on high to get away from the smell. Time to put on the apron, roll up the sleeves, and do more research. This time I decided to investigate the Kodak F-24 formula. Why I bypassed this one before is beyond me, but I did, and it was a mistake. There is an alternative mixture that is suppose to be ‘low-odor’ that substitutes Citric Acid for the Sodium Bisulfite of the original Kodak formula. This mixture still had a very strong smell. So much for the alternative, low-odor mixture!
Next, I mixed up a two liter batch of the original F-24 formula, and surprise. . . it smells just like Zone VI Fixer. Next to no odor at all. I measured the pH. . . well whaddya know. . . it was exactly 5.5, just like Zone VI. Next I needed a stability test. I put two liters of F-24 in a four liter jug and let it set for a week. No change! That does it for me. So far as I am concerned, there is no difference.
Wow! Have I solved the great mystery? Could it be that Zone VI Fixer is nothing more than Kodak F-24? I have changed our FORMULAS AREA to reflect the formula for F-24 Fixer since it is now our chosen formula for paper. Note, that the only difference in the new formula is the addition of 10 grams of Sodium Sulfite per liter to the original Looten Acid Fixer formula. Not that difficult, but it does make a difference. Even if F-24 is not the exact same formula as Zone VI, it is plenty close enough for me. I will add that Gordon Hutchings also recommends F-24 for film and paper in “The Book Of Pyro.” So, now you know what I have learned about fixer.
There is one more thing to be aware of; be very careful with the temperature of the water when mixing Sodium Thiosulfate. The most common Sodium Thiosulfate is the Pentahydrate (crystalline type) which requires 240 grams per liter. You need water at about 100-125°F, because it is extremely endothermic and will rapidly cool the water as it dissolves. This I knew from experience. What I didn’t know is that Sodium Thiosulfate Anhydrous (fine grain like table salt), which requires 152 grams per liter, should never be mixed in water above 90°F, because it will decompose and form a precipitant. Just so you know, if using Sodium Thiosulfate Pentahydrate (large crystals) use hot water. If you are using the Anhydrous (fine grain) type, mix at about 80-85°F.
CASE CLOSED. . . at least for me. I have found what I was looking for. If you were a Zone VI Fixer user and are looking for a suitable, easy replacement, this should work just fine. Now, back to making photographs. . . and. . . I can turn that vent fan down to low again!
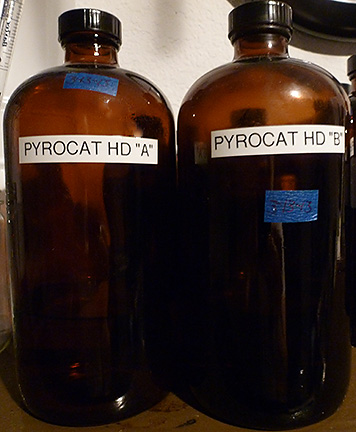 I had written about my experiments with Pyro Staining Developers back in October of 2010, and that should make it very clear that I have chosen my favorite film developer. Take a look at my previous post, “THE PYRO-CAT IS OUT OF THE BAG.” Of all of the Pyro Staining Developers I tested, PyroCat-HD by Sandy King has proven to be, hands down, the best of the best. If you are seriously looking for the finest all-around film developer, I would strongly suggest you take a serious look into PyroCat-HD.
Sandy King has done his research and formulated an excellent developer. Also, he has a new web site that is outstanding. I was pleased to find that he has a section dedicated to his technical writings which contains his original article on Pyro Developers. If you are seriously thinking about working with Pyro Developers, I would highly recommend you take a look at the article, “AN INTRODUCTION TO PYRO STAINING DEVELOPERS, WITH SPECIAL ATTENTION TO THE PYROCAT-HD FORMULA” by Sandy King.
There is no need for me to go into the details of my experiments with Pyro Developers since I have covered what I learned in my previous BLOG post. I would also recommend the above mentioned article by Sandy King, which covers a lot of what you need to know about Staining Developers. All I can add is that PyroCat-HD is the only developer we now use. Maybe you should try it yourself?
JB
 I am a firm believer that necessity is the mother of invention. Let’s face it, most people do not design and build just for the enjoyment of designing and building. . . at least I don’t. Many years ago I decided to purchase the Zone VI Compensating Developing Timer and I have used it ever since. This is a great darkroom tool, and I would not process film nor paper without it.
The biggest problem I had when I first got my timer was trying to come up with a way to mount the sensor to my trays. Since by this time in my photographic career I was tray processing sheet film, I had no use for tanks and what was sorely missing was some sort of bracket to hold the sensor in the tray. I tried tape and even a plastic close pin. Nothing seemed to work, so it was off to think a bit. I do my best thinking while taking a nap.
After some time contemplating the situation, I finally visualized a clamping device that could be attached to the lip of a tray. I decided that it needed to be made of a tough material that wasn’t affected by chemistry and would be easy to keep clean. So I chose to make my clamp from a chunk of Acrylic.
I dug out an old hunk of scrap Acrylic from the junk box and began working it into shape with a band saw and vertical mill. What I eventually came up with was a prototype temperature clamp that I have been using for over ten years now. Take a look at the accompanying photos and you will see a very well used piece of darkroom equipment.
I have always wanted to improve a little more on my original design, but just never got around to it, until now. Though my prototype shows no signs of degradation, it is well stained from the Amidol days and my biggest concern is that there might come a time when the Acrylic would fail. You know how nothing ever fails except when you really need it. I could envision this thing breaking in the middle of a printing session or even worse, in total darkness during a film run. Though from careful examination of the original, I can see no signs of failure. Still, I always like having a spare on hand.
So, having decided I need a spare clamp it was time to do a little redesign and then off to the shop to cut up some Acrylic. I beefed up the clamp a little and reworked it so it could be drilled for both sizes of probes that came with the original timer. Yes, we do have a spare timer also. The only thing is the spare is the newer unit and uses the larger probe. My original Zone VI Compensating Developing Timer came with a probe with an OD of 0.1875 inches, while the newer model has a probe diameter of 0.250 inches.
As with most projects of this type, it is just as easy to make several as it is to make one. I cut up all of the Acrylic that I had on hand and made a handful of Probe Brackets. I still have some hardware on order, but I already feel better knowing I have spare parts on hand.